Epson EX-1000 User Manual - Page 23
Connecting the Printer to Your Computer - cable
 |
View all Epson EX-1000 manuals
Add to My Manuals
Save this manual to your list of manuals |
Page 23 highlights
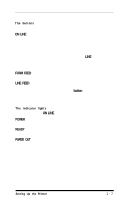
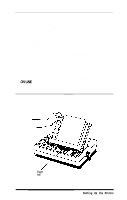
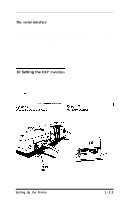
To run the same test in the draft mode, hold down the LINE FEED button instead of the FORM FEED button while you turn the printer on. The EX cannot print a draft self test, however, if the NLQ DIP switch is on. Therefore, if the Print Quality line of the self test printout says 'Print Quality NLQ," you cannot print a draft test without changing a DIP switch. (DIP switches are explained in Appendix E.) 9 Connecting the Printer to Your Computer Your EX printer has two separate interface connections. Therefore, you must be sure to use the one that your computer requires. The two interfaces are a Centronics® compatible parallel interface and an RS-232C compatible serial interface. If you have a suitable cable, you can connect most computers immediately The few computers that require other interfaces can usually use one of the optional interface boards described in Appendix F Check your computer's manual if don't know which interface to use. The parallel interface More connecting a parallel interface cable, see that both the printer and computer are turned off. Then plug the connector into the printer as shown in Fire 1-11. Next squeeze the clips gently and click them into place. Some parallel cables have a ground wire. Connect this wire to the ground screw on the printer to protect data from interference. Then plug the other end of the cable into the computer and connect the ground wire on the computer end of the cable if it has one. Parallel interfaces require no further adjustment. 1-12 Setting Up the Printer
-
 1
1 -
2
-
3
-
4
-
5
-
6
-
7
-
8
-
9
-
10
-
11
-
12
-
13
-
14
-
15
-
16
-
17
-
 18
18 -
 19
19 -
 20
20 -
 21
21 -
 22
22 -
 23
23 -
 24
24 -
 25
25 -
 26
26 -
 27
27 -
 28
28 -
29
-
30
-
31
-
32
-
33
-
34
-
35
-
36
-
37
-
38
-
39
-
40
-
41
-
42
-
43
-
44
-
45
-
46
-
47
-
48
-
49
-
50
-
51
-
52
-
53
-
54
-
55
-
56
-
57
-
58
-
59
-
60
-
61
-
62
-
63
-
64
-
65
-
66
-
67
-
68
-
69
-
70
-
71
-
72
-
73
-
74
-
75
-
76
-
77
-
78
-
79
-
80
-
81
-
82
-
83
-
84
-
85
-
86
-
87
-
88
-
89
-
90
-
91
-
92
-
93
-
94
-
95
-
96
-
97
-
98
-
99
-
100
-
101
-
102
-
103
-
104
-
105
-
106
-
107
-
108
-
109
-
110
-
111
-
112
-
113
-
114
-
115
-
116
-
117
-
118
-
119
-
120
-
121
-
122
-
123
-
124
-
125
-
126
-
127
-
128
-
129
-
130
-
131
-
132
-
133
-
134
-
135
-
136
-
137
-
138
-
139
-
140
-
141
-
142
-
143
-
144
-
145
-
146
-
147
-
148
-
149
-
150
-
151
-
152
-
153
-
154
-
155
-
156
-
157
-
158
-
159
-
160
-
161
-
162
-
163
-
164
-
165
-
166
-
167
-
168
-
169
-
170
-
171
-
172
-
173
-
174
-
175
-
176
-
177
-
178
-
179
-
180
-
181
-
182
-
183
-
184
-
185
-
186
-
187
-
188
-
189
-
190
-
191
-
192
 |
 |
