Epson EX-1000 User Manual - Page 71
Sending the character definition, and ESC I commands see the Command Summary.
 |
View all Epson EX-1000 manuals
Add to My Manuals
Save this manual to your list of manuals |
Page 71 highlights
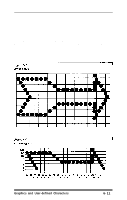
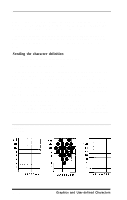
eight of them in a single user-defined character. The design in Figure 6-5 uses the top eight, but you can also use the bottom eight by using the grid on the right as explained later in this section. Once the character is planned on the grid, you simply add the pin values for each column together, just as you do for graphics. Then, the next step in defining a character is to send this information to the printer. Sending the character definition The command to define characters is complex: ESC & 0 nl n2 al dl.. . dn You can define more than one character with a single command. The values nl and n2 are the ASCII codes of the first and last characters you are defining. If you are defining only one character, nl and n2 are the same. You can use any codes between 32 and 127 or 161 and 254 decimal for nl and n2, but it is best not to define decimal 32, which is the code for a space. You can also use other codes by using the ESC 6 and ESC I commands (see the Command Summary). An example will show how to specify nl and n2. If, for instance, you want to redefine the characters A to Z, nl is A (or ASCII code 65) and n2 is Z (or ASCII code 90). So the command ESC & 0 AZ (followed by the appropriate data) would replace the entire alphabet of capital letters. Figure 6-5. Design grids 6-14 Graphics and User-defined Characters
-
 1
1 -
2
-
3
-
4
-
5
-
6
-
7
-
8
-
9
-
10
-
11
-
12
-
13
-
14
-
15
-
16
-
17
-
18
-
19
-
20
-
21
-
22
-
23
-
24
-
25
-
26
-
27
-
28
-
29
-
30
-
31
-
32
-
33
-
34
-
35
-
36
-
37
-
38
-
39
-
40
-
41
-
42
-
43
-
44
-
45
-
46
-
47
-
48
-
49
-
50
-
51
-
52
-
53
-
54
-
55
-
56
-
57
-
58
-
59
-
60
-
61
-
62
-
63
-
64
-
65
-
 66
66 -
 67
67 -
 68
68 -
 69
69 -
 70
70 -
 71
71 -
 72
72 -
 73
73 -
 74
74 -
 75
75 -
 76
76 -
77
-
78
-
79
-
80
-
81
-
82
-
83
-
84
-
85
-
86
-
87
-
88
-
89
-
90
-
91
-
92
-
93
-
94
-
95
-
96
-
97
-
98
-
99
-
100
-
101
-
102
-
103
-
104
-
105
-
106
-
107
-
108
-
109
-
110
-
111
-
112
-
113
-
114
-
115
-
116
-
117
-
118
-
119
-
120
-
121
-
122
-
123
-
124
-
125
-
126
-
127
-
128
-
129
-
130
-
131
-
132
-
133
-
134
-
135
-
136
-
137
-
138
-
139
-
140
-
141
-
142
-
143
-
144
-
145
-
146
-
147
-
148
-
149
-
150
-
151
-
152
-
153
-
154
-
155
-
156
-
157
-
158
-
159
-
160
-
161
-
162
-
163
-
164
-
165
-
166
-
167
-
168
-
169
-
170
-
171
-
172
-
173
-
174
-
175
-
176
-
177
-
178
-
179
-
180
-
181
-
182
-
183
-
184
-
185
-
186
-
187
-
188
-
189
-
190
-
191
-
192
 |
 |
