Epson Perfection 3200 Pro Color Management Workbook - Page 18
Building a Scanner Profile for Transparencies, Scanning the Transparency Target
 |
View all Epson Perfection 3200 Pro manuals
Add to My Manuals
Save this manual to your list of manuals |
Page 18 highlights
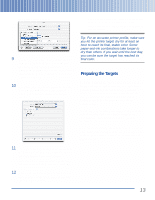
Building a Scanner Profile for Transparencies To scan transparencies, you need to use a different profile from the one you use for reflective copy such as photographic prints. This section provides step-by-step instructions for building a scanner transparency profile. First, you'll scan the transparency target included with MonacoEZcolor using SilverFast, then you'll load the scan into MonacoEZcolor and build the profile. Locate the 4x5 transparency IT8.7/1 target included in the MonacoEZcolor package, and load it in your scanner's 4x5 film holder. The target must be loaded face-down in the holder ("wrongreading" or mirror-image as viewed from above). Handle the target carefully by its edges to avoid getting fingerprints or smudges on the color patches. Then place the holder on the scanner glass, with the large arrow on the holder pointing to the right rear of the scanner glass. Then close the lid. 1 Launch the standalone SilverFast application. You'll be prompted to import the SilverFast (Epson) plug-in, as shown. You can find the plug-in inside the SilverFast application folder. Note: Your scanner must be connected to your computer and turned on before you can successfully import the scanner plug-in. Before you scan the target, you need to make sure that SilverFast is configured correctly for the profile scan. 2 On the main SilverFast screen, click the General tab, and make sure the Scan Mode is set to Normal (File), Original is set to Transparency, and Pos./Neg. is set to Positive, as shown: Scanning the Transparency Target To build a transparency profile, you must use special settings in SilverFast, similar to those used in building the reflective profile. You must scan the profiling target with all color management and color correction features turned off, following the instructions in this section. 14
-
 1
1 -
2
-
3
-
4
-
5
-
6
-
7
-
8
-
9
-
10
-
11
-
12
-
 13
13 -
 14
14 -
 15
15 -
 16
16 -
 17
17 -
 18
18 -
 19
19 -
 20
20 -
 21
21 -
 22
22 -
 23
23 -
24
-
25
-
26
-
27
-
28
-
29
-
30
-
31
-
32
-
33
-
34
 |
 |
