Epson Perfection 3200 Pro Color Management Workbook - Page 24
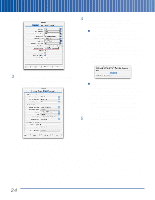
The Set Monitor White Point screen appears, as the Desired White Point.
 |
View all Epson Perfection 3200 Pro manuals
Add to My Manuals
Save this manual to your list of manuals |
Page 24 highlights
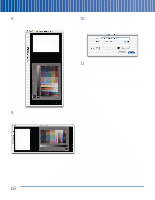
The Set Monitor White Point screen appears: 6 Click the right arrow to proceed. If you chose CRT as your monitor type, the following screen appears. If you chose LCD as your monitor type, skip to step 8 on page 21. 5 Choose 6500K as the Desired White Point. If your monitor has adjustable white point settings, adjust them to 6500K, then choose 6500K in the Hardware Setting area. If your monitor does not offer adjustable 7 Click on the darkest square that lets you white point settings, then choose I Don't identify the letter clearly. The following Know in the Hardware Setting area. screen appears: 20
-
 1
1 -
2
-
3
-
4
-
5
-
6
-
7
-
8
-
9
-
10
-
11
-
12
-
13
-
14
-
15
-
16
-
17
-
18
-
 19
19 -
 20
20 -
 21
21 -
 22
22 -
 23
23 -
 24
24 -
 25
25 -
 26
26 -
 27
27 -
 28
28 -
 29
29 -
30
-
31
-
32
-
33
-
34
 |
 |

The Set Monitor White Point screen appears:
5
Choose
6500K
as the Desired White Point.
If your monitor has adjustable white point
settings, adjust them to 6500K, then
choose
6500K
in the Hardware Setting
area.
If your monitor does not offer adjustable
white point settings, then choose
I Don’t
Know
in the Hardware Setting area.
6
Click the right arrow to proceed.
If you chose CRT as your monitor type,
the following screen appears.
If you chose LCD as your monitor type,
skip to step 8 on page 21.
7
Click on the darkest square that lets you
identify the letter clearly. The following
screen appears:
20