Gateway MT6723 8512216 - Gateway Notebook User Guide R1 - Page 87
Adding and modifying user accounts, User account tips
 |
View all Gateway MT6723 manuals
Add to My Manuals
Save this manual to your list of manuals |
Page 87 highlights
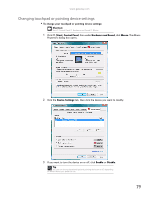
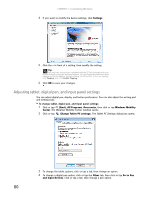
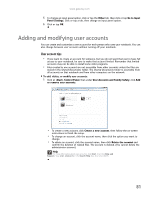
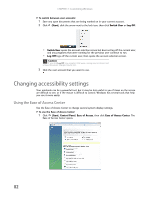
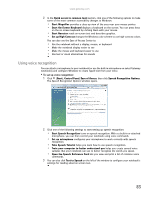
www.gateway.com 5 To change an input panel option, click or tap the Other tab, then click or tap Go to Input Panel Settings. Click or tap a tab, then change an input panel option. 6 Click or tap OK. Adding and modifying user accounts You can create and customize a user account for each person who uses your notebook. You can also change between user accounts without turning off your notebook. User account tips • If you want to create an account for someone, but you do not want that user to have full access to your notebook, be sure to make that account limited. Remember that limited accounts may not be able to install some older programs. • Files created in one account are not accessible from other accounts unless the files are stored in the Shared Documents folder. The Shared Documents folder is accessible from all accounts on that notebook and from other computers on the network. To add, delete, or modify user accounts: 1 Click (Start), Control Panel, then under User Accounts and Family Safety, click Add or remove user accounts. • To create a new account, click Create a new account, then follow the on-screen instructions to finish the setup. • To change an account, click the account name, then click the option you want to change. • To delete an account, click the account name, then click Delete the account and confirm the deletion of related files. The account is deleted. (You cannot delete the administrator account.) Help For more information about user accounts, click Start, then click Help and Support. Type user accounts in the Search Help box, then press ENTER. 81
-
 1
1 -
2
-
3
-
4
-
5
-
6
-
7
-
8
-
9
-
10
-
11
-
12
-
13
-
14
-
15
-
16
-
17
-
18
-
19
-
20
-
21
-
22
-
23
-
24
-
25
-
26
-
27
-
28
-
29
-
30
-
31
-
32
-
33
-
34
-
35
-
36
-
37
-
38
-
39
-
40
-
41
-
42
-
43
-
44
-
45
-
46
-
47
-
48
-
49
-
50
-
51
-
52
-
53
-
54
-
55
-
56
-
57
-
58
-
59
-
60
-
61
-
62
-
63
-
64
-
65
-
66
-
67
-
68
-
69
-
70
-
71
-
72
-
73
-
74
-
75
-
76
-
77
-
78
-
79
-
80
-
81
-
 82
82 -
 83
83 -
 84
84 -
 85
85 -
 86
86 -
 87
87 -
 88
88 -
 89
89 -
 90
90 -
 91
91 -
 92
92 -
93
-
94
-
95
-
96
-
97
-
98
-
99
-
100
-
101
-
102
-
103
-
104
-
105
-
106
-
107
-
108
-
109
-
110
-
111
-
112
 |
 |
