HP 353803-B22 HP StorageWorks 1000 Modular Smart Array maintenance and service - Page 4

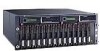
Customer replaceable components, Replacing a Fibre Channel I/O module

Page 4 highlights

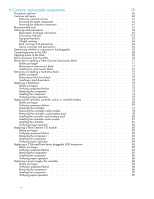
6 Customer replaceable components 59 Procedural overview 60 Customer self repair 60 Parts-only warranty service 61 Procuring the spare component 61 Returning the defective component 61 Recommended tools 61 Warnings and precautions 62 Electrostatic discharge information 62 Grounding methods 115 Equipment symbols 63 Weight warning 64 Rack warnings and precautions 64 Device warnings and precautions 65 Determining whether a component is hot-pluggable 67 Connecting power to the MSA 68 Applying power to the MSA 69 Removing power from the MSA 70 Removing or installing a Fibre Channel interconnect blank 71 Before you begin 71 Removing an interconnect blank 71 Installing an interconnect blank 71 Removing or installing a hard drive blank 72 Before you begin 72 Removing a hard drive blank 72 Installing a hard drive blank 72 Replacing a hard drive 73 Before you begin 73 Verifying component failure 73 Removing the component 73 Installing the component 74 Verifying proper operation 75 Replacing the controller, controller cache, or controller battery 76 Before you begin 83 Verifying component failure 77 Removing the controller 77 Removing the controller cache module 78 Removing the controller cache battery pack 78 Installing the controller cache battery pack 80 Installing the controller cache module 81 Installing the controller 81 Verifying proper operation 82 Replacing a Fibre Channel I/O module 83 Before you begin 83 Verifying component failure 83 Removing the component 83 Installing the component 84 Verifying proper operation 84 Replacing a 2-Gb small form factor pluggable (SFP) transceiver 85 Before you begin 85 Verifying component failure 85 Removing the component 85 Installing the component 85 Verifying proper operation 86 Replacing a power supply/fan assembly 86 Before you begin 86 Verifying component failure 86 Removing the component 86 Installing the component 87 Verifying proper operation 87 4

  • 1
  • 2
  • 3
  • 4
  • 5
  • 6
  • 7
  • 8
  • 9
  • 10
  • 11
  • 12
  • 13
  • 14
  • 15
  • 16
  • 17
  • 18
  • 19
  • 20
  • 21
  • 22
  • 23
  • 24
  • 25
  • 26
  • 27
  • 28
  • 29
  • 30
  • 31
  • 32
  • 33
  • 34
  • 35
  • 36
  • 37
  • 38
  • 39
  • 40
  • 41
  • 42
  • 43
  • 44
  • 45
  • 46
  • 47
  • 48
  • 49
  • 50
  • 51
  • 52
  • 53
  • 54
  • 55
  • 56
  • 57
  • 58
  • 59
  • 60
  • 61
  • 62
  • 63
  • 64
  • 65
  • 66
  • 67
  • 68
  • 69
  • 70
  • 71
  • 72
  • 73
  • 74
  • 75
  • 76
  • 77
  • 78
  • 79
  • 80
  • 81
  • 82
  • 83
  • 84
  • 85
  • 86
  • 87
  • 88
  • 89
  • 90
  • 91
  • 92
  • 93
  • 94
  • 95
  • 96
  • 97
  • 98
  • 99
  • 100
  • 101
  • 102
  • 103
  • 104
  • 105
  • 106
  • 107
  • 108
  • 109
  • 110
  • 111
  • 112
  • 113
  • 114
  • 115
  • 116
  • 117
  • 118
  • 119
  • 120
  • 121
  • 122

6 Customer replaceable components
.................
59
Procedural overview
....................................
60
Customer self repair
....................................
60
Parts-only warranty service
...............................
61
Procuring the spare component
.............................
61
Returning the defective component
............................
61
Recommended tools
....................................
61
Warnings and precautions
.................................
62
Electrostatic discharge information
............................
62
Grounding methods
..................................
115
Equipment symbols
...................................
63
Weight warning
....................................
64
Rack warnings and precautions
.............................
64
Device warnings and precautions
............................
65
Determining whether a component is hot-pluggable
.......................
67
Connecting power to the MSA
................................
68
Applying power to the MSA
.................................
69
Removing power from the MSA
...............................
70
Removing or installing a Fibre Channel interconnect blank
....................
71
Before you begin
...................................
71
Removing an interconnect blank
.............................
71
Installing an interconnect blank
.............................
71
Removing or installing a hard drive blank
...........................
72
Before you begin
...................................
72
Removing a hard drive blank
..............................
72
Installing a hard drive blank
...............................
72
Replacing a hard drive
...................................
73
Before you begin
...................................
73
Verifying component failure
...............................
73
Removing the component
................................
73
Installing the component
................................
74
Verifying proper operation
...............................
75
Replacing the controller, controller cache, or controller battery
..................
76
Before you begin
...................................
83
Verifying component failure
...............................
77
Removing the controller
.................................
77
Removing the controller cache module
..........................
78
Removing the controller cache battery pack
........................
78
Installing the controller cache battery pack
........................
80
Installing the controller cache module
...........................
81
Installing the controller
.................................
81
Verifying proper operation
...............................
82
Replacing a Fibre Channel I/O module
............................
83
Before you begin
...................................
83
Verifying component failure
...............................
83
Removing the component
................................
83
Installing the component
................................
84
Verifying proper operation
...............................
84
Replacing a 2-Gb small form factor pluggable (SFP) transceiver
..................
85
Before you begin
...................................
85
Verifying component failure
...............................
85
Removing the component
................................
85
Installing the component
................................
85
Verifying proper operation
...............................
86
Replacing a power supply/fan assembly
...........................
86
Before you begin
...................................
86
Verifying component failure
...............................
86
Removing the component
................................
86
Installing the component
................................
87
Verifying proper operation
...............................
87
4