HP 353803-B22 HP StorageWorks 1000 Modular Smart Array maintenance and service - Page 92
Verifying component failure, Removing the component, Remove module
 |
UPC - 808736781619
View all HP 353803-B22 manuals
Add to My Manuals
Save this manual to your list of manuals |
Page 92 highlights
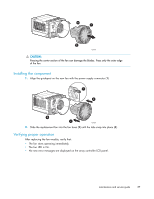
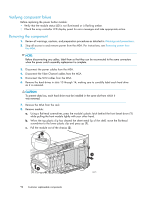
Verifying component failure Before replacing the power button module: • Verify that the module status LED is not illuminated or is flashing amber. • Check the array controller LCD display panel for error messages and take appropriate action. Removing the component 1. Review all warnings, cautions, and preparation procedures as detailed in Warnings and precautions. 2. Stop all access to and remove power from the MSA. For instructions, see Removing power from the MSA. NOTE: Before disconnecting any cables, label them so that they can be reconnected to the same connectors when the power switch assembly replacement is complete. 3. Disconnect the power cables from the MSA. 4. Disconnect the Fibre Channel cables from the MSA. 5. Disconnect the SCSI cables from the MSA. 6. Remove the hard drives in slots 10 through 14, making sure to carefully label each hard drive as it is removed. CAUTION: To prevent data loss, each hard drive must be installed in the same slot from which it was removed. 7. Remove the MSA from the rack. 8. Remove module: a. Using a flat-head screwdriver, press the module's plastic latch behind the front bezel down (1) while pulling the front module lightly with your other hand. b. When the top plastic clip has cleared the sheet metal lip of the shelf, move the flat-head screwdriver to the lower plastic clip and press up (1). c. Pull the module out of the chasiss (2). 1 1 92 Customer replaceable components 2 15571
-
 1
1 -
2
-
3
-
4
-
5
-
6
-
7
-
8
-
9
-
10
-
11
-
12
-
13
-
14
-
15
-
16
-
17
-
18
-
19
-
20
-
21
-
22
-
23
-
24
-
25
-
26
-
27
-
28
-
29
-
30
-
31
-
32
-
33
-
34
-
35
-
36
-
37
-
38
-
39
-
40
-
41
-
42
-
43
-
44
-
45
-
46
-
47
-
48
-
49
-
50
-
51
-
52
-
53
-
54
-
55
-
56
-
57
-
58
-
59
-
60
-
61
-
62
-
63
-
64
-
65
-
66
-
67
-
68
-
69
-
70
-
71
-
72
-
73
-
74
-
75
-
76
-
77
-
78
-
79
-
80
-
81
-
82
-
83
-
84
-
85
-
86
-
 87
87 -
 88
88 -
 89
89 -
 90
90 -
 91
91 -
 92
92 -
 93
93 -
 94
94 -
 95
95 -
 96
96 -
 97
97 -
98
-
99
-
100
-
101
-
102
-
103
-
104
-
105
-
106
-
107
-
108
-
109
-
110
-
111
-
112
-
113
-
114
-
115
-
116
-
117
-
118
-
119
-
120
-
121
-
122
 |
 |
