HP 353803-B22 HP StorageWorks 1000 Modular Smart Array maintenance and service - Page 89
The fan LED is On.
 |
UPC - 808736781619
View all HP 353803-B22 manuals
Add to My Manuals
Save this manual to your list of manuals |
Page 89 highlights
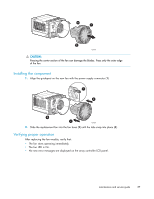
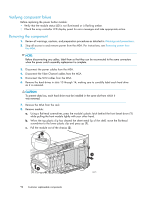
2 1 1 15555 CAUTION: Pressing the center section of the fan can damage the blades. Press only the outer edge of the fan. Installing the component 1. Align the guidepost on the new fan with the power supply connector (1). 1 3 2 3 15556 2. Slide the replacement fan into the fan base (2) until the tabs snap into place (3). Verifying proper operation After replacing the fan module, verify that: • The fan starts operating immediately. • The fan LED is On. • No new error messages are displayed on the array controller LCD panel. maintenance and service guide 89
-
 1
1 -
2
-
3
-
4
-
5
-
6
-
7
-
8
-
9
-
10
-
11
-
12
-
13
-
14
-
15
-
16
-
17
-
18
-
19
-
20
-
21
-
22
-
23
-
24
-
25
-
26
-
27
-
28
-
29
-
30
-
31
-
32
-
33
-
34
-
35
-
36
-
37
-
38
-
39
-
40
-
41
-
42
-
43
-
44
-
45
-
46
-
47
-
48
-
49
-
50
-
51
-
52
-
53
-
54
-
55
-
56
-
57
-
58
-
59
-
60
-
61
-
62
-
63
-
64
-
65
-
66
-
67
-
68
-
69
-
70
-
71
-
72
-
73
-
74
-
75
-
76
-
77
-
78
-
79
-
80
-
81
-
82
-
83
-
 84
84 -
 85
85 -
 86
86 -
 87
87 -
 88
88 -
 89
89 -
 90
90 -
 91
91 -
 92
92 -
 93
93 -
 94
94 -
95
-
96
-
97
-
98
-
99
-
100
-
101
-
102
-
103
-
104
-
105
-
106
-
107
-
108
-
109
-
110
-
111
-
112
-
113
-
114
-
115
-
116
-
117
-
118
-
119
-
120
-
121
-
122
 |
 |

1
1
2
15555
CAUTION:
Pressing the center section of the fan can damage the blades. Press only the outer edge
of the fan.
Installing the component
1.
Align the guidepost on the new fan with the power supply connector (
1
).
3
3
2
1
15556
2.
Slide the replacement fan into the fan base (
2
) until the tabs snap into place (
3
).
Verifying proper operation
After replacing the fan module, verify that:
•
The fan starts operating immediately.
•
The fan LED is On.
•
No new error messages are displayed on the array controller LCD panel.
maintenance and service guide
89