HP 353803-B22 HP StorageWorks 1000 Modular Smart Array maintenance and service - Page 74
Installing the component, If you replace a hard drive while the system is off
 |
UPC - 808736781619
View all HP 353803-B22 manuals
Add to My Manuals
Save this manual to your list of manuals |
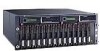
Page 74 highlights
• If you replace a hard drive while the system is off, it may be necessary to rebuild the replaced hard drive. 1. Review all warnings, cautions, and preparation procedures as detailed in Warnings and precautions. 2. Be sure that the Online and Drive Access LED LEDs are both Off and that the Fault LED is On. 3. Press the ejector button (1) and pull the release lever to the full open position (2). 4. Wait approximately 10 seconds for the internal disk to stop spinning before continuing to the next step. Handling a hard drive while the internal media is spinning can damage the media. 5. Pull the hard drive out of the enclosure bay (3). 3 1 2 15591 Installing the component 1. Press the hard drive ejector button (1) and pull the release lever to the full open position (2). 1 2 15592 2. Slide the replacement hard drive into the same bay from which the old hard drive was just removed, making sure that the lever is in the full open position to ensure a correct latch. Then, push the hard drive into the bay as far as it will go, pressing firmly on the hard drive to make sure that it is seated properly (1). 74 Customer replaceable components
-
 1
1 -
2
-
3
-
4
-
5
-
6
-
7
-
8
-
9
-
10
-
11
-
12
-
13
-
14
-
15
-
16
-
17
-
18
-
19
-
20
-
21
-
22
-
23
-
24
-
25
-
26
-
27
-
28
-
29
-
30
-
31
-
32
-
33
-
34
-
35
-
36
-
37
-
38
-
39
-
40
-
41
-
42
-
43
-
44
-
45
-
46
-
47
-
48
-
49
-
50
-
51
-
52
-
53
-
54
-
55
-
56
-
57
-
58
-
59
-
60
-
61
-
62
-
63
-
64
-
65
-
66
-
67
-
68
-
 69
69 -
 70
70 -
 71
71 -
 72
72 -
 73
73 -
 74
74 -
 75
75 -
 76
76 -
 77
77 -
 78
78 -
 79
79 -
80
-
81
-
82
-
83
-
84
-
85
-
86
-
87
-
88
-
89
-
90
-
91
-
92
-
93
-
94
-
95
-
96
-
97
-
98
-
99
-
100
-
101
-
102
-
103
-
104
-
105
-
106
-
107
-
108
-
109
-
110
-
111
-
112
-
113
-
114
-
115
-
116
-
117
-
118
-
119
-
120
-
121
-
122
 |
 |
