HP 5550 User Guide - Page 228
TONER, TONER EMPTY, be low or empty.
 |
UPC - 808736333603
View all HP 5550 manuals
Add to My Manuals
Save this manual to your list of manuals |
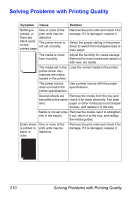
Page 228 highlights
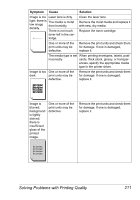
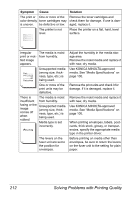
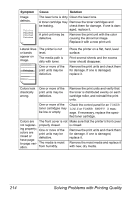
Symptom Image defects. Cause Solution The laser lens is dirty. Clean the laser lens. A toner cartridge may Remove the toner cartridges and be leaking. check them for damage. If one is dam- aged, replace it. A print unit may be defective. Remove the print unit with the color causing the abnormal image. Replace it with a new print unit. Lateral lines or bands appear on image. The printer is not level. The media path is dirty with toner. One or more of the print units may be defective. Place the printer on a flat, hard, level surface. Print several sheets and the excess toner should disappear. Remove the print units and check them for damage. If one is damaged, replace it. Colors look One or more of the drastically print units may be wrong. defective. Remove the print units and verify that the toner is distributed evenly on each cartridge roller, and reinstall the print units. One or more of the toner cartridges may be low or empty. Check the control panel for an TONER LOW X or TONER EMPTY X message. If necessary, replace the specified toner cartridge. Colors are The front cover is not Make sure that the printer's front cover not register- properly closed. is closed. ing properly; One or more of the colors are print units may be mixed or defective. have page- to-page vari- The media is moist ation. from humidity. Remove the print units and check them for damage. If one is damaged, replace it. Remove the moist media and replace it with new, dry media. 214 Solving Problems with Printing Quality
-
 1
1 -
2
-
3
-
4
-
5
-
6
-
7
-
8
-
9
-
10
-
11
-
12
-
13
-
14
-
15
-
16
-
17
-
18
-
19
-
20
-
21
-
22
-
23
-
24
-
25
-
26
-
27
-
28
-
29
-
30
-
31
-
32
-
33
-
34
-
35
-
36
-
37
-
38
-
39
-
40
-
41
-
42
-
43
-
44
-
45
-
46
-
47
-
48
-
49
-
50
-
51
-
52
-
53
-
54
-
55
-
56
-
57
-
58
-
59
-
60
-
61
-
62
-
63
-
64
-
65
-
66
-
67
-
68
-
69
-
70
-
71
-
72
-
73
-
74
-
75
-
76
-
77
-
78
-
79
-
80
-
81
-
82
-
83
-
84
-
85
-
86
-
87
-
88
-
89
-
90
-
91
-
92
-
93
-
94
-
95
-
96
-
97
-
98
-
99
-
100
-
101
-
102
-
103
-
104
-
105
-
106
-
107
-
108
-
109
-
110
-
111
-
112
-
113
-
114
-
115
-
116
-
117
-
118
-
119
-
120
-
121
-
122
-
123
-
124
-
125
-
126
-
127
-
128
-
129
-
130
-
131
-
132
-
133
-
134
-
135
-
136
-
137
-
138
-
139
-
140
-
141
-
142
-
143
-
144
-
145
-
146
-
147
-
148
-
149
-
150
-
151
-
152
-
153
-
154
-
155
-
156
-
157
-
158
-
159
-
160
-
161
-
162
-
163
-
164
-
165
-
166
-
167
-
168
-
169
-
170
-
171
-
172
-
173
-
174
-
175
-
176
-
177
-
178
-
179
-
180
-
181
-
182
-
183
-
184
-
185
-
186
-
187
-
188
-
189
-
190
-
191
-
192
-
193
-
194
-
195
-
196
-
197
-
198
-
199
-
200
-
201
-
202
-
203
-
204
-
205
-
206
-
207
-
208
-
209
-
210
-
211
-
212
-
213
-
214
-
215
-
216
-
217
-
218
-
219
-
220
-
221
-
222
-
 223
223 -
 224
224 -
 225
225 -
 226
226 -
 227
227 -
 228
228 -
 229
229 -
 230
230 -
 231
231 -
 232
232 -
 233
233 -
234
-
235
-
236
-
237
-
238
-
239
-
240
-
241
-
242
-
243
-
244
-
245
-
246
-
247
-
248
-
249
-
250
-
251
-
252
-
253
-
254
-
255
-
256
-
257
-
258
-
259
-
260
-
261
-
262
-
263
-
264
-
265
-
266
-
267
-
268
-
269
-
270
-
271
-
272
-
273
-
274
-
275
-
276
-
277
-
278
-
279
-
280
-
281
-
282
-
283
-
284
 |
 |