HP LaserJet Pro CP1025 HP LaserJet Pro CP1020 - Software Technical Reference - Page 56
General Windows installation for network connections, Network setup
 |
View all HP LaserJet Pro CP1025 manuals
Add to My Manuals
Save this manual to your list of manuals |
Page 56 highlights
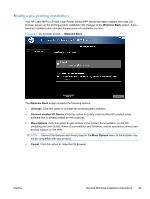
General Windows installation for network connections ● Network setup ● Windows installation instructions for network-connected products ● Print driver only installation instructions (Microsoft Add printer Wizard) Network setup NOTE: Set up, turn on, and connect the product to the network before installing the software. To connect a product to a network, use the following instructions: 1. Connect the product to the network. 2. Turn on the product. NOTE: You must complete the power-up sequence in this order or the installer discovery utility fails to recognize the product. It might take a few minutes for the product to obtain a TCP/IP address. 3. To print a configuration page from the product control panel, press and hold the Resume button for two to three seconds to print a configuration page and a supplies status page (English only). 4. Install the printing-system software. Use the information from the test pages to specify the network variables during installation. Windows installation instructions for network-connected products NOTE: Complete the network setup before completing this procedure. Use the following instructions to install the printing-system software on a computer that is running Windows 7, Windows XP, or Windows Vista, and is connected to the product through a network. NOTE: You must have administrator privileges to install the software. 1. Quit all open programs. 2. Insert the printing-system software CD into the CD-ROM drive. NOTE: If the CD-ROM does not start automatically, click Start, click Run, and then browse to and double-click the SETUP.EXE file in the root directory of the CD. 3. Click the Install button, and then follow the onscreen prompts. 4. When the installer software prompts you to select how the product will be connected, select Connect through a wired network. or Connect through a wireless network. Follow the onscreen prompts. The HP ePrint window opens as the installation completes. HP ePrint provides simplified printing for internet connected products. HP ePrint might require a firmware upgrade. 42 Chapter 3 Install Windows software and utilities ENWW
-
 1
1 -
2
-
3
-
4
-
5
-
6
-
7
-
8
-
9
-
10
-
11
-
12
-
13
-
14
-
15
-
16
-
17
-
18
-
19
-
20
-
21
-
22
-
23
-
24
-
25
-
26
-
27
-
28
-
29
-
30
-
31
-
32
-
33
-
34
-
35
-
36
-
37
-
38
-
39
-
40
-
41
-
42
-
43
-
44
-
45
-
46
-
47
-
48
-
49
-
50
-
 51
51 -
 52
52 -
 53
53 -
 54
54 -
 55
55 -
 56
56 -
 57
57 -
 58
58 -
 59
59 -
 60
60 -
 61
61 -
62
-
63
-
64
-
65
-
66
-
67
-
68
-
69
-
70
-
71
-
72
-
73
-
74
-
75
-
76
-
77
-
78
-
79
-
80
-
81
-
82
-
83
-
84
-
85
-
86
-
87
-
88
-
89
-
90
-
91
-
92
-
93
-
94
-
95
-
96
-
97
-
98
-
99
-
100
-
101
-
102
-
103
-
104
-
105
-
106
-
107
-
108
-
109
-
110
-
111
-
112
-
113
-
114
-
115
-
116
-
117
-
118
-
119
-
120
-
121
-
122
 |
 |