HP LaserJet Pro CP1025 HP LaserJet Pro CP1020 - Software Technical Reference - Page 67
Use defined printing shortcuts, Create a custom printing shortcut, Cardstock /Heavy Thick Printing
 |
View all HP LaserJet Pro CP1025 manuals
Add to My Manuals
Save this manual to your list of manuals |
Page 67 highlights
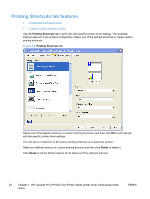
Use defined printing shortcuts The following defined printing shortcuts are available: ● General Everyday Printing. Select this option to print using typical settings. ● Eco-print (Two-sided Printing). Select this option to print using typical settings for manual duplex printing. ● Cardstock /Heavy (Thick) Printing. Select this option to print using typical settings for booklet printing. ● Glossy/Presentation Printing. Select this option to print using typical settings for printing on envelopes. ● Snapshot Photos (4x6). Select this option to print with the default printer driver settings. ● Envelopes ● Label Printing ● Transparency Printing ● Factory Defaults NOTE: If you change any of the settings for a defined printing shortcut, the Save As... and Reset buttons become active. Click Save As... to save the new settings as a custom printing shortcut. Click Reset to set the default options for all features of the selected shortcut. Create a custom printing shortcut Create a custom printing shortcut by following these steps: 1. Select one of the defined shortcuts as a base. 2. Select the appropriate print settings on the Printing Shortcuts tab, or by using the settings on any of the Printing Preferences tabs. 3. On the Printing Shortcuts tab, click Save As.... The Printing shortcuts box appears. 4. Type a name for the custom printing shortcut, and then click the OK button. The custom printing shortcut appears in the printing shortcuts list. ENWW Printing Shortcuts tab features 53
-
 1
1 -
2
-
3
-
4
-
5
-
6
-
7
-
8
-
9
-
10
-
11
-
12
-
13
-
14
-
15
-
16
-
17
-
18
-
19
-
20
-
21
-
22
-
23
-
24
-
25
-
26
-
27
-
28
-
29
-
30
-
31
-
32
-
33
-
34
-
35
-
36
-
37
-
38
-
39
-
40
-
41
-
42
-
43
-
44
-
45
-
46
-
47
-
48
-
49
-
50
-
51
-
52
-
53
-
54
-
55
-
56
-
57
-
58
-
59
-
60
-
61
-
 62
62 -
 63
63 -
 64
64 -
 65
65 -
 66
66 -
 67
67 -
 68
68 -
 69
69 -
 70
70 -
 71
71 -
 72
72 -
73
-
74
-
75
-
76
-
77
-
78
-
79
-
80
-
81
-
82
-
83
-
84
-
85
-
86
-
87
-
88
-
89
-
90
-
91
-
92
-
93
-
94
-
95
-
96
-
97
-
98
-
99
-
100
-
101
-
102
-
103
-
104
-
105
-
106
-
107
-
108
-
109
-
110
-
111
-
112
-
113
-
114
-
115
-
116
-
117
-
118
-
119
-
120
-
121
-
122
 |
 |