HP LaserJet Pro CP1025 HP LaserJet Pro CP1020 - Software Technical Reference - Page 57
Print driver only installation instructions (Microsoft Add printer Wizard), Printer sharing disclaimer
 |
View all HP LaserJet Pro CP1025 manuals
Add to My Manuals
Save this manual to your list of manuals |
Page 57 highlights
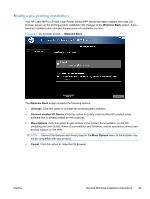
5. If you are prompted to restart the computer, click Yes. 6. After installation of the printing-system software, print a test page to ensure that the product driver is installed correctly. Print driver only installation instructions (Microsoft Add printer Wizard) NOTE: This product driver only software solution provides print-only functionality through a communications port that has already been created for this product (USB or network connected). Use the following instructions to install the product driver only: 1. Click Start, and then do one of the following: For Windows 7: Click Devices and products. -orFor Windows Server 2003 and Windows XP Professional: Select Settings, and then click products and Faxes. -orFor Windows XP Home: Click Control Panel, and then double-click the products and Other Hardware icon. -orFor Windows Vista: Click Computer, click Control Panel, and then click Hardware and Sound. 2. Click Add product, and then click Next. 3. When asked if the product is a local or network product, select A network product, or a product attached to another computer, and then click Next. NOTE: Use of a local port is recommended, if it is available. If no local port is available, create a new TCP/IP port. 4. On the Install product Software screen, click the Have Disk... button. The Install from Disk dialog box appears. 5. Insert the printing-system software CD into the CD-ROM drive. 6. Click Browse..., and then select the product driver for the product. 7. Click Open. 8. On the Install from Disk dialog box, click OK. 9. Click Next. Complete the installation. When prompted, print a test page to ensure that the product driver is installed correctly. Printer sharing disclaimer HP does not support peer-to-peer networking, as the feature is a function of Microsoft operating systems and not of the HP printer drivers. Go to Microsoft at www.microsoft.com. ENWW General Windows installation instructions 43
-
 1
1 -
2
-
3
-
4
-
5
-
6
-
7
-
8
-
9
-
10
-
11
-
12
-
13
-
14
-
15
-
16
-
17
-
18
-
19
-
20
-
21
-
22
-
23
-
24
-
25
-
26
-
27
-
28
-
29
-
30
-
31
-
32
-
33
-
34
-
35
-
36
-
37
-
38
-
39
-
40
-
41
-
42
-
43
-
44
-
45
-
46
-
47
-
48
-
49
-
50
-
51
-
 52
52 -
 53
53 -
 54
54 -
 55
55 -
 56
56 -
 57
57 -
 58
58 -
 59
59 -
 60
60 -
 61
61 -
 62
62 -
63
-
64
-
65
-
66
-
67
-
68
-
69
-
70
-
71
-
72
-
73
-
74
-
75
-
76
-
77
-
78
-
79
-
80
-
81
-
82
-
83
-
84
-
85
-
86
-
87
-
88
-
89
-
90
-
91
-
92
-
93
-
94
-
95
-
96
-
97
-
98
-
99
-
100
-
101
-
102
-
103
-
104
-
105
-
106
-
107
-
108
-
109
-
110
-
111
-
112
-
113
-
114
-
115
-
116
-
117
-
118
-
119
-
120
-
121
-
122
 |
 |