HP N6310 HP Scanjet N6310 User Guide - Page 31
Scanner initialization or hardware problems, Check the USB connection, Power - troubleshooting
 |
UPC - 883585956005
View all HP N6310 manuals
Add to My Manuals
Save this manual to your list of manuals |
Page 31 highlights
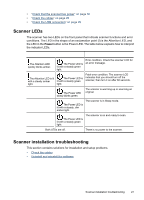
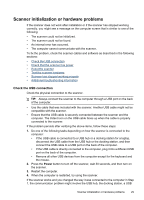
Scanner initialization or hardware problems If the scanner does not work after installation or if the scanner has stopped working correctly, you might see a message on the computer screen that is similar to one of the following: • The scanner could not be initialized. • The scanner could not be found. • An internal error has occurred. • The computer cannot communicate with the scanner. To fix the problem, check the scanner cables and software as described in the following sections: • Check the USB connection • Check that the scanner has power • Reset the scanner • Test the scanner hardware • Scanner has stopped working properly • Additional troubleshooting information Check the USB connection Check the physical connection to the scanner. TIP: Always connect the scanner to the computer through a USB port on the back of the computer. • Use the cable that was included with the scanner. Another USB cable might not be compatible with the scanner. • Ensure that the USB cable is securely connected between the scanner and the computer. The trident icon on the USB cable faces up when the cable is properly connected to the scanner. If the problem persists after verifying the above items, follow these steps: 1. Do one of the following tasks depending on how the scanner is connected to the computer: • If the USB cable is connected to a USB hub or a docking station for a laptop, disconnect the USB cable from the USB hub or the docking station, and then connect the USB cable to a USB port on the back of the computer. • If the USB cable is directly connected to the computer, plug it into a different USB port on the back of the computer. • Remove all other USB devices from the computer except for the keyboard and the mouse. 2. Press the Power button to turn off the scanner, wait 30 seconds, and then turn on the scanner. 3. Restart the computer. 4. When the computer is restarted, try using the scanner. If the scanner works and you changed the way it was connected to the computer in Step 1, the communication problem might involve the USB hub, the docking station, a USB Scanner initialization or hardware problems 29
-
 1
1 -
2
-
3
-
4
-
5
-
6
-
7
-
8
-
9
-
10
-
11
-
12
-
13
-
14
-
15
-
16
-
17
-
18
-
19
-
20
-
21
-
22
-
23
-
24
-
25
-
 26
26 -
 27
27 -
 28
28 -
 29
29 -
 30
30 -
 31
31 -
 32
32 -
 33
33 -
 34
34 -
 35
35 -
 36
36 -
37
-
38
-
39
-
40
-
41
-
42
-
43
-
44
-
45
-
46
-
47
-
48
 |
 |