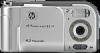
HP Photosmart E217 User's Manual
HP Photosmart E217 Manual
 |
View all HP Photosmart E217 manuals
Add to My Manuals
Save this manual to your list of manuals |
HP Photosmart E217 manual content summary:
- HP Photosmart E217 | User's Manual - Page 1
HP Photosmart E217 Digital Camera User's Manual - HP Photosmart E217 | User's Manual - Page 2
- HP Photosmart E217 | User's Manual - Page 3
© Copyright 2005 Hewlett-Packard Development Company, L.P. The information contained herein is subject to change without notice. The only warranties for HP products and services are set forth in the express warranty statements accompanying such products and services. Nothing herein should - HP Photosmart E217 | User's Manual - Page 4
- HP Photosmart E217 | User's Manual - Page 5
14 6 Install and Format a Memory Card (Optional 15 7 Install the Software 17 Windows 17 Macintosh 18 User's Manual on the CD 18 Camera Parts 19 Back of the Camera 19 Top of the Camera 21 Front, Left Side, and Bottom of the Camera. . . 22 Camera States 24 Camera Menus 24 2 Taking Pictures - HP Photosmart E217 | User's Manual - Page 6
Reviewing USB Configuration 69 Language 70 Move Images to Card 71 Reset Settings 72 6 Troubleshooting and Support 73 Resetting the Camera 74 HP Image Zone Software 75 System Requirements (Windows Only 75 HP Image Zone Express (Windows Only) . . . . 76 6 HP Photosmart E217 User's Manual - HP Photosmart E217 | User's Manual - Page 7
Software 77 Connecting Your Camera as a Digital Camera 77 Using a Memory Card Reader 78 Configuring the Camera as a Disk Drive. . 81 Problems and Solutions 83 Error Messages on the Camera 95 Error Messages on the Computer 104 Getting Assistance 106 HP Accessibility Website 106 HP Photosmart - HP Photosmart E217 | User's Manual - Page 8
C Caring for Your Camera 123 Basic Camera Care 123 Cleaning the Camera 125 Cleaning the Camera Lens 125 Cleaning the Camera Body and Image Display 126 D Specifications 127 Memory Capacity 131 8 HP Photosmart E217 User's Manual - HP Photosmart E217 | User's Manual - Page 9
1 Getting Started Congratulations on your purchase of the HP Photosmart E217 digital camera and welcome to the world of digital photography! This manual explains camera features you can use to ensure great results while enjoying the photographic experience. Some of these features are: • Video and - HP Photosmart E217 | User's Manual - Page 10
Setup To locate a part on your camera (such as a button or a light) while following the instructions in this section, see Camera Parts on page 19. 1. Attach the Wrist Strap Attach the wrist strap to the wrist strap mount on the side of the camera as shown. 10 HP Photosmart E217 User's Manual - HP Photosmart E217 | User's Manual - Page 11
Memory card door on the side of the camera by sliding the door toward the front of the camera. 2. Insert the batteries as indicated inside the door. 3. Close the Battery/Memory card optional HP Photosmart quick recharger. For more information, see Appendix B, Purchasing Camera Accessories, starting - HP Photosmart E217 | User's Manual - Page 12
the lens. The Power/ Memory light on the back of the camera turns on solid green. The HP logo also displays on the Image Display as the camera powers up. To turn the camera off, slide the lens about cleaning the lens, see Cleaning the Camera on page 125. 12 HP Photosmart E217 User's Manual - HP Photosmart E217 | User's Manual - Page 13
4. Choose the Language The first time you turn the camera on, you are prompted to choose a language. 1. Scroll to the language that you want by using the buttons on the Controller . 2. Press the button to - HP Photosmart E217 | User's Manual - Page 14
5. Set the Date and Time The camera has a clock that records the date and time at which you take each picture. This information is recorded in the press the button. The Date & Time screen appears again. Repeat Steps 1 through 5 to set the correct date and time. 14 HP Photosmart E217 User's Manual - HP Photosmart E217 | User's Manual - Page 15
) instead to store images and video clips. For more information about supported memory cards, see Storage on page 129. 1. Turn off the camera and open the Battery/Memory card door on the side of the camera. 2. Insert the memory card in the small slot behind the batteries, with the notched end of - HP Photosmart E217 | User's Manual - Page 16
you will no longer be able to view images stored in the camera's internal memory. To use internal memory and view images stored there, remove the memory card, or transfer the images from the internal memory to the memory card (see Move Images to Card on page 71). 16 HP Photosmart E217 User's Manual - HP Photosmart E217 | User's Manual - Page 17
, see Using Your Camera without Installing the HP Image Zone Software on page 77. NOTE: If you have trouble installing or using the HP Image Zone software, see the HP Customer Support website: www.hp.com/support for more information. Windows® To install the HP Image Zone software successfully, your - HP Photosmart E217 | User's Manual - Page 18
language. NOTE: For an interactive learning experience (in English) that will guide you through the most-used features of your camera and provide basic digital photography tips, please install and run the Interactive User's Guide program from your software CD. 18 HP Photosmart E217 User's Manual - HP Photosmart E217 | User's Manual - Page 19
button Description Allows you to frame pictures and video clips using Live View and review them afterward in Playback, and to view all the menus. • If Live View you to switch to Live View. • If the Image Display is off, but the camera is on, allows you to turn the Image Display on. • If a menu is - HP Photosmart E217 | User's Manual - Page 20
Live View, allows you to digitally zoom the picture to a lower resolution while taking still pictures (page 31). • Zoom Out ( button)-While in Live View, allows you to digitally zoom the picture to a higher resolution while taking still pictures (page 31). 20 HP Photosmart E217 User's Manual - HP Photosmart E217 | User's Manual - Page 21
Top of the Camera 1 2 3 # Name Description 1 Shutter button Takes a picture. (page 29) 2 Wrist strap mount (page 10) Allows you to attach a wrist strap to the camera. 3 Video button (page 30) Starts and stops recording a video clip. Getting Started 21 - HP Photosmart E217 | User's Manual - Page 22
turns on solid when recording video. 3 Flash (page 32) Provides additional light to improve picture-taking. 4 USB connector (pages 61, 62) Allows you to connect a USB cable from the camera to a USB-enabled computer or any PictBridge-certified printer. 22 HP Photosmart E217 User's Manual - HP Photosmart E217 | User's Manual - Page 23
Description 5 Focus Mode Allows you to switch between Normal and switch (page 34) Macro focus mode. 6 Tripod mount Allows you to mount the camera on a tripod. 7 Microphone (page 34) Records audio clips that are attached to still images and the audio portion of video clips. Getting Started - HP Photosmart E217 | User's Manual - Page 24
see Chapter 3, Reviewing Images and Video Clips, starting on page 49. To switch between Live View and Playback states, press the Live View/Playback button. Camera Menus Your camera has three menus that option and using the buttons to change the setting. 24 HP Photosmart E217 User's Manual - HP Photosmart E217 | User's Manual - Page 25
configuration settings such as display brightness, date and time, and language, among others. It also allows you to move images from the internal memory to an optional memory card. For information about using this menu, see Chapter 5, Using the Setup Menu, starting on page 65. Getting Started 25 - HP Photosmart E217 | User's Manual - Page 26
26 HP Photosmart E217 User's Manual - HP Photosmart E217 | User's Manual - Page 27
in the upper left corner of the Image Display. TIP: To conserve battery life, the Image Display shuts down during periods of inactivity when the camera is on. You can activate the Image Display by pressing the Live View/ Playback button. Taking Pictures and Recording Video Clips 27 - HP Photosmart E217 | User's Manual - Page 28
in Live View when the camera settings are at their default values and an optional memory card is installed in the camera. If you change other camera settings, icons for those and how much space remains in memory) 5 4MP Image Quality setting (default is 4MP) 28 HP Photosmart E217 User's Manual - HP Photosmart E217 | User's Manual - Page 29
and gently press the Shutter button to reduce camera shake and prevent blurry pictures. After a picture is taken, the image appears for several seconds on the Image Display. This is called Instant Review. You can delete the image during Instant Review by pressing the button, then selecting This - HP Photosmart E217 | User's Manual - Page 30
, then selecting This Image in the Delete sub-menu. A video clip includes audio. To hear the audio portion of your video clips, transfer them to your computer and use the HP Image Zone software. NOTE: Digital zoom is not available while recording video clips. 30 HP Photosmart E217 User's Manual - HP Photosmart E217 | User's Manual - Page 31
, 2.2MP appears in place of 4MP, indicating that the image is being reduced to a size of 2.2 Megapixels. 3. When the image is at the desired size, press the Shutter button to take the picture. 4. To turn digital zoom off, press the button (Zoom Out icon) until the yellow frame disappears. NOTE - HP Photosmart E217 | User's Manual - Page 32
using this setting, so you should use a tripod to avoid blurry pictures from camera shake. NOTE: The flash is not available in Sunset mode nor is it the camera is turned off. The flash setting resets to the default Auto Flash setting when you turn the camera off. 32 HP Photosmart E217 User's Manual - HP Photosmart E217 | User's Manual - Page 33
flashes quickly up to three times to minimize the subject's pupils, thus reducing the effect of the red-eye phenomenon, before the camera uses the main flash. It will take longer to take a picture using red-eye reduction, because the shutter is delayed for the additional flashes. Therefore, - HP Photosmart E217 | User's Manual - Page 34
more than 1 m (39 in) away. Macro Use Macro mode to take close-up pictures of subjects less than 1 m (39 in) away. In this mode, the camera will focus at a distance range of 60 cm to 1m (24 to 39 in), and the Macro icon appears on the image display. 34 HP Photosmart E217 User's Manual - HP Photosmart E217 | User's Manual - Page 35
video. To stop recording the video clip, press the Video button again; otherwise, the video will continue recording until the camera runs out of memory. The self-timer setting resets to the default Normal setting after the picture is taken or the video clip is recorded. Taking Pictures and Recording - HP Photosmart E217 | User's Manual - Page 36
a tripod, frame your picture, then press the Shutter button all the way down and remove your hands from the camera. The camera will wait 10 seconds before taking the image, eliminating any possibility of your shaking the camera when you press the Shutter button. 36 HP Photosmart E217 User's Manual - HP Photosmart E217 | User's Manual - Page 37
settings that affect the characteristics of the images and video clips you capture with your camera. 1. To display the Capture Menu, press the button if Live View is on. If Live View is not on, press the Live View/ Playback button, - HP Photosmart E217 | User's Manual - Page 38
shutter speed for the scene. Use Action mode to capture sporting events, moving cars, or any scene where you want to stop the action. The camera uses fast shutter speeds and higher ISO speeds to stop motion. 38 HP Photosmart E217 User's Manual - HP Photosmart E217 | User's Manual - Page 39
skylines, when you want the foreground and the background to be in focus. The camera combines a higher F-number for better depth of field with higher saturation for a changed again or until the camera is turned off. The shooting mode setting resets to the default Auto Mode setting when you turn the - HP Photosmart E217 | User's Manual - Page 40
of the still images you capture with your camera. The Image Quality sub-menu has four settings memory than the 4MP Best setting above. This is the default setting and is recommended if you plan to print images up to a size of 210 by 297 mm (8.5 by 11 in). 40 HP Photosmart E217 User's Manual - HP Photosmart E217 | User's Manual - Page 41
quality and compression. This is a memory-efficient setting and is recommended if you plan to print images up to a size of 130 by 180 mm (5 by camera's internal memory or on an optional memory card. For example, the 4MP Best setting results in the highest quality images, but consumes more memory - HP Photosmart E217 | User's Manual - Page 42
until it is changed again, even when you turn the camera off. NOTE: When you use digital zoom, the resolution reduces as you zoom in. See Using Digital Zoom on page 31. NOTE: Image Quality settings do not button to save the setting and return to the Capture Menu. 42 HP Photosmart E217 User's Manual - HP Photosmart E217 | User's Manual - Page 43
the lower left-hand corner of the image. Date & Time The camera will permanently imprint the date and time in the lower left-hand corner in effect until it is changed again, even when you turn the camera off. NOTE: The Date and Time setting does not apply when recording video clips. Taking Pictures - HP Photosmart E217 | User's Manual - Page 44
Value) Compensation to override the automatic exposure setting that the camera makes. EV Compensation is useful in scenes that contain many light camera is turned off. The EV Compensation setting resets to the default 0.0 setting when you turn the camera off. 44 HP Photosmart E217 User's Manual - HP Photosmart E217 | User's Manual - Page 45
blue, while indoor tungsten light is more yellow. Scenes dominated by a single color may require an adjustment of the white balance setting to help the camera reproduce colors more accurately and ensure that whites appear white in the final image. You can also adjust the white balance to produce - HP Photosmart E217 | User's Manual - Page 46
or halogen lighting (typically found in homes). Fluorescent The camera balances color based on fluorescent lighting. If the setting or until the camera is turned off. The White Balance setting resets to the default Auto setting when you turn the camera off. 46 HP Photosmart E217 User's Manual - HP Photosmart E217 | User's Manual - Page 47
the Live View screen. The new setting remains in effect until it is changed again or until the camera is turned off. The ISO Speed setting resets to the default Auto setting when you turn the camera off. NOTE: The ISO Speed setting does not apply when recording video clips. Taking Pictures and - HP Photosmart E217 | User's Manual - Page 48
48 HP Photosmart E217 User's Manual - HP Photosmart E217 | User's Manual - Page 49
. 3. To change to Live View after reviewing your images and video clips, press the Live View/Playback button again. NOTE: To hear audio clips that have been attached to your still images, transfer them to your computer and use the HP Image Zone software. Reviewing Images and Video Clips 49 - HP Photosmart E217 | User's Manual - Page 50
During Playback, the Image Display also indicates additional information about each image or video clip. The following table describes this information. 1 23 4 5 7 6 50 HP Photosmart E217 User's Manual - HP Photosmart E217 | User's Manual - Page 51
first few seconds. 2 Displays only when an optional memory card is installed in the camera. 3 Power indicator, such as this full battery level clip out of the total number of images and video clips that are stored in memory. 7 0:29 • Shows the recorded length of this audio or video clip. • - HP Photosmart E217 | User's Manual - Page 52
the upper left-hand corner of the screen. In addition, icons are shown in the upper right-hand corner of the screen for an optional memory card if installed (indicated by the SD icon ) and the power indicator (see Power Indicators on page 116). 52 HP Photosmart E217 User's Manual - HP Photosmart E217 | User's Manual - Page 53
or video clips, undelete images, and format the camera's internal memory or optional memory card. Additionally, you can record audio clips to Select the highlighted Playback Menu option by pressing the button. Follow the instructions on the screen to complete the selected task. 5. To exit the - HP Photosmart E217 | User's Manual - Page 54
the current image or video clip, delete all images and video clips, format the internal memory or an optional memory card, and undelete the last deleted image. (See Delete on page 55.) View Thumbnails-Displays Audio on page 60.) EXIT-Exits the Playback Menu. 54 HP Photosmart E217 User's Manual - HP Photosmart E217 | User's Manual - Page 55
, or on an optional memory card that is installed in the camera. • Format (Memory/Card)-Deletes all of the images, video clips, and files in internal memory or on an optional memory card, and then formats the internal memory or memory card. To help prevent corrupted cards and images, use Format - HP Photosmart E217 | User's Manual - Page 56
, an audio icon signifies that an audio clip is attached to this still image, and a video icon signifies that the image is a video clip. 56 HP Photosmart E217 User's Manual - HP Photosmart E217 | User's Manual - Page 57
to normal magnification. 4. Press the button to exit Magnify and return to Playback. NOTE: You can only magnify still images; video clips cannot be magnified. Reviewing Images and Video Clips 57 - HP Photosmart E217 | User's Manual - Page 58
you connect your camera to a PictBridge-certified printer (see Printing Images Directly from the Camera on page 62) or a computer with the HP Image Zone software installed (see HP Image Zone Software on page 75). NOTE: Print is not available for video clips. 58 HP Photosmart E217 User's Manual - HP Photosmart E217 | User's Manual - Page 59
Rotate In the Playback Menu (page 53), when you select Rotate, the camera displays a sub-menu that allows you to rotate the image in 90-degree increments. 1. In the Playback to save image in the new orientation. NOTE: Rotate is not available for video clips. Reviewing Images and Video Clips 59 - HP Photosmart E217 | User's Manual - Page 60
the audio continues to record until the camera runs out of memory. If the currently displayed image already has transfer the images to which they are attached to your computer and use the HP Image Zone software. NOTE: Record Audio is not available for video clips. 60 HP Photosmart E217 User's Manual - HP Photosmart E217 | User's Manual - Page 61
perform this task using a memory card reader (see Using a Memory Card Reader on page 78). 1. Confirm that either the HP Image Zone software or the HP Image Zone Express (Windows only) software is installed on your computer (see Install the Software on page 17). To transfer images to a computer that - HP Photosmart E217 | User's Manual - Page 62
lights on the printer or error messages displayed about the printer. Load paper into the printer, if needed. 2. Connect your camera to the printer. a. Make sure the camera's USB Configuration setting is set to Digital Camera (see USB Configuration on page 69). 62 HP Photosmart E217 User's Manual - HP Photosmart E217 | User's Manual - Page 63
nearest the lens and connect the small end of the USB cable to the USB connector on the camera. 4. When the camera is connected to the printer, a Print Setup menu displays on the camera. If you already selected images to print using the camera Playback Menu, the number of images selected is shown - HP Photosmart E217 | User's Manual - Page 64
into the printer's memory card slot to print the images or video clips. If your printer can print video clips, you can insert the memory card directly in the printer's memory card slot and print the video clip. See your printer's manual for specific instructions. 64 HP Photosmart E217 User's Manual - HP Photosmart E217 | User's Manual - Page 65
5 Using the Setup Menu The Setup Menu allows you to adjust a number of camera settings, such as the camera sounds, date and time, and the configuration of the USB. 1. While in Live View, press the Live View/Playback button, and then press the button. 2. Scroll to the Setup Menu tab using the buttons - HP Photosmart E217 | User's Manual - Page 66
save the setting and return to the Setup Menu. The new setting remains in effect until it is changed again, even when you turn the camera off. 66 HP Photosmart E217 User's Manual - HP Photosmart E217 | User's Manual - Page 67
sounds are not the audio sounds recorded with images or video clips. The default Camera Sounds setting is On. 1. In the Setup Menu (page 65), select Camera Sounds. 2. In the Camera Sounds sub-menu, highlight Off or On. 3. Press the button to save the setting and return to the Setup Menu. The new - HP Photosmart E217 | User's Manual - Page 68
also remain current as long as the camera batteries that are installed have a charge, or the batteries are removed for less than 10 minutes. If the camera is without batteries for a prolonged period, the clock may be reset to the last date and time at which the 68 HP Photosmart E217 User's Manual - HP Photosmart E217 | User's Manual - Page 69
recognize the camera as a disk drive using the Mass Storage Device Class (MSDC) standard. Use this setting to transfer images to a Windows 2000, 98SE, or Me computer that does not have the HP Image Zone software installed on it (see Transferring Images to a Computer without HP Image Zone Software on - HP Photosmart E217 | User's Manual - Page 70
Language This setting allows you to set the language used in the camera interface, such as the text in menus. 1. In the Setup Menu (page 65), select . 2. In the The new setting remains in effect until it is changed again, even when you turn the camera off. 70 HP Photosmart E217 User's Manual - HP Photosmart E217 | User's Manual - Page 71
the images, highlight Yes and press the button. During the move, a progress bar is shown. All of the images that are successfully moved to the memory card are then deleted from the camera's internal memory. When the move is complete, you return to the Setup Menu. Using the Setup Menu 71 - HP Photosmart E217 | User's Manual - Page 72
to their default value in the Capture Menu and Setup Menu (except Date & Time, Language, and USB Configuration). 4. Press the button to reset settings and return to the Setup Menu. 5. If you removed an optional memory card in Step 1, replace the memory card. 72 HP Photosmart E217 User's Manual - HP Photosmart E217 | User's Manual - Page 73
from HP, including web and phone support (page 106) NOTE: For more information about solutions to problems mentioned here, as well as any other issues you might have with your camera or the HP Image Zone software, see the HP Customer Support website: www.hp.com/support. Troubleshooting and Support - HP Photosmart E217 | User's Manual - Page 74
the problem.) 3. Remove the batteries from the camera for 5 to 10 seconds. 4. Reinsert the batteries and close the Battery/Memory card door. 5. After verifying that the camera works without an optional memory card, turn off the camera and reinsert the card if you have one. 74 HP Photosmart E217 User - HP Photosmart E217 | User's Manual - Page 75
Zone software. • If your computer has Windows 2000 or XP and 128MB of RAM or more, the installation process installs the full version of the HP Image Zone software. • If your computer has Windows 2000 or XP and between 64MB and 128MB of RAM, the installation process Troubleshooting and Support 75 - HP Photosmart E217 | User's Manual - Page 76
full version of the HP Image Zone software, including transferring images and video clips from your camera to a computer. However, you will not be able to view transferred video clips in Image Zone Express: you must view them with another viewer software package. 76 HP Photosmart E217 User's Manual - HP Photosmart E217 | User's Manual - Page 77
HP Image Zone Software If you do not, or cannot, install HP Image Zone on your computer, there are three ways to transfer images from your camera to the computer: • Connect your camera to the computer as a Digital Camera (Windows XP or Mac OS X only) • Use a memory card reader • Configure the camera - HP Photosmart E217 | User's Manual - Page 78
and HP Photosmart printers have memory card slots built into them, and you can use these memory card slots as you would use a regular memory card reader to save images to the computer. Transferring Images to a Windows Computer Using a Memory Card Reader 1. Remove the memory card from your camera and - HP Photosmart E217 | User's Manual - Page 79
space on the card, you can either delete the images or format the card (under the Delete option in the Playback Menu in the camera). NOTE: It is recommended that you format the card rather than delete the images because it will help prevent corrupted images or cards. Troubleshooting and Support 79 - HP Photosmart E217 | User's Manual - Page 80
the images manually, look on the desktop for a disk drive icon which represents the memory card, then copy the images from there to your local hard drive. For more information about how to copy files, visit Mac Help, the help system included with your computer. 80 HP Photosmart E217 User's Manual - HP Photosmart E217 | User's Manual - Page 81
in Using a Memory Card Reader on pages 78, 80. On Windows computers, the camera will appear as a removable disk in the Windows Explorer screen. On Macintosh computers, either the Image Capture or iPhoto application will launch automatically. 4. When you have finished transferring images from the - HP Photosmart E217 | User's Manual - Page 82
NOTE: On Macintosh computers, if either Image Capture or iPhoto do not launch automatically, look on the desktop for a disk drive icon with your camera's model number. For more information about how to copy files, visit Mac Help. 82 HP Photosmart E217 User's Manual - HP Photosmart E217 | User's Manual - Page 83
and Solutions Problem The camera does not turn on. Possible Cause Solution You did not slide the lens cover far enough. • Slide the lens . • Do not use ordinary Alkaline batteries. For best results, use Energizer Lithium AA or rechargeable NiMH AA batteries. Troubleshooting and Support 83 - HP Photosmart E217 | User's Manual - Page 84
. The camera may have experienced a transient problem. Reset the camera (see page 74). The Power/ Memory light is on but the camera seems stuck and won't operate properly. The camera may have experienced a transient problem. Reset the camera (see page 74). 84 HP Photosmart E217 User's Manual - HP Photosmart E217 | User's Manual - Page 85
Problem Possible Cause Solution I have to replace or recharge camera does not respond when I press a button. The camera is turned off or has shut down. The batteries are drained. Turn on the camera, or turn it off and then on again. Replace or recharge the batteries. Troubleshooting and Support - HP Photosmart E217 | User's Manual - Page 86
occurs between pressing the Shutter button and the camera taking a picture. The scene is dark and the camera is taking a long exposure. • Use the flash. • If using flash is not possible, then use a tripod to keep the camera steady during the long exposure time. 86 HP Photosmart E217 User's Manual - HP Photosmart E217 | User's Manual - Page 87
the way down. Transfer images from the camera to your computer, then format the internal memory or the memory card (page 15 and 55). Or replace the card with a new one. The optional memory card that is installed is locked. With the camera turned off, remove the memory card and switch the locking - HP Photosmart E217 | User's Manual - Page 88
picture again (see page 34). The subject moved or you moved the camera while you took the picture. • Set the flash to Auto Flash or Flash On and set the shooting mode to Action . • Hold the camera with two hands as you press the Shutter button or use a tripod. 88 HP Photosmart E217 User's Manual - HP Photosmart E217 | User's Manual - Page 89
Problem My image is too bright. Possible Cause much light. • Try taking the picture from a different angle. • Avoid pointing the camera directly toward a bright light or reflective surface on a sunny day. • Decrease EV Compensation Low or Medium (see page 66). Troubleshooting and Support 89 - HP Photosmart E217 | User's Manual - Page 90
Problem My image is too dark. Possible Cause Solution The flash was on, but the subject was too far away. Make sure your subject (see page 44). Your finger blocked the flash. Be sure to move your fingers away from the flash when you take a picture. 90 HP Photosmart E217 User's Manual - HP Photosmart E217 | User's Manual - Page 91
Problem My image is too dark (continued). My image is grainy. camera gets hotter, images you take may have more noise, resulting in more graininess. The effect will diminish as the camera cools. For best image quality, avoid storing the camera in very hot locations. Troubleshooting and Support - HP Photosmart E217 | User's Manual - Page 92
changed. Reset the date and time by using the Date & Time option in the Setup Menu (see page 68). The batteries were drained or were removed from the camera for too long. Reset the date and time by using the Date & Time option in the Setup Menu (see page 68). 92 HP Photosmart E217 User's Manual - HP Photosmart E217 | User's Manual - Page 93
on page 131 for tips about memory cards. The camera may be processing an image. Wait until the Power/Memory light turns solid green, indicating that the camera has finished processing. I cannot transfer images from the camera to my computer. The HP Image Zone software is not installed on the - HP Photosmart E217 | User's Manual - Page 94
I am having a Your computer • Refer to the computer problem does not have requirements (see page 75). installing or enough RAM to • Refer to the HP Customer using the install the Support website: HP Image software. www.hp.com/support. Zone software. 94 HP Photosmart E217 User's Manual - HP Photosmart E217 | User's Manual - Page 95
. UNSUPPORTED CARD The optional memory card that is installed in the memory slot is not a supported memory card. Ensure that the memory card is the proper type for your camera (see page 129). If it is the proper type, try reformatting the memory card (see page 55). Troubleshooting and Support 95 - HP Photosmart E217 | User's Manual - Page 96
computer. See your card reader documentation for instructions. CARD LOCKED The optional memory card that is installed is locked. With the camera turned off, remove the memory card from the camera and switch the locking tab on the card to the unlocked position. 96 HP Photosmart E217 User's Manual - HP Photosmart E217 | User's Manual - Page 97
, then in internal try rotating the image memory or on the again. optional memory • Transfer images from card to save a the camera to your rotated image. computer, then rotate the image using the HP Image Zone software or another image editing package. Troubleshooting and Support 97 - HP Photosmart E217 | User's Manual - Page 98
image error. Unable to complete request. The camera could not complete the image modification you requested. • Try modifying the image again. • If the same message displays, transfer the image to your computer and modify it using the HP Image Zone software. 98 HP Photosmart E217 User's Manual - HP Photosmart E217 | User's Manual - Page 99
removing the memory the camera card from the camera. finished writing • With the camera to the card or turned off, remove the was half-locked. memory card and check to see if the locking tab on the edge of the card is fully in the unlocked position. Troubleshooting and Support 99 - HP Photosmart E217 | User's Manual - Page 100
it does not recognize. Make sure that the camera is connected to a supported printer or computer. The printer is an unsupported device. Connect the camera to a PictBridge-certified printer. Or connect the camera to a computer and print from there instead. 100 HP Photosmart E217 User's Manual - HP Photosmart E217 | User's Manual - Page 101
or too large. • Turn off the camera. Reconnect the camera and turn it on. • If that does not work, transfer the image file to your computer and try printing the image file from the computer. No printable images in memory. or No printable images on card. The camera has no still images. Video clips - HP Photosmart E217 | User's Manual - Page 102
plain paper, or your printer does not support borderless prints. Try selecting a smaller print size, or try using photo paper to make borderless prints. There is a problem with the printer's ink. The ink cartridge color and quality may not be of high quality. 102 HP Photosmart E217 User's Manual - HP Photosmart E217 | User's Manual - Page 103
is out of paper. Load paper into the printer, and then press the OK or Continue button on the printer. Printer error. There is a problem with the printer. Turn the printer off, then on again. Press the button on the camera. Complete the print request again. Troubleshooting and Support 103 - HP Photosmart E217 | User's Manual - Page 104
connected to the computer and camera. Change the USB setting to Disk Drive (see page 69). The camera then appears as another disk drive on the computer so you can copy the image files to the computer. Connect the camera directly to a USB port on the computer. 104 HP Photosmart E217 User's Manual - HP Photosmart E217 | User's Manual - Page 105
camera turned off, remove the memory card and switch the locking tab on the card to the unlocked position. The USB Reboot the computer. connection failed. Could Not Send The computer is To Service not connected to the Internet. Make sure your computer is online. Troubleshooting and Support - HP Photosmart E217 | User's Manual - Page 106
page 83). 2. Access the HP Customer Support website for support. If you have access to the Internet, you can obtain a wide range of information about your digital camera. Visit the HP website for product help, drivers, and software updates at www.hp.com/support. 106 HP Photosmart E217 User's Manual - HP Photosmart E217 | User's Manual - Page 107
HP while you are in front of your computer and digital camera. For faster service, please be prepared to provide the following information: • The digital camera's model number (on the front of the camera) • The digital camera's serial number (on the bottom of the camera) Troubleshooting and Support - HP Photosmart E217 | User's Manual - Page 108
Customer Support; however there will be a per-incident fee. • Europe: Return product to your dealer OR call HP Customer Support; however there will be a per-incident fee. • Latin America: Call HP Customer Support (after October 31, 2005, a fee will be charged). 108 HP Photosmart E217 User's Manual - HP Photosmart E217 | User's Manual - Page 109
your country or region does not appear in the following lists, please refer to www.hp.com/support for support information. Australia Australia (out-of-warranty) 1300 721 147 1902 910 910 021-3881- 6 272 5300 Viêt Nam 02-8722-8000 +66 (2) 353 9000 +84 88234530 . Troubleshooting and Support 109 - HP Photosmart E217 | User's Manual - Page 110
0-800-10111 1-877-232-0589 1-800-711-2884 1-800-711-2884 1-800-474-6836 0004-054-177 58-212-278-8666 0-800-474-68368 110 HP Photosmart E217 User's Manual - HP Photosmart E217 | User's Manual - Page 111
that you fully charge them before using them in the camera. • If you do not intend to use your camera for extended periods of time (more than two months), HP recommends that you remove the batteries. • When inserting the batteries in the camera, always be sure to orient the batteries as directed by - HP Photosmart E217 | User's Manual - Page 112
provide acceptable low temperature performance. To improve the performance of all battery types, keep the camera and/or batteries stored in a warm inside pocket when in a cold environment. Extending Battery , do not drop this battery into a coin-filled pocket. 112 HP Photosmart E217 User's Manual - HP Photosmart E217 | User's Manual - Page 113
• Do not pierce the battery with nails, strike the battery with a hammer, step on the battery, or otherwise subject it to strong impacts or shocks. • Do not solder directly onto the battery. • Do not expose the battery to water or salt water, or allow the battery to get wet. • Do not disassemble or - HP Photosmart E217 | User's Manual - Page 114
battery life Poor Good Fair Low temperature/winter use Poor Good Fair Infrequent use Fair Good Fair Want to recharge batteries No No Good 114 HP Photosmart E217 User's Manual - HP Photosmart E217 | User's Manual - Page 115
Number of Shots per Battery Type The following table shows the minimum, maximum, and average number of shots that may be obtained using Alkaline, Lithium, and rechargeable NiMH batteries. Battery type Minimum number of shots Maximum number of shots Approximate number of shots under average use - HP Photosmart E217 | User's Manual - Page 116
. Batteries have 30 to 70 percent energy remaining. Batteries have 10 to 30 percent energy remaining. Blinking Batteries' level is low. Only Playback mode available: camera will not take pictures. Batteries are depleted. Camera will power down. 116 HP Photosmart E217 User's Manual - HP Photosmart E217 | User's Manual - Page 117
Recharging NiMH Batteries NiMH batteries can be recharged with the optional HP Photosmart battery quick recharger. For information about this optional accessory, see Appendix B, Purchasing Camera Accessories, starting on page121. The following table shows the average time it takes to recharge NiMH - HP Photosmart E217 | User's Manual - Page 118
• NiMH batteries discharge when not in use, whether they are installed in a camera or not. If they have not been used for more than two weeks, recharge them before period of time without harm to the batteries. Always store charged batteries in a cool location. 118 HP Photosmart E217 User's Manual - HP Photosmart E217 | User's Manual - Page 119
-out for Power Conservation To conserve battery power, the Image Display turns off automatically if there is no button activity for one minute. When the camera is connected to a computer, the Image Display turns off automatically 10 seconds after the connection is made. When the - HP Photosmart E217 | User's Manual - Page 120
120 HP Photosmart E217 User's Manual - HP Photosmart E217 | User's Manual - Page 121
.com (US) • www.hpshopping.ca (Canada) • www.hp.com/eur/hpoptions (Europe) • www.hp.com/apac/homeandoffice (Asia Pacific) Below are some accessories for this digital camera. These camera accessories may not be available in all regions. • HP Photosmart M-series quick recharge kit (L1815A/L1815B) One - HP Photosmart E217 | User's Manual - Page 122
/L1875B) • HP Photosmart 1GB SD memory card (L1876A / L1876B) • HP Photosmart camera cases Protect your camera with a compact padded case. Includes neck strap, belt loop, and an organizer for memory cards. Available in either black (Q6216A) or silver (Q6217A). 122 HP Photosmart E217 User's Manual - HP Photosmart E217 | User's Manual - Page 123
temperature for about an hour before removing it from the plastic bag. Doing so will help prevent condensation inside the camera and extend its life. • Store your digital camera in a cool, dry place away from windows, furnaces, and damp basements. • Always slide the lens cover over the lens when you - HP Photosmart E217 | User's Manual - Page 124
the camera yourself. Touching the inside of a digital camera can result in electrical shock. Contact an authorized HP Service Center for repairs. NOTE: For information about handling batteries safely, see Appendix A, Managing Batteries, starting on page111. 124 HP Photosmart E217 User's Manual - HP Photosmart E217 | User's Manual - Page 125
cleaning beyond what is described in this section, take the camera to a camera store that specializes in cleaning digital cameras. Cleaning your camera not only keeps it looking its best, it also improves the quality of your photos. It is especially important to clean the lens regularly because - HP Photosmart E217 | User's Manual - Page 126
on the camera body and Image Display. 1. Blow gently on the Image Display to eliminate dust. 2. Wipe the entire surface of the camera and the Image Display using a clean, dry, soft cloth. NOTE: You can also wipe the Image Display with lens- cleaning tissue. 126 HP Photosmart E217 User's Manual - HP Photosmart E217 | User's Manual - Page 127
D Specifications Feature Resolution Sensor Color depth Lens Lens threads Zoom Focus Shutter speed Tripod mount Built-in flash Flash working range External flash Description Still pictures: • 4.06 MP (2332 by 1740) total pixel count • 4.01 MP (2320 by 1728) effective pixel count Video clips: • QVGA - HP Photosmart E217 | User's Manual - Page 128
, Date & Time Imprint settings EV Compensation settings Can be set manually from -2.0 to +2.0 EV (Exposure Value) in 1/3 EV increments. White Balance Auto (default), Sun, Shade, Tungsten, Fluorescent settings ISO Speed settings Auto (default),100, 200, 400 128 HP Photosmart E217 User's Manual - HP Photosmart E217 | User's Manual - Page 129
• Slot for memory card • This camera supports both standard and high-speed HP-branded Secure Digital (SD) and MultiMediaCard (MMC) memory cards 16MB and larger. Only MMC cards that have been verified compliant to the MultiMediaCard specification are supported. Compliant MMC memory cards have the - HP Photosmart E217 | User's Manual - Page 130
HP Photosmart Quick Recharger. Average recharging time of NiMH batteries is provided in the section Recharging NiMH Batteries on page 117. • PTP transfer (15740) • MSDC transfer • JPEG • MPEG1 level 1 • DPOF 1.1 • EXIF 2.2 • DCF 1.0 • DPS USB % relative humidity 130 HP Photosmart E217 User's Manual - HP Photosmart E217 | User's Manual - Page 131
memory is available for storing images, because some memory is used for internal camera operations. Also, the actual file sizes and number of still images that can be stored in the internal memory in the camera or on an optional memory card are for images without audio clips. Specifications 131 - HP Photosmart E217 | User's Manual - Page 132
132 HP Photosmart E217 User's Manual - HP Photosmart E217 | User's Manual - Page 133
an image 44 buttons on camera 19 buying camera accessories 121 C camera accessories 121 cleaning the body 126 cleaning the image display 126 cleaning the lens 125 general care 123 general cleaning 125 menus 24 reset 74 specifications 127 states 24 turn on/off 12 camera care cleaning the body 126 - HP Photosmart E217 | User's Manual - Page 134
as 69 Display Brightness 66 E error messages on camera 95 on computer 104 EV Compensation 44 extending battery life 112 F flash description 22 settings 32 using 32 working range 127 Flash button 20 f-number 127 focus mode settings 34 switch 23 focus range 127 134 HP Photosmart E217 User's Manual - HP Photosmart E217 | User's Manual - Page 135
format internal memory 55 memory card 15, 55 H help from customer support 106 HP Image Zone Express software, description 76 HP Image Zone software description 75 installing 17 not using 77 Windows requirements 75 HP web sites 106 I Image Display description 19 using 27 Image Quality, setting 40 - HP Photosmart E217 | User's Manual - Page 136
NiMH batteries recharging 117 safety precautions 112 number of images stored in internal memory 131 pictures remaining 28, 52 O over-exposing an image 44 override automatic exposure 38 P parts of camera back of camera 19 front, left side, and bottom of camera 22 136 HP Photosmart E217 User's Manual - HP Photosmart E217 | User's Manual - Page 137
39 power indicators 116 light 20 specifications 130 turn on/off 12 power conservation, time-out 119 Power light, description 20 print images 58 print images directly to printer 62 problems, troubleshooting 73 product support 106 purchasing camera accessories 121 R range Exposure Compensation 128 - HP Photosmart E217 | User's Manual - Page 138
of flash 127 wrist strap, attaching to camera 10 Z zoom digital 31 specifications 127 U under-exposing an image 44 USB configuration setting 69 connector on camera 22 V Video button 21 video clips, recording 30 W web sites for HP 106 White Balance, setting 45 138 HP Photosmart E217 User's Manual
-
 1
1 -
 2
2 -
 3
3 -
 4
4 -
 5
5 -
 6
6 -
 7
7 -
8
-
9
-
10
-
11
-
12
-
13
-
14
-
15
-
16
-
17
-
18
-
19
-
20
-
21
-
22
-
23
-
24
-
25
-
26
-
27
-
28
-
29
-
30
-
31
-
32
-
33
-
34
-
35
-
36
-
37
-
38
-
39
-
40
-
41
-
42
-
43
-
44
-
45
-
46
-
47
-
48
-
49
-
50
-
51
-
52
-
53
-
54
-
55
-
56
-
57
-
58
-
59
-
60
-
61
-
62
-
63
-
64
-
65
-
66
-
67
-
68
-
69
-
70
-
71
-
72
-
73
-
74
-
75
-
76
-
77
-
78
-
79
-
80
-
81
-
82
-
83
-
84
-
85
-
86
-
87
-
88
-
89
-
90
-
91
-
92
-
93
-
94
-
95
-
96
-
97
-
98
-
99
-
100
-
101
-
102
-
103
-
104
-
105
-
106
-
107
-
108
-
109
-
110
-
111
-
112
-
113
-
114
-
115
-
116
-
117
-
118
-
119
-
120
-
121
-
122
-
123
-
124
-
125
-
126
-
127
-
128
-
129
-
130
-
131
-
132
-
133
-
134
-
135
-
136
-
137
-
138
 |
 |

User’s Manual
HP Photosmart E217 Digital Camera