HP Photosmart E217 User's Manual - Page 47
ISO Speed
 |
View all HP Photosmart E217 manuals
Add to My Manuals
Save this manual to your list of manuals |
Page 47 highlights
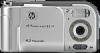
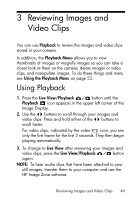
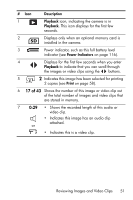
ISO Speed This setting adjusts the sensitivity of the camera to light. When ISO Speed is set to the default Auto setting, the camera selects the best ISO speed for the scene. Lower ISO speeds will capture images with the least amount of grain (or noise), but result in slower shutter speeds. If taking a picture in low light conditions without a flash at ISO 100, you may want to use a tripod. In contrast, higher ISO numbers allow faster shutter speeds, and can be used when taking pictures in dark areas without a flash, or when taking pictures of fast moving objects. Higher ISO speeds produce pictures with more grain (or noise). 1. In the Capture Menu (page 37), select ISO Speed. 2. In the ISO Speed sub-menu, use the buttons to highlight a setting. 3. Press the button to save the setting and return to the Capture Menu. If the setting is anything other than the default Auto setting, the icon for the setting (as shown in the ISO Speed sub-menu) will appear in the Live View screen. The new setting remains in effect until it is changed again or until the camera is turned off. The ISO Speed setting resets to the default Auto setting when you turn the camera off. NOTE: The ISO Speed setting does not apply when recording video clips. Taking Pictures and Recording Video Clips 47
-
 1
1 -
2
-
3
-
4
-
5
-
6
-
7
-
8
-
9
-
10
-
11
-
12
-
13
-
14
-
15
-
16
-
17
-
18
-
19
-
20
-
21
-
22
-
23
-
24
-
25
-
26
-
27
-
28
-
29
-
30
-
31
-
32
-
33
-
34
-
35
-
36
-
37
-
38
-
39
-
40
-
41
-
 42
42 -
 43
43 -
 44
44 -
 45
45 -
 46
46 -
 47
47 -
 48
48 -
 49
49 -
 50
50 -
 51
51 -
 52
52 -
53
-
54
-
55
-
56
-
57
-
58
-
59
-
60
-
61
-
62
-
63
-
64
-
65
-
66
-
67
-
68
-
69
-
70
-
71
-
72
-
73
-
74
-
75
-
76
-
77
-
78
-
79
-
80
-
81
-
82
-
83
-
84
-
85
-
86
-
87
-
88
-
89
-
90
-
91
-
92
-
93
-
94
-
95
-
96
-
97
-
98
-
99
-
100
-
101
-
102
-
103
-
104
-
105
-
106
-
107
-
108
-
109
-
110
-
111
-
112
-
113
-
114
-
115
-
116
-
117
-
118
-
119
-
120
-
121
-
122
-
123
-
124
-
125
-
126
-
127
-
128
-
129
-
130
-
131
-
132
-
133
-
134
-
135
-
136
-
137
-
138
 |
 |