HP Photosmart E217 User's Manual - Page 15
Install and Format a Memory Card (Optional
 |
View all HP Photosmart E217 manuals
Add to My Manuals
Save this manual to your list of manuals |
Page 15 highlights
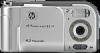
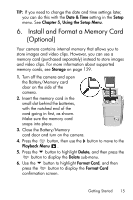
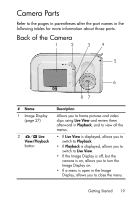
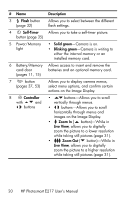
TIP: If you need to change the date and time settings later, you can do this with the Date & Time setting in the Setup menu. See Chapter 5, Using the Setup Menu. 6. Install and Format a Memory Card (Optional) Your camera contains internal memory that allows you to store images and video clips. However, you can use a memory card (purchased separately) instead to store images and video clips. For more information about supported memory cards, see Storage on page 129. 1. Turn off the camera and open the Battery/Memory card door on the side of the camera. 2. Insert the memory card in the small slot behind the batteries, with the notched end of the card going in first, as shown. Make sure the memory card snaps into place. 3. Close the Battery/Memory card door and turn on the camera. 4. Press the button, then use the button to move to the Playback Menu . 5. Press the button to highlight Delete, and then press the button to display the Delete sub-menu. 6. Use the button to highlight Format Card, and then press the button to display the Format Card confirmation screen. Getting Started 15
-
 1
1 -
2
-
3
-
4
-
5
-
6
-
7
-
8
-
9
-
 10
10 -
 11
11 -
 12
12 -
 13
13 -
 14
14 -
 15
15 -
 16
16 -
 17
17 -
 18
18 -
 19
19 -
 20
20 -
21
-
22
-
23
-
24
-
25
-
26
-
27
-
28
-
29
-
30
-
31
-
32
-
33
-
34
-
35
-
36
-
37
-
38
-
39
-
40
-
41
-
42
-
43
-
44
-
45
-
46
-
47
-
48
-
49
-
50
-
51
-
52
-
53
-
54
-
55
-
56
-
57
-
58
-
59
-
60
-
61
-
62
-
63
-
64
-
65
-
66
-
67
-
68
-
69
-
70
-
71
-
72
-
73
-
74
-
75
-
76
-
77
-
78
-
79
-
80
-
81
-
82
-
83
-
84
-
85
-
86
-
87
-
88
-
89
-
90
-
91
-
92
-
93
-
94
-
95
-
96
-
97
-
98
-
99
-
100
-
101
-
102
-
103
-
104
-
105
-
106
-
107
-
108
-
109
-
110
-
111
-
112
-
113
-
114
-
115
-
116
-
117
-
118
-
119
-
120
-
121
-
122
-
123
-
124
-
125
-
126
-
127
-
128
-
129
-
130
-
131
-
132
-
133
-
134
-
135
-
136
-
137
-
138
 |
 |