HP StorageWorks 2/16V HP StorageWorks Fabric OS 5.3.x administrator guide (569 - Page 176
/16 SAN Switch and 4/8 SAN Switch, Brocade 4Gb SAN Switch for HP p-Class BladeSystem, SAN Switch 2/8V
 |
View all HP StorageWorks 2/16V manuals
Add to My Manuals
Save this manual to your list of manuals |
Page 176 highlights
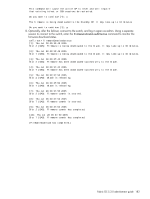
4/16 SAN Switch and 4/8 SAN Switch, Brocade 4Gb SAN Switch for HP p-Class BladeSystem, Brocade 4Gb SAN Switch for HP c-Class BladeSystem, SAN Switch 2/8V, SAN Switch 2/16V, SAN Switch 2/32, SAN Switch 4/32, SAN Switch 4/32B, 4/64 SAN Switch and 400 MP Router firmware download procedure The upgrade process first downloads and then commits the firmware to the switch. While the upgrade is proceeding, you can start another telnet session on the switch and use the firmwareDownloadStatus command to observe the upgrade progress if you wish. NOTE: After you start the process, do not enter any disruptive commands (such as reboot) that will interrupt the process. The entire firmware download and commit process takes approximately 17 minutes. If there is a problem, wait for the time-out (30 minutes for network problems). Disrupting the process can render the switch inoperable and require you to seek assistance from HP. Do not disconnect the switch from power during the process, because the switch could becaome inoperable upon reboot. To upgrade firmware for 4/16 SAN Switch and 4/8 SAN Switch, Brocade 4Gb SAN Switch for HP p-Class BladeSystem, Brocade 4Gb SAN Switch for HP c-Class BladeSystem, SAN Switch 2/8V, SAN Switch 2/16V, SAN Switch 2/32, SAN Switch 4/32, SAN Switch 4/32B, 4/64 SAN Switch, and 400 MP Router 1. Verify that the FTP service is running on the host server and that you have a user ID on that server. 2. Obtain the firmware file from the HP web site, see "Obtaining and decompressing firmware" and store the file on the FTP server. 3. Verify that the FTP service is running and unpack the compressed files preserving Directory structures. 4. Use the firmwareShow command to check the current firmware version on connected switches. Upgrade their firmware if necessary before proceeding with upgrading this switch. Refer to "Checking connected switches" on page 176 for more details. 5. Connect to the switch and log in as admin. 6. Enter the firmwareDownload command. 7. At the "Do you want to continue [y/n]" prompt, press y. 8. Respond to the prompts as follows: Server Name or IP Address Enter the name or IP address of the FTP server where the firmware file is stored; for example, 192.1.2.3. You can enter a server name if DNS is enabled. 178 Installing and maintaining firmware
-
 1
1 -
2
-
3
-
4
-
5
-
6
-
7
-
8
-
9
-
10
-
11
-
12
-
13
-
14
-
15
-
16
-
17
-
18
-
19
-
20
-
21
-
22
-
23
-
24
-
25
-
26
-
27
-
28
-
29
-
30
-
31
-
32
-
33
-
34
-
35
-
36
-
37
-
38
-
39
-
40
-
41
-
42
-
43
-
44
-
45
-
46
-
47
-
48
-
49
-
50
-
51
-
52
-
53
-
54
-
55
-
56
-
57
-
58
-
59
-
60
-
61
-
62
-
63
-
64
-
65
-
66
-
67
-
68
-
69
-
70
-
71
-
72
-
73
-
74
-
75
-
76
-
77
-
78
-
79
-
80
-
81
-
82
-
83
-
84
-
85
-
86
-
87
-
88
-
89
-
90
-
91
-
92
-
93
-
94
-
95
-
96
-
97
-
98
-
99
-
100
-
101
-
102
-
103
-
104
-
105
-
106
-
107
-
108
-
109
-
110
-
111
-
112
-
113
-
114
-
115
-
116
-
117
-
118
-
119
-
120
-
121
-
122
-
123
-
124
-
125
-
126
-
127
-
128
-
129
-
130
-
131
-
132
-
133
-
134
-
135
-
136
-
137
-
138
-
139
-
140
-
141
-
142
-
143
-
144
-
145
-
146
-
147
-
148
-
149
-
150
-
151
-
152
-
153
-
154
-
155
-
156
-
157
-
158
-
159
-
160
-
161
-
162
-
163
-
164
-
165
-
166
-
167
-
168
-
169
-
170
-
 171
171 -
 172
172 -
 173
173 -
 174
174 -
 175
175 -
 176
176 -
 177
177 -
 178
178 -
 179
179 -
 180
180 -
 181
181 -
182
-
183
-
184
-
185
-
186
-
187
-
188
-
189
-
190
-
191
-
192
-
193
-
194
-
195
-
196
-
197
-
198
-
199
-
200
-
201
-
202
-
203
-
204
-
205
-
206
-
207
-
208
-
209
-
210
-
211
-
212
-
213
-
214
-
215
-
216
-
217
-
218
-
219
-
220
-
221
-
222
-
223
-
224
-
225
-
226
-
227
-
228
-
229
-
230
-
231
-
232
-
233
-
234
-
235
-
236
-
237
-
238
-
239
-
240
-
241
-
242
-
243
-
244
-
245
-
246
-
247
-
248
-
249
-
250
-
251
-
252
-
253
-
254
-
255
-
256
-
257
-
258
-
259
-
260
-
261
-
262
-
263
-
264
-
265
-
266
-
267
-
268
-
269
-
270
-
271
-
272
-
273
-
274
-
275
-
276
-
277
-
278
-
279
-
280
-
281
-
282
-
283
-
284
-
285
-
286
-
287
-
288
-
289
-
290
-
291
-
292
-
293
-
294
-
295
-
296
-
297
-
298
-
299
-
300
-
301
-
302
-
303
-
304
-
305
-
306
-
307
-
308
-
309
-
310
-
311
-
312
-
313
-
314
-
315
-
316
-
317
-
318
-
319
-
320
-
321
-
322
-
323
-
324
-
325
-
326
-
327
-
328
-
329
-
330
-
331
-
332
-
333
-
334
-
335
-
336
-
337
-
338
-
339
-
340
-
341
-
342
-
343
-
344
-
345
-
346
-
347
-
348
-
349
-
350
-
351
-
352
-
353
-
354
-
355
-
356
-
357
-
358
-
359
-
360
-
361
-
362
-
363
-
364
-
365
-
366
-
367
-
368
-
369
-
370
-
371
-
372
-
373
-
374
-
375
-
376
-
377
-
378
-
379
-
380
-
381
-
382
-
383
-
384
-
385
-
386
-
387
-
388
-
389
-
390
-
391
-
392
-
393
-
394
-
395
-
396
-
397
-
398
-
399
-
400
-
401
-
402
-
403
-
404
-
405
-
406
-
407
-
408
-
409
-
410
-
411
-
412
-
413
-
414
-
415
-
416
-
417
-
418
-
419
-
420
-
421
-
422
-
423
-
424
-
425
-
426
-
427
-
428
-
429
-
430
-
431
-
432
-
433
-
434
-
435
-
436
-
437
-
438
-
439
-
440
-
441
-
442
-
443
-
444
-
445
-
446
-
447
-
448
-
449
-
450
-
451
-
452
-
453
-
454
-
455
-
456
-
457
-
458
-
459
-
460
-
461
-
462
-
463
-
464
-
465
 |
 |
