HP StorageWorks 2/16V HP StorageWorks Fabric OS 5.3.x administrator guide (569 - Page 259
Cascaded configuration, two switches, Setting a unique domain ID, secModeEnable
 |
View all HP StorageWorks 2/16V manuals
Add to My Manuals
Save this manual to your list of manuals |
Page 259 highlights
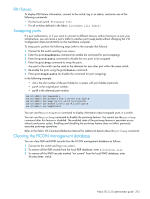
CAUTION: If Security is enabled via the CLI in the FICON environment, then you should use the following syntax for the secModeEnable command: secmodeenable --lockdown=scc --currentpwd --fcs "*" Issuing the secModeEnable command as it appears above enables security and creates an SCC policy with all of the switches that currently reside in the fabric. It will also use the current password as the password for all available accounts on the switch. Also, if you intend to use the secModeEnable --quickmode command, device connection control (DCC) policies are created for every port; this is not required for cascaded FICON configurations. These DCC policies in a cascaded configuration lock down the ports because no devices are logged into them before the command is executed, so no device can connect to these ports until you specifically add them to the DCC policy. If you issued the secModeEnable --quickmode command, the best solution is to delete the DCC policies that were created. Be sure not to delete the SCC policy, which is required for FICON cascaded configurations. 5. Connect and enable channel and control unit (CU) devices. The Query for Security Attributes (QSA) response to the channel indicates that the fabric binding and IDID are enabled. Figure 17 shows one viable cascaded configurations. These configurations require Channel A to be configured for two-byte addressing and require IDID and fabric binding. There can be only two switches in the path from the channel to the control unit. Figure 17 Cascaded configuration, two switches Channel A Switch Domain ID = 21 Switch Domain ID = 22 Figure 18 Cascaded configuration, three switches Control Unit B Channel A Switch Domain ID = 21 Switch Domain ID = 22 Control Unit C Switch Domain ID = 23 Control Unit D Setting a unique domain ID In a cascaded configuration, each switch must have a unique domain ID, and insistent domain ID (IDID) mode must be enabled. To set a unique domain ID and enable IDID mode, complete the following steps: 1. Connect to the switch and log in as admin. 2. Verify that the switch has a unique domain ID. If it does not, set a unique domain ID. For instructions on displaying and changing the domain ID, refer to Working with domain IDs, page 40. 3. Enter the switchDisable command to disable the switch. 4. Enter the configure command. 5. Press y after the Fabric Parameters prompt. 6. To enable IDID mode, press y after the "Insistent Domain ID Mode" prompt. (You can disable this mode by pressing n.) Fabric OS 5.3.0 administrator guide 271
-
 1
1 -
2
-
3
-
4
-
5
-
6
-
7
-
8
-
9
-
10
-
11
-
12
-
13
-
14
-
15
-
16
-
17
-
18
-
19
-
20
-
21
-
22
-
23
-
24
-
25
-
26
-
27
-
28
-
29
-
30
-
31
-
32
-
33
-
34
-
35
-
36
-
37
-
38
-
39
-
40
-
41
-
42
-
43
-
44
-
45
-
46
-
47
-
48
-
49
-
50
-
51
-
52
-
53
-
54
-
55
-
56
-
57
-
58
-
59
-
60
-
61
-
62
-
63
-
64
-
65
-
66
-
67
-
68
-
69
-
70
-
71
-
72
-
73
-
74
-
75
-
76
-
77
-
78
-
79
-
80
-
81
-
82
-
83
-
84
-
85
-
86
-
87
-
88
-
89
-
90
-
91
-
92
-
93
-
94
-
95
-
96
-
97
-
98
-
99
-
100
-
101
-
102
-
103
-
104
-
105
-
106
-
107
-
108
-
109
-
110
-
111
-
112
-
113
-
114
-
115
-
116
-
117
-
118
-
119
-
120
-
121
-
122
-
123
-
124
-
125
-
126
-
127
-
128
-
129
-
130
-
131
-
132
-
133
-
134
-
135
-
136
-
137
-
138
-
139
-
140
-
141
-
142
-
143
-
144
-
145
-
146
-
147
-
148
-
149
-
150
-
151
-
152
-
153
-
154
-
155
-
156
-
157
-
158
-
159
-
160
-
161
-
162
-
163
-
164
-
165
-
166
-
167
-
168
-
169
-
170
-
171
-
172
-
173
-
174
-
175
-
176
-
177
-
178
-
179
-
180
-
181
-
182
-
183
-
184
-
185
-
186
-
187
-
188
-
189
-
190
-
191
-
192
-
193
-
194
-
195
-
196
-
197
-
198
-
199
-
200
-
201
-
202
-
203
-
204
-
205
-
206
-
207
-
208
-
209
-
210
-
211
-
212
-
213
-
214
-
215
-
216
-
217
-
218
-
219
-
220
-
221
-
222
-
223
-
224
-
225
-
226
-
227
-
228
-
229
-
230
-
231
-
232
-
233
-
234
-
235
-
236
-
237
-
238
-
239
-
240
-
241
-
242
-
243
-
244
-
245
-
246
-
247
-
248
-
249
-
250
-
251
-
252
-
253
-
 254
254 -
 255
255 -
 256
256 -
 257
257 -
 258
258 -
 259
259 -
 260
260 -
 261
261 -
 262
262 -
 263
263 -
 264
264 -
265
-
266
-
267
-
268
-
269
-
270
-
271
-
272
-
273
-
274
-
275
-
276
-
277
-
278
-
279
-
280
-
281
-
282
-
283
-
284
-
285
-
286
-
287
-
288
-
289
-
290
-
291
-
292
-
293
-
294
-
295
-
296
-
297
-
298
-
299
-
300
-
301
-
302
-
303
-
304
-
305
-
306
-
307
-
308
-
309
-
310
-
311
-
312
-
313
-
314
-
315
-
316
-
317
-
318
-
319
-
320
-
321
-
322
-
323
-
324
-
325
-
326
-
327
-
328
-
329
-
330
-
331
-
332
-
333
-
334
-
335
-
336
-
337
-
338
-
339
-
340
-
341
-
342
-
343
-
344
-
345
-
346
-
347
-
348
-
349
-
350
-
351
-
352
-
353
-
354
-
355
-
356
-
357
-
358
-
359
-
360
-
361
-
362
-
363
-
364
-
365
-
366
-
367
-
368
-
369
-
370
-
371
-
372
-
373
-
374
-
375
-
376
-
377
-
378
-
379
-
380
-
381
-
382
-
383
-
384
-
385
-
386
-
387
-
388
-
389
-
390
-
391
-
392
-
393
-
394
-
395
-
396
-
397
-
398
-
399
-
400
-
401
-
402
-
403
-
404
-
405
-
406
-
407
-
408
-
409
-
410
-
411
-
412
-
413
-
414
-
415
-
416
-
417
-
418
-
419
-
420
-
421
-
422
-
423
-
424
-
425
-
426
-
427
-
428
-
429
-
430
-
431
-
432
-
433
-
434
-
435
-
436
-
437
-
438
-
439
-
440
-
441
-
442
-
443
-
444
-
445
-
446
-
447
-
448
-
449
-
450
-
451
-
452
-
453
-
454
-
455
-
456
-
457
-
458
-
459
-
460
-
461
-
462
-
463
-
464
-
465
 |
 |
