HP W2338h HP w185,w1858, w2338h LCD Monitor - User Guide - Page 31
Main Menu, Options, Submenu Options, Description, Switch Video Input - native resolution
 |
UPC - 884420172529
View all HP W2338h manuals
Add to My Manuals
Save this manual to your list of manuals |
Page 31 highlights
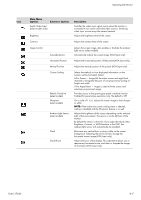
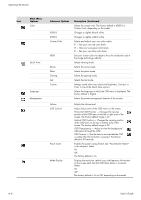
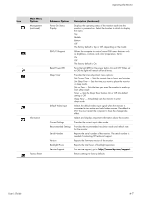
Operating the Monitor Icon Main Menu Options Submenu Options Switch Video Input (select models only) Brightness Contrast Image Control Auto-Adjustment Horizontal Position Vertical Position Custom Scaling Refresh Overdrive (select models) Sharpness (select models) Ambient Light Sensor (select models) Clock Clock Phase Description Switches the video input signal source when the monitor is connected to two active and valid video sources. Switching video input sources may take several seconds. Adjusts the brightness level of the screen. Adjusts the contrast level of the screen. Adjusts the screen image. Also enables or disables the ambient light sensor (select models). Automatically adjusts the screen image (VGA Input only). Adjusts the horizontal position of the picture (VGA Input only). Adjusts the vertical position of the picture (VGA Input only). Selects the method on how displayed information on the monitor will be formatted. Select: Fill to Screen - Image fills the entire screen and might look distorted or elongated because of non-proportional scaling of height and width. Fill to Aspect Ratio - Image is sized to fit the screen and maintains proportional image. Provides access to the gray-to-gray panel overdrive function. Enabled for panel native resolution only. The default is Off. On a scale of 1 to 5, adjusts the screen image to look sharper or softer. NOTE: If the one-to-one custom scaling menu is selected, scaling is disabled and the Sharpness feature is as well. Adjusts the brightness of the screen depending on the ambient light of the environment. The sensor is on the left front of the monitor. By default the sensor is set to On. If you adjust the Quick View, Brightness, Contrast, or sRGB functions in the OSD, the ambient light sensor will automatically be disabled. Minimizes any vertical bars or strips visible on the screen background. Adjusting the Clock will also change the horizontal screen image (VGA Input only). Adjusts the focus of the display. This adjustment allows you to remove any horizontal noise, and clear or sharpen the image of characters (VGA Input only). User's Guide 4-5
-
 1
1 -
2
-
3
-
4
-
5
-
6
-
7
-
8
-
9
-
10
-
11
-
12
-
13
-
14
-
15
-
16
-
17
-
18
-
19
-
20
-
21
-
22
-
23
-
24
-
25
-
 26
26 -
 27
27 -
 28
28 -
 29
29 -
 30
30 -
 31
31 -
 32
32 -
 33
33 -
 34
34 -
 35
35 -
 36
36 -
37
-
38
-
39
-
40
-
41
-
42
-
43
-
44
-
45
-
46
-
47
-
48
-
49
-
50
-
51
-
52
-
53
-
54
-
55
-
56
-
57
-
58
-
59
-
60
-
61
-
62
-
63
-
64
-
65
-
66
-
67
-
68
 |
 |