JVC DLA-QX1G Instruction Manual - Page 10
Controls and Features
 |
View all JVC DLA-QX1G manuals
Add to My Manuals
Save this manual to your list of manuals |
Page 10 highlights
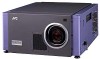
Controls and Features Front Side / Top Surface / Right Side 1 2 9 8 1 STAND BY OPERATE VIC SELECT 1 2 MODE KEY STONE 3 EXIT MENU T ZOOM FOCUS W ENTER CONTROL REMOTE RS-232C OUT RS-232C IN R G H/CS RGB Analog VIC BV 7 21 6 5 1 2 3 4 1 Handles They are set in place when shipped from the factory. To carry this projector, use them. You can remove them if necessary. For details, refer to "To remove the handles" on page 9. 2 Adjustable feet They are set at the shortest position when shipped from the factory. Turn the foot to make the projector level. Adjustment can be made in the range of ±3.5° vertically and ±4.5° horizontally. 3 Connector panel For details, refer to "Connector Panel" on pages 12 and 13. 4 Control panel For details, refer to "Control Panel" on pages 10 and 11. 5 AC IN (power input) terminal This is the power input terminal where the supplied power cord is connected. For details, refer to "Connecting the Power Cord (Supplied)" on page 31. 6 MAIN POWER switch This is the main power switch. When it is turned on, the projector goes into stand-by mode, and the STAND BY indicator on the control panel comes on. ON [ ❙ ]: The main power turns on. OFF [‡]: The main power turns off. 7 Remote sensor When operating with the remote control unit, aim it at this sensor. An additional remote sensor is provided on the control panel of the projector. The effective operating distance of the remote control is about 32.8 ft (10 m) from each of the sensors. The effective operating range of angles is 50° horizontally, and 15° vertically. 8 Lens mount Attach a projection lens separately sold to this mount. GL-MQ1010G GL-MQ1015SG GL-MQ1020ZG GL-MQ1023SZG 1 : 1 fixed-focus lens 1.5 : 1 fixed-focus lens 2.1 : 1 to 4.9 : 1 zoom lens 3 : 1 to 7 : 1 zoom lens For attaching or replacing the lens, consult your dealer who performed the installation and adjustments of your projector. 8
-
 1
1 -
2
-
3
-
4
-
 5
5 -
 6
6 -
 7
7 -
 8
8 -
 9
9 -
 10
10 -
 11
11 -
 12
12 -
 13
13 -
 14
14 -
 15
15 -
16
-
17
-
18
-
19
-
20
-
21
-
22
-
23
-
24
-
25
-
26
-
27
-
28
-
29
-
30
-
31
-
32
-
33
-
34
-
35
-
36
-
37
-
38
-
39
-
40
-
41
-
42
-
43
-
44
-
45
-
46
-
47
-
48
-
49
-
50
-
51
-
52
-
53
-
54
-
55
-
56
-
57
-
58
-
59
-
60
-
61
-
62
-
63
-
64
-
65
-
66
-
67
-
68
-
69
-
70
-
71
-
72
-
73
-
74
-
75
-
76
-
77
-
78
-
79
-
80
-
81
-
82
-
83
-
84
-
85
-
86
-
87
-
88
-
89
-
90
-
91
-
92
-
93
-
94
-
95
-
96
-
97
-
98
-
99
-
100
-
101
-
102
-
103
-
104
-
105
-
106
-
107
-
108
-
109
-
110
-
111
-
112
-
113
-
114
-
115
-
116
-
117
-
118
-
119
-
120
-
121
-
122
-
123
-
124
-
125
-
126
-
127
-
128
-
129
-
130
-
131
-
132
 |
 |
