Kenmore HE2t User Guide - Page 41
Press
 |
View all Kenmore HE2t manuals
Add to My Manuals
Save this manual to your list of manuals |
Page 41 highlights
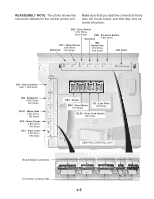
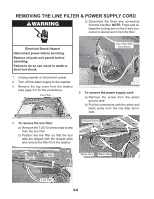
d) Remove the two screws at the recessed hole and bottom of the console. Console Screws e) Lift the top edge of the console and unhook it from the holder clips. 6. To remove the touchpad/LED assembly: a) Pull the selector knob off the switch shaft. b) Press the seven console locking tabs, and unsnap the touchpad/LED assembly, then lift the assembly from the console and remove it. Pull Off Selector Knob Lift Top Edge Of Console f) Press the locking tab on the right rear side of the console inward, and remove the console. Console Locking Tab Press Release 7 Console Locking Tabs Touchpad/LED Assembly 4-3
-
 1
1 -
2
-
3
-
4
-
5
-
6
-
7
-
8
-
9
-
10
-
11
-
12
-
13
-
14
-
15
-
16
-
17
-
18
-
19
-
20
-
21
-
22
-
23
-
24
-
25
-
26
-
27
-
28
-
29
-
30
-
31
-
32
-
33
-
34
-
35
-
 36
36 -
 37
37 -
 38
38 -
 39
39 -
 40
40 -
 41
41 -
 42
42 -
 43
43 -
 44
44 -
 45
45 -
 46
46 -
47
-
48
-
49
-
50
-
51
-
52
-
53
-
54
-
55
-
56
-
57
-
58
-
59
-
60
-
61
-
62
-
63
-
64
-
65
-
66
-
67
-
68
-
69
-
70
-
71
-
72
-
73
-
74
-
75
-
76
-
77
-
78
-
79
-
80
-
81
-
82
-
83
-
84
-
85
-
86
-
87
-
88
-
89
-
90
-
91
-
92
-
93
-
94
-
95
-
96
 |
 |

4-3
e) Lift the top edge of the console and
unhook it from the holder clips.
d) Remove the two screws at the recessed
hole and bottom of the console.
6.
To remove the touchpad/LED assem-
bly:
a) Pull the selector knob off the switch
shaft.
b) Press the seven console locking tabs,
and unsnap the touchpad/LED as-
sembly, then lift the assembly from the
console and remove it.
f) Press the locking tab on the right rear
side of the console inward, and re-
move the console.
Console Screws
Console
Locking Tab
Press
Lift Top Edge
Of Console
Release 7 Console Locking Tabs
Touchpad/LED Assembly
Pull Off
Selector Knob