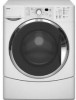
Kenmore HE2t User Guide - Page 53
To remove the bellows, Continued on the next
 |
View all Kenmore HE2t manuals
Add to My Manuals
Save this manual to your list of manuals |
Page 53 highlights
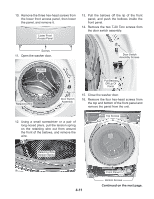
c) Pull the door switch assembly out and turn it over so that you can access the connectors. d) Unlock the tabs and disconnect the three wire connectors from the door switch terminals, then remove the assembly. Bellows Retaining Clamp Screw 3 Door Switch Assembly Connectors 8. To remove the bellows: a) Remove the two T-20 Torx screws from the door switch assembly (see the photo in step 7b). b) Remove the front panel from the washer (see steps 15 and 16 on page 4-11 for the procedure). c) Turn the bellows retaining clamp screw counterclockwise until the clamp is loose enough to remove it from around the bellows (see the top right photo). NOTE: It may be necessary to completely remove the screw from one end of the clamp. d) Remove the bellows retaining clamp from around the bellows. Remove Bellows Retaining Clamp Continued on the next page. 4-15
-
 1
1 -
2
-
3
-
4
-
5
-
6
-
7
-
8
-
9
-
10
-
11
-
12
-
13
-
14
-
15
-
16
-
17
-
18
-
19
-
20
-
21
-
22
-
23
-
24
-
25
-
26
-
27
-
28
-
29
-
30
-
31
-
32
-
33
-
34
-
35
-
36
-
37
-
38
-
39
-
40
-
41
-
42
-
43
-
44
-
45
-
46
-
47
-
 48
48 -
 49
49 -
 50
50 -
 51
51 -
 52
52 -
 53
53 -
 54
54 -
 55
55 -
 56
56 -
 57
57 -
 58
58 -
59
-
60
-
61
-
62
-
63
-
64
-
65
-
66
-
67
-
68
-
69
-
70
-
71
-
72
-
73
-
74
-
75
-
76
-
77
-
78
-
79
-
80
-
81
-
82
-
83
-
84
-
85
-
86
-
87
-
88
-
89
-
90
-
91
-
92
-
93
-
94
-
95
-
96
 |
 |
