Kenmore HE2t User Guide - Page 49
Continued on the next - bellow
 |
View all Kenmore HE2t manuals
Add to My Manuals
Save this manual to your list of manuals |
Page 49 highlights
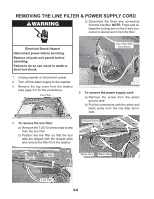
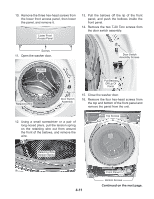
10. Remove the three hex-head screws from the lower front access panel, then lower the panel, and remove it. Lower Front Access Panel 13. Pull the bellows off the lip of the front panel, and push the bellows inside the front panel. 14. Remove the two T-20 Torx screws from the door switch assembly. Screws 11. Open the washer door. Door Switch Assembly Screws Bellows Retaining Wire Door Switch Assembly Pull Bellows Off Lip Of Panel 15. Close the washer door. 16. Remove the four hex-head screws from the top and bottom of the front panel and remove the panel from the unit. 12. Using a small screwdriver or a pair of long-nosed pliers, pull the tension spring on the retaining wire out from around the front of the bellows, and remove the wire. Top Screws Retaining Wire Tension Spring 4-11 Front Panel Bottom Screws Continued on the next page.
-
 1
1 -
2
-
3
-
4
-
5
-
6
-
7
-
8
-
9
-
10
-
11
-
12
-
13
-
14
-
15
-
16
-
17
-
18
-
19
-
20
-
21
-
22
-
23
-
24
-
25
-
26
-
27
-
28
-
29
-
30
-
31
-
32
-
33
-
34
-
35
-
36
-
37
-
38
-
39
-
40
-
41
-
42
-
43
-
 44
44 -
 45
45 -
 46
46 -
 47
47 -
 48
48 -
 49
49 -
 50
50 -
 51
51 -
 52
52 -
 53
53 -
 54
54 -
55
-
56
-
57
-
58
-
59
-
60
-
61
-
62
-
63
-
64
-
65
-
66
-
67
-
68
-
69
-
70
-
71
-
72
-
73
-
74
-
75
-
76
-
77
-
78
-
79
-
80
-
81
-
82
-
83
-
84
-
85
-
86
-
87
-
88
-
89
-
90
-
91
-
92
-
93
-
94
-
95
-
96
 |
 |
