Konica Minolta bizhub PRESS C71hc SD-513 User Manual - Page 175
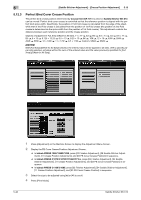
Perfect Bind Cover Crease Position
 |
View all Konica Minolta bizhub PRESS C71hc manuals
Add to My Manuals
Save this manual to your list of manuals |
Page 175 highlights
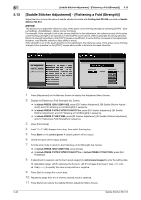
5 [Saddle Stitcher Adjustment] - [Crease Position Adjustment] 5.12 5.12.3 Perfect Bind Cover Crease Position The perfect bind crease position determined by Creaser Unit CR-101 mounted on Saddle Stitcher SD-513 can be moved. Perfect bind cover crease is controlled so that the reference position is aligned with the perfect bind spine width. Specifically, the position of 1st Fold crease is calculated from the edge of the sheet, while that of 2nd Fold crease is calculated from the position of 1st Fold crease (the position of 2nd Fold crease is determined as the spine width from the position of 1st Fold crease). This adjustment controls the distance between each reference position and the crease position. Objects of adjustment: Full Area (Offset for All Size), 11 e 17 w, A3 w, B4 w, 8.5 e 14 w, A4 w, 8.5 e 11 w, B5 w, 8 e 13 w, 8.125 e 13.25 w, 8.5 e 13 w, 8.25 e 13 w, 8K w, 16K w, 12 e 18 w, A3W w, B4W w, A4W w, B5W w, 12 e 18W w, 11 e 17W w, 8.5 e 11W w, Custom, SRA3 w, SRA4 w NOTICE With [Full Area] ([Offset for All Size]) selected, the entered value will be applied to all sizes. With a specific paper size selected, set value will be the sum of the entered value and the value previously specified for [Full Area] ([Offset for All Size]). 1 Press [Adjustment] on the Machine Screen to display the Adjustment Menu Screen. 2 Display the PB Cover Crease Position Adjustment Screen. % In bizhub PRESS 1250/1250P/1052, press [02 Finisher Adjustment], [08 Saddle Stitcher Adjustment], [11 Crease Position Adjustment], and [03 PB Cover Crease Position] in sequence. % In bizhub PRESS C1070/C1070P/C1060/C71hc, press [04 Finisher Adjustment], [04 Saddle Stitcher Adjustment], [11 Crease Position Adjustment], and [03 PB Cover Crease Position] in sequence. % In bizhub PRESS C1100/C1085, press [03 Finisher Adjustment], [04 Saddle Stitcher Adjustment], [11 Crease Position Adjustment], and [03 PB Cover Crease Position] in sequence. 3 Select the size to be adjusted using [+] or [,] to scroll. 4 Press [Print Mode]. 5-46 Saddle Stitcher SD-513
-
 1
1 -
2
-
3
-
4
-
5
-
6
-
7
-
8
-
9
-
10
-
11
-
12
-
13
-
14
-
15
-
16
-
17
-
18
-
19
-
20
-
21
-
22
-
23
-
24
-
25
-
26
-
27
-
28
-
29
-
30
-
31
-
32
-
33
-
34
-
35
-
36
-
37
-
38
-
39
-
40
-
41
-
42
-
43
-
44
-
45
-
46
-
47
-
48
-
49
-
50
-
51
-
52
-
53
-
54
-
55
-
56
-
57
-
58
-
59
-
60
-
61
-
62
-
63
-
64
-
65
-
66
-
67
-
68
-
69
-
70
-
71
-
72
-
73
-
74
-
75
-
76
-
77
-
78
-
79
-
80
-
81
-
82
-
83
-
84
-
85
-
86
-
87
-
88
-
89
-
90
-
91
-
92
-
93
-
94
-
95
-
96
-
97
-
98
-
99
-
100
-
101
-
102
-
103
-
104
-
105
-
106
-
107
-
108
-
109
-
110
-
111
-
112
-
113
-
114
-
115
-
116
-
117
-
118
-
119
-
120
-
121
-
122
-
123
-
124
-
125
-
126
-
127
-
128
-
129
-
130
-
131
-
132
-
133
-
134
-
135
-
136
-
137
-
138
-
139
-
140
-
141
-
142
-
143
-
144
-
145
-
146
-
147
-
148
-
149
-
150
-
151
-
152
-
153
-
154
-
155
-
156
-
157
-
158
-
159
-
160
-
161
-
162
-
163
-
164
-
165
-
166
-
167
-
168
-
169
-
 170
170 -
 171
171 -
 172
172 -
 173
173 -
 174
174 -
 175
175 -
 176
176 -
 177
177 -
 178
178 -
 179
179 -
 180
180 -
181
-
182
-
183
-
184
-
185
-
186
-
187
-
188
-
189
-
190
-
191
-
192
-
193
-
194
-
195
-
196
-
197
-
198
-
199
-
200
-
201
-
202
 |
 |
