Konica Minolta bizhub PRESS C71hc SD-513 User Manual - Page 71
Press [OK] on the Output Setting Screen to return to the Copy Screen.
 |
View all Konica Minolta bizhub PRESS C71hc manuals
Add to My Manuals
Save this manual to your list of manuals |
Page 71 highlights
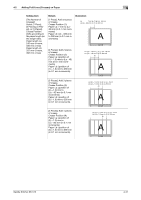
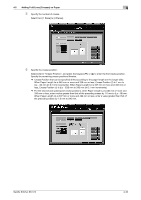
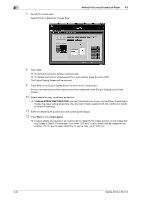
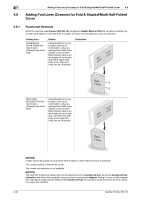
4 7 Specify the crease side. Select [Front] or [Back] for "Crease Side". Adding Fold Lines (Creases) on Paper 4.5 8 Press [OK]. % To restore the previous setting, press [Cancel]. % To disable the function while keeping the current setting, press [Function OFF]. The Output Setting Screen will be restored. 9 Press [OK] on the Output Setting Screen to return to the Copy Screen. An icon representing specified output mode will be displayed under [Output Setting] on the Copy Screen. 10 Select additional copy conditions, as desired. % In bizhub PRESS 1250/1250P/1052, you can load sheets onto a tray, and use [Paper Presetting] to change the paper setting temporarily. See the User's Guide supplied with this machine for details on [Paper Presetting]. 11 Enter the desired print quantity from the control panel keypad. 12 Press Start on the control panel. % If output sheets are creased at an invalid position, respecify the crease position on the Crease Setting Screen in Step 6. For example, if you enter "210 mm", output sheets may be creased at the position 211 mm due to paper stretching. In such a case, set to "209 mm". 4-34 Saddle Stitcher SD-513
-
 1
1 -
2
-
3
-
4
-
5
-
6
-
7
-
8
-
9
-
10
-
11
-
12
-
13
-
14
-
15
-
16
-
17
-
18
-
19
-
20
-
21
-
22
-
23
-
24
-
25
-
26
-
27
-
28
-
29
-
30
-
31
-
32
-
33
-
34
-
35
-
36
-
37
-
38
-
39
-
40
-
41
-
42
-
43
-
44
-
45
-
46
-
47
-
48
-
49
-
50
-
51
-
52
-
53
-
54
-
55
-
56
-
57
-
58
-
59
-
60
-
61
-
62
-
63
-
64
-
65
-
 66
66 -
 67
67 -
 68
68 -
 69
69 -
 70
70 -
 71
71 -
 72
72 -
 73
73 -
 74
74 -
 75
75 -
 76
76 -
77
-
78
-
79
-
80
-
81
-
82
-
83
-
84
-
85
-
86
-
87
-
88
-
89
-
90
-
91
-
92
-
93
-
94
-
95
-
96
-
97
-
98
-
99
-
100
-
101
-
102
-
103
-
104
-
105
-
106
-
107
-
108
-
109
-
110
-
111
-
112
-
113
-
114
-
115
-
116
-
117
-
118
-
119
-
120
-
121
-
122
-
123
-
124
-
125
-
126
-
127
-
128
-
129
-
130
-
131
-
132
-
133
-
134
-
135
-
136
-
137
-
138
-
139
-
140
-
141
-
142
-
143
-
144
-
145
-
146
-
147
-
148
-
149
-
150
-
151
-
152
-
153
-
154
-
155
-
156
-
157
-
158
-
159
-
160
-
161
-
162
-
163
-
164
-
165
-
166
-
167
-
168
-
169
-
170
-
171
-
172
-
173
-
174
-
175
-
176
-
177
-
178
-
179
-
180
-
181
-
182
-
183
-
184
-
185
-
186
-
187
-
188
-
189
-
190
-
191
-
192
-
193
-
194
-
195
-
196
-
197
-
198
-
199
-
200
-
201
-
202
 |
 |
