Konica Minolta bizhub PRESS C71hc SD-513 User Manual - Page 72
Adding Fold Lines Creases on Paper, Type of printer driver, Setting screen, Description
 |
View all Konica Minolta bizhub PRESS C71hc manuals
Add to My Manuals
Save this manual to your list of manuals |
Page 72 highlights
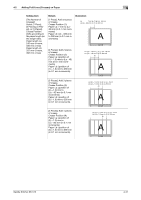
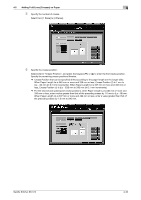
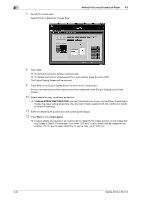
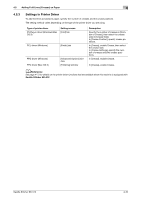
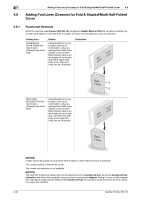
4.5 Adding Fold Lines (Creases) on Paper 4 4.5.3 Settings in Printer Driver To add fold lines (creases) to paper, specify the number of creases and the crease positions. The setting method varies depending on the type of the printer driver you are using. Type of printer driver PS Plug-in driver (Windows/Mac OS X) Setting screen [Fold] tab PCL driver (Windows) [Finish] tab PPD driver (Windows) PPD driver (Mac OS X) [Advanced Options] window [Finishing] window Description Specify the number of creases in [Number of Crease], then select the crease side in [Crease Side]. In [Crease Position], specify crease positions. In [Crease], enable Crease, then select the crease side. In [Crease Settings], specify the number of creases and the crease positions. In [Crease], enable Crease. In [Crease], enable Crease. dReference See page 4-73 for details on the printer driver functions that are available when this machine is equipped with Saddle Stitcher SD-513. Saddle Stitcher SD-513 4-35
-
 1
1 -
2
-
3
-
4
-
5
-
6
-
7
-
8
-
9
-
10
-
11
-
12
-
13
-
14
-
15
-
16
-
17
-
18
-
19
-
20
-
21
-
22
-
23
-
24
-
25
-
26
-
27
-
28
-
29
-
30
-
31
-
32
-
33
-
34
-
35
-
36
-
37
-
38
-
39
-
40
-
41
-
42
-
43
-
44
-
45
-
46
-
47
-
48
-
49
-
50
-
51
-
52
-
53
-
54
-
55
-
56
-
57
-
58
-
59
-
60
-
61
-
62
-
63
-
64
-
65
-
66
-
 67
67 -
 68
68 -
 69
69 -
 70
70 -
 71
71 -
 72
72 -
 73
73 -
 74
74 -
 75
75 -
 76
76 -
 77
77 -
78
-
79
-
80
-
81
-
82
-
83
-
84
-
85
-
86
-
87
-
88
-
89
-
90
-
91
-
92
-
93
-
94
-
95
-
96
-
97
-
98
-
99
-
100
-
101
-
102
-
103
-
104
-
105
-
106
-
107
-
108
-
109
-
110
-
111
-
112
-
113
-
114
-
115
-
116
-
117
-
118
-
119
-
120
-
121
-
122
-
123
-
124
-
125
-
126
-
127
-
128
-
129
-
130
-
131
-
132
-
133
-
134
-
135
-
136
-
137
-
138
-
139
-
140
-
141
-
142
-
143
-
144
-
145
-
146
-
147
-
148
-
149
-
150
-
151
-
152
-
153
-
154
-
155
-
156
-
157
-
158
-
159
-
160
-
161
-
162
-
163
-
164
-
165
-
166
-
167
-
168
-
169
-
170
-
171
-
172
-
173
-
174
-
175
-
176
-
177
-
178
-
179
-
180
-
181
-
182
-
183
-
184
-
185
-
186
-
187
-
188
-
189
-
190
-
191
-
192
-
193
-
194
-
195
-
196
-
197
-
198
-
199
-
200
-
201
-
202
 |
 |
