Konica Minolta bizhub PRESS C71hc SD-513 User Manual - Page 78
bizhub PRESS C1070/C1070P/C1060/C71hc
 |
View all Konica Minolta bizhub PRESS C71hc manuals
Add to My Manuals
Save this manual to your list of manuals |
Page 78 highlights
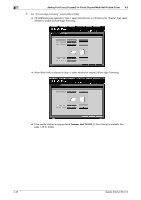
4.6 Adding Fold Lines (Creases) for Fold & Stapled/Multi Half-Folded Cover 4 13 As the cover paper tray, select the tray to which the cover paper has been loaded in step 2. % In bizhub PRESS 1250/1250P/1052, press [Cover Tray Change] to select a tray. % In bizhub PRESS C1070/C1070P/C1060/C71hc or bizhub PRESS C1100/C1085, select a tray in [Cover Tray Setting]. 14 Press [OK] to complete the setting and return to the Copy Screen. 15 Select additional copy conditions, as desired. 16 Enter the desired print quantity from the control panel keypad. % The number of sets that can be output to a bundle exit tray varies depending on the type of paper. See page 2-13 for details. 17 Set up the bundle exit tray extension, and open the stopper. 18 Press Start on the control panel. 4.6.3 Settings in Printer Driver For the printer driver, configure settings separately for the body and cover. See page 4-22 for details on Fold & Staple and Multi Half-Fold. See page 4-30 for details on Crease. dReference See page 4-73 for details on the printer driver functions that are available when this machine is equipped with Saddle Stitcher SD-513. Saddle Stitcher SD-513 4-41
-
 1
1 -
2
-
3
-
4
-
5
-
6
-
7
-
8
-
9
-
10
-
11
-
12
-
13
-
14
-
15
-
16
-
17
-
18
-
19
-
20
-
21
-
22
-
23
-
24
-
25
-
26
-
27
-
28
-
29
-
30
-
31
-
32
-
33
-
34
-
35
-
36
-
37
-
38
-
39
-
40
-
41
-
42
-
43
-
44
-
45
-
46
-
47
-
48
-
49
-
50
-
51
-
52
-
53
-
54
-
55
-
56
-
57
-
58
-
59
-
60
-
61
-
62
-
63
-
64
-
65
-
66
-
67
-
68
-
69
-
70
-
71
-
72
-
 73
73 -
 74
74 -
 75
75 -
 76
76 -
 77
77 -
 78
78 -
 79
79 -
 80
80 -
 81
81 -
 82
82 -
 83
83 -
84
-
85
-
86
-
87
-
88
-
89
-
90
-
91
-
92
-
93
-
94
-
95
-
96
-
97
-
98
-
99
-
100
-
101
-
102
-
103
-
104
-
105
-
106
-
107
-
108
-
109
-
110
-
111
-
112
-
113
-
114
-
115
-
116
-
117
-
118
-
119
-
120
-
121
-
122
-
123
-
124
-
125
-
126
-
127
-
128
-
129
-
130
-
131
-
132
-
133
-
134
-
135
-
136
-
137
-
138
-
139
-
140
-
141
-
142
-
143
-
144
-
145
-
146
-
147
-
148
-
149
-
150
-
151
-
152
-
153
-
154
-
155
-
156
-
157
-
158
-
159
-
160
-
161
-
162
-
163
-
164
-
165
-
166
-
167
-
168
-
169
-
170
-
171
-
172
-
173
-
174
-
175
-
176
-
177
-
178
-
179
-
180
-
181
-
182
-
183
-
184
-
185
-
186
-
187
-
188
-
189
-
190
-
191
-
192
-
193
-
194
-
195
-
196
-
197
-
198
-
199
-
200
-
201
-
202
 |
 |
