Lenovo ThinkPad X60s (English) Service and Troubleshooting Guide - Page 32
Starting, Setup, Utility
 |
View all Lenovo ThinkPad X60s manuals
Add to My Manuals
Save this manual to your list of manuals |
Page 32 highlights
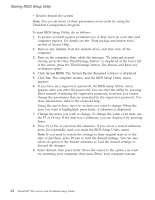
Starting BIOS Setup Utility v Restart: Restart the system. Note: You can set many of these parameters more easily by using the ThinkPad Configuration Program. To start BIOS Setup Utility, do as follows: 1. To protect yourself against accidental loss of data, back up your data and computer registry. For details see the "Data backup-and-restore tools" section of Access Help. 2. Remove any diskette from the diskette drive, and then turn off the computer. 3. Turn on the computer; then, while the message, "To interrupt normal startup, press the blue ThinkVantage button" is displayed at the lower left of the screen, press the ThinkVantage button. The Rescue and Recovery workspace opens. 4. Click Access BIOS. The System Restart Required window is displayed. 5. Click Yes. The computer restarts, and the BIOS Setup Utility menu appears. 6. If you have set a supervisor password, the BIOS Setup Utility menu appears after you enter the password. You can start the utility by pressing Enter instead of entering the supervisor password; however, you cannot change the parameters that are protected by the supervisor password. For more information, refer to the on-board help. Using the cursor keys, move to an item you want to change. When the item you want is highlighted, press Enter. A submenu is displayed. 7. Change the items you wish to change. To change the value of an item, use the F5 or F6 key. If the item has a submenu, you can display it by pressing Enter. 8. Press F3 or Esc to exit from the submenu. If you are in a nested submenu, press Esc repeatedly until you reach the BIOS Setup Utility menu. Note: If you need to restore the settings to their original state as of the time of purchase, press F9 key to load the default settings. You can also select an option in the Restart submenu to load the default settings or discard the changes. 9. Select Restart; then press Enter. Move the cursor to the option you want for restarting your computer; then press Enter. Your computer restarts. 24 ThinkPad® X60 Service and Troubleshooting Guide
-
 1
1 -
2
-
3
-
4
-
5
-
6
-
7
-
8
-
9
-
10
-
11
-
12
-
13
-
14
-
15
-
16
-
17
-
18
-
19
-
20
-
21
-
22
-
23
-
24
-
25
-
26
-
 27
27 -
 28
28 -
 29
29 -
 30
30 -
 31
31 -
 32
32 -
 33
33 -
 34
34 -
 35
35 -
 36
36 -
 37
37 -
38
-
39
-
40
-
41
-
42
-
43
-
44
-
45
-
46
-
47
-
48
-
49
-
50
-
51
-
52
-
53
-
54
-
55
-
56
-
57
-
58
-
59
-
60
-
61
-
62
-
63
-
64
-
65
-
66
-
67
-
68
-
69
-
70
-
71
-
72
 |
 |