Lexmark 25C0010 User's Guide - Page 110
matching tab as you work your way to the front of the printer.
 |
UPC - 734646054492
View all Lexmark 25C0010 manuals
Add to My Manuals
Save this manual to your list of manuals |
Page 110 highlights
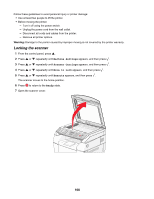
3 Remove the right side cover by starting at the back of the printer and gently pulling each of the four slots off of its matching tab as you work your way to the front of the printer. 4 Remove the left side cover by starting at the back of the printer and gently pulling each of the four slots off of its matching tab as you work your way to the front of the printer. 110
-
 1
1 -
2
-
3
-
4
-
5
-
6
-
7
-
8
-
9
-
10
-
11
-
12
-
13
-
14
-
15
-
16
-
17
-
18
-
19
-
20
-
21
-
22
-
23
-
24
-
25
-
26
-
27
-
28
-
29
-
30
-
31
-
32
-
33
-
34
-
35
-
36
-
37
-
38
-
39
-
40
-
41
-
42
-
43
-
44
-
45
-
46
-
47
-
48
-
49
-
50
-
51
-
52
-
53
-
54
-
55
-
56
-
57
-
58
-
59
-
60
-
61
-
62
-
63
-
64
-
65
-
66
-
67
-
68
-
69
-
70
-
71
-
72
-
73
-
74
-
75
-
76
-
77
-
78
-
79
-
80
-
81
-
82
-
83
-
84
-
85
-
86
-
87
-
88
-
89
-
90
-
91
-
92
-
93
-
94
-
95
-
96
-
97
-
98
-
99
-
100
-
101
-
102
-
103
-
104
-
 105
105 -
 106
106 -
 107
107 -
 108
108 -
 109
109 -
 110
110 -
 111
111 -
 112
112 -
 113
113 -
 114
114 -
 115
115 -
116
-
117
-
118
-
119
-
120
-
121
-
122
-
123
-
124
-
125
-
126
-
127
-
128
-
129
-
130
-
131
-
132
-
133
-
134
-
135
-
136
-
137
-
138
-
139
-
140
-
141
-
142
-
143
-
144
-
145
-
146
-
147
-
148
-
149
-
150
 |
 |

3
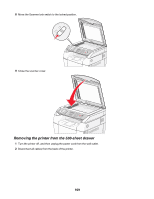
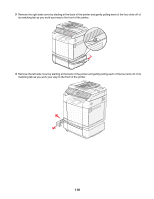
Remove the right side cover by starting at the back of the printer and gently pulling each of the four slots off of
its matching tab as you work your way to the front of the printer.
4
Remove the left side cover by starting at the back of the printer and gently pulling each of the four slots off of its
matching tab as you work your way to the front of the printer.
110