Lexmark 25C0010 User's Guide - Page 54
Collating copies, Canceling a copy job
 |
UPC - 734646054492
View all Lexmark 25C0010 manuals
Add to My Manuals
Save this manual to your list of manuals |
Page 54 highlights
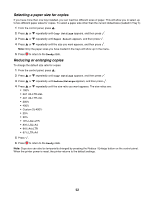
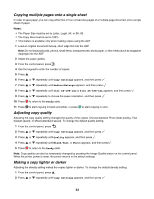
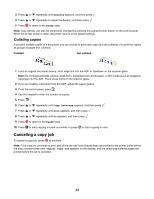
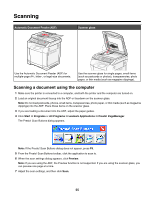
3 Press or repeatedly until Density appears, and then press . 4 Press or repeatedly to adjust the density, and then press . 5 Press to return to the Ready state. Note: Copy density can also be temporarily changed by pressing the Lighter/Darker button on the control panel. When the printer power is reset, the printer returns to the default settings. Collating copies If you print multiple copies of a document, you can choose to print each copy as a set (collated) or to print the copies as groups of pages (not collated). Collated Not collated 1 Load an original document faceup, short edge first into the ADF or facedown on the scanner glass. Note: Do not load postcards, photos, small items, transparencies, photo paper, or thin media (such as magazine clippings) into the ADF. Place these items on the scanner glass. 2 If you are loading a document into the ADF, adjust the paper guides. 3 From the control panel, press . 4 Use the keypad to enter the number of copies. 5 Press . 6 Press or repeatedly until Copy Settings appears, and then press . 7 Press or repeatedly until Sort appears, and then press . 8 Press or repeatedly until On appears, and then press . 9 Press to return to the Ready state. 10 Press to start copying in black and white, or press to start copying in color. Canceling a copy job To cancel a copy job, press at any time. Note: If the copy job continues to print, part of the job may have already been transmitted to the printer buffer before the stop command was sent. Cancel Copy Job appears on the display, and the remaining buffered pages are printed before the job is canceled. 54
-
 1
1 -
2
-
3
-
4
-
5
-
6
-
7
-
8
-
9
-
10
-
11
-
12
-
13
-
14
-
15
-
16
-
17
-
18
-
19
-
20
-
21
-
22
-
23
-
24
-
25
-
26
-
27
-
28
-
29
-
30
-
31
-
32
-
33
-
34
-
35
-
36
-
37
-
38
-
39
-
40
-
41
-
42
-
43
-
44
-
45
-
46
-
47
-
48
-
 49
49 -
 50
50 -
 51
51 -
 52
52 -
 53
53 -
 54
54 -
 55
55 -
 56
56 -
 57
57 -
 58
58 -
 59
59 -
60
-
61
-
62
-
63
-
64
-
65
-
66
-
67
-
68
-
69
-
70
-
71
-
72
-
73
-
74
-
75
-
76
-
77
-
78
-
79
-
80
-
81
-
82
-
83
-
84
-
85
-
86
-
87
-
88
-
89
-
90
-
91
-
92
-
93
-
94
-
95
-
96
-
97
-
98
-
99
-
100
-
101
-
102
-
103
-
104
-
105
-
106
-
107
-
108
-
109
-
110
-
111
-
112
-
113
-
114
-
115
-
116
-
117
-
118
-
119
-
120
-
121
-
122
-
123
-
124
-
125
-
126
-
127
-
128
-
129
-
130
-
131
-
132
-
133
-
134
-
135
-
136
-
137
-
138
-
139
-
140
-
141
-
142
-
143
-
144
-
145
-
146
-
147
-
148
-
149
-
150
 |
 |
