Lexmark 25C0010 User's Guide - Page 67
Understanding the dialing options, Customizing dial settings, Setting the dialing mode
 |
UPC - 734646054492
View all Lexmark 25C0010 manuals
Add to My Manuals
Save this manual to your list of manuals |
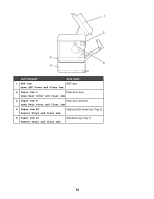
Page 67 highlights
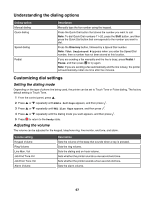
Understanding the dialing options Dialing option Manual dialing Quick dialing Speed dialing Redial Description Manually type the fax number using the keypad. Press the Quick Dial button that stores the number you want to call. Note: To dial Quick Dial numbers 11-20, press the Shift button, and then press the Quick Dial button that corresponds to the number you want to dial. Press the Directory button, followed by a Speed Dial number. Note: If Not Registered # appears when you enter the Speed Dial number, then a number has not been stored at this location. If you are sending a fax manually and the line is busy, press Redial / Pause, and then press to try again. Note: If you are sending a fax automatically and the line is busy, the printer will automatically redial one time after five minutes. Customizing dial settings Setting the dialing mode Depending on the type of phone line being used, the printer can be set to Touch Tone or Pulse dialing. The factory default setting is Touch Tone. 1 From the control panel, press . 2 Press or repeatedly until Admin Settings appears, and then press . 3 Press or repeatedly until TEL Line Type appears, and then press . 4 Press 5 Press or repeatedly until the dialing mode you want appears, and then press . to return to the Ready state. Adjusting the volume The volume can be adjusted for the keypad, telephone ring, line monitor, end tone, and alarm. Volume setting Keypad Volume Ring Volume Line Mon. Vol Job End Tone Vol Job Error Tone Vol Alarm Volume Description Sets the volume of the beep that sounds when a key is pressed. Sets the ring volume. Sets the dialing and on-hook volume. Sets whether the printer sounds a one-second end tone. Sets whether the printer sounds a four-second end tone. Sets the alarm volume. 67
-
 1
1 -
2
-
3
-
4
-
5
-
6
-
7
-
8
-
9
-
10
-
11
-
12
-
13
-
14
-
15
-
16
-
17
-
18
-
19
-
20
-
21
-
22
-
23
-
24
-
25
-
26
-
27
-
28
-
29
-
30
-
31
-
32
-
33
-
34
-
35
-
36
-
37
-
38
-
39
-
40
-
41
-
42
-
43
-
44
-
45
-
46
-
47
-
48
-
49
-
50
-
51
-
52
-
53
-
54
-
55
-
56
-
57
-
58
-
59
-
60
-
61
-
 62
62 -
 63
63 -
 64
64 -
 65
65 -
 66
66 -
 67
67 -
 68
68 -
 69
69 -
 70
70 -
 71
71 -
 72
72 -
73
-
74
-
75
-
76
-
77
-
78
-
79
-
80
-
81
-
82
-
83
-
84
-
85
-
86
-
87
-
88
-
89
-
90
-
91
-
92
-
93
-
94
-
95
-
96
-
97
-
98
-
99
-
100
-
101
-
102
-
103
-
104
-
105
-
106
-
107
-
108
-
109
-
110
-
111
-
112
-
113
-
114
-
115
-
116
-
117
-
118
-
119
-
120
-
121
-
122
-
123
-
124
-
125
-
126
-
127
-
128
-
129
-
130
-
131
-
132
-
133
-
134
-
135
-
136
-
137
-
138
-
139
-
140
-
141
-
142
-
143
-
144
-
145
-
146
-
147
-
148
-
149
-
150
 |
 |
