Lexmark Pro5500t Quick Reference - Page 12
Understanding the parts of the printer, Use
 |
View all Lexmark Pro5500t manuals
Add to My Manuals
Save this manual to your list of manuals |
Page 12 highlights
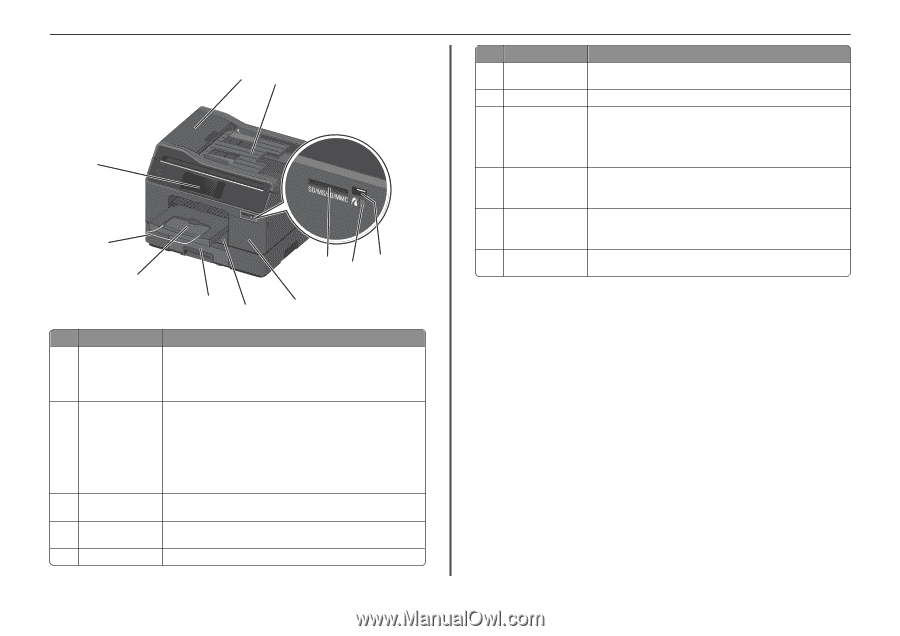
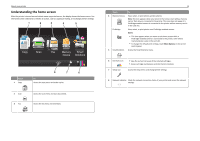
About your printer Understanding the parts of the printer 1 2 11 SD/MS/xD/MMC 10 9 8 7 54 3 6 Use the To 1 Automatic Document • Scan, copy, or fax multiple‑page documents. Feeder (ADF) • Access ADF paper jams. Note: Select printer models allow duplex scanning, copying, or faxing with just a single pass of a page through the ADF. 2 ADF input tray Load original documents into the ADF. Notes: • Do not load postcards, photos, small items, or thin media (such as magazine clippings) into the ADF. Place these items on the scanner glass. • After scanning, copying, or faxing, you can lift the right end of the input tray to retrieve the original documents easily. 3 PictBridge and USB port Connect a PictBridge-enabled digital camera or a flash drive to the printer. 4 Card reader light Check the card reader status. The light comes on when a memory card is inserted and blinks when a memory card is being accessed. 5 Memory card slot Insert a memory card. 12 Use the To 6 Ink cartridge access door Install, remove, or replace ink cartridges. 7 Paper tray (Tray 1) Load paper. 8 Second paper tray Load additional paper. (Tray 2) You can load the same type of paper as in Tray 1. You can also load a different Note: This option is type of paper and change the default paper settings so the printer uses paper available only on from Tray 2 for certain types of print jobs. select printer models. 9 Exit bin Hold paper as it exits. Note: For the printer to be ready for any print job, make sure to fully extend the exit bin and to flip out the bin extender. 10 Bin extender Catch the paper as it exits. Note: For the printer to be ready for any print job, make sure to fully extend the exit bin and to flip out the bin extender. 11 Printer control panel Operate the printer. with touch screen
-
 1
1 -
2
-
3
-
4
-
5
-
6
-
 7
7 -
 8
8 -
 9
9 -
 10
10 -
 11
11 -
 12
12 -
 13
13 -
 14
14 -
 15
15 -
 16
16 -
 17
17 -
18
-
19
-
20
-
21
-
22
-
23
-
24
-
25
-
26
-
27
-
28
-
29
-
30
-
31
-
32
-
33
-
34
-
35
-
36
-
37
-
38
-
39
-
40
-
41
-
42
-
43
-
44
-
45
-
46
-
47
-
48
-
49
-
50
-
51
-
52
-
53
-
54
-
55
 |
 |