Lexmark T652DTN Embedded Web Server Administrator's Guide - Page 13
Configuring Kerberos 5 for use with LDAP+GSSAPI, Creating a simple Kerberos configuration file
 |
UPC - 734646317368
View all Lexmark T652DTN manuals
Add to My Manuals
Save this manual to your list of manuals |
Page 13 highlights
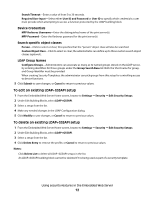
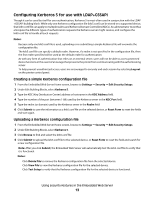
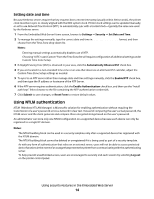
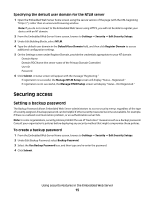
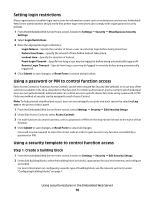
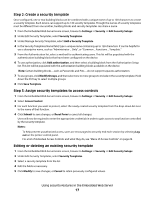
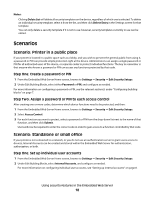
Configuring Kerberos 5 for use with LDAP+GSSAPI Though it can be used by itself for user authentication, Kerberos 5 is most often used in conjunction with the LDAP +GSSAPI building block. While only one Kerberos configuration file (krb5.conf) can be stored on a supported device, that krb5.conf file can apply to multiple realms and Kerberos Domain Controllers (KDCs). An administrator must thus anticipate the different types of authentication requests the Kerberos server might receive, and configure the krb5.conf file to handle all such requests. Notes: • Because only one krb5.conf file is used, uploading or re-submitting a simple Kerberos file will overwrite the configuration file. • The krb5.conf file can specify a default realm. However, if a realm is not specified in the configuration file, then the first realm specified will be used as the default realm for authentication. • As with any form of authentication that relies on an external server, users will not be able to access protected device functions in the event of an outage that prevents the printer from communicating with the authenticating server. • To help prevent unauthorized access, users are encouraged to securely end each session by selecting Log out on the printer control panel. Creating a simple Kerberos configuration file 1 From the Embedded Web Server Home screen, browse to Settings ª Security ª Edit Security Setups. 2 Under Edit Building Blocks, select Kerberos 5. 3 Type the KDC (Key Distribution Center) address or hostname in the KDC Address field. 4 Type the number of the port (between 1-88) used by the Kerberos server in the KDC Port field. 5 Type the realm (or domain) used by the Kerberos server in the Realm field 6 Click Submit to save the information as a krb5.conf file on the selected device, or Reset Form to reset the fields and start again. Uploading a Kerberos configuration file 1 From the Embedded Web Server Home screen, browse to Settings ª Security ª Edit Security Setups. 2 Under Edit Building Blocks, select Kerberos 5. 3 Click Browse to find and select the krb5.conf file. 4 Click Submit to upload the krb5.conf file to the selected device, or Reset Form to reset the field and search for a new configuration file. Note: After you click Submit, the Embedded Web Server will automatically test the krb5.conf file to verify that it is functional. Notes: • Click Delete File to remove the Kerberos configuration file from the selected device. • Click View File to view the Kerberos configuration file for the selected device. • Click Test Setup to verify that the Kerberos configuration file for the selected device is functional. Using security features in the Embedded Web Server 13
-
 1
1 -
2
-
3
-
4
-
5
-
6
-
7
-
 8
8 -
 9
9 -
 10
10 -
 11
11 -
 12
12 -
 13
13 -
 14
14 -
 15
15 -
 16
16 -
 17
17 -
 18
18 -
19
-
20
-
21
-
22
-
23
-
24
-
25
-
26
-
27
-
28
-
29
-
30
-
31
-
32
-
33
-
34
-
35
-
36
-
37
-
38
-
39
-
40
 |
 |