Lexmark T652DTN Embedded Web Server Administrator's Guide - Page 22
Setting certificate defaults, Configuring confidential printing, Download Signing Request
 |
UPC - 734646317368
View all Lexmark T652DTN manuals
Add to My Manuals
Save this manual to your list of manuals |
Page 22 highlights
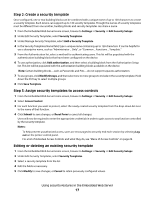
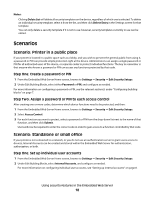
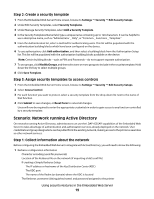
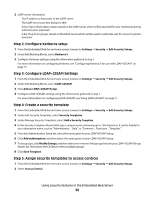
4 From here, you can: • Delete-Remove a previously stored certificate. • Download to File-Download or save the certificate as a .pem file. • Download Signing Request-Download or save the signing request as a .csr file. • Install Signed Certificate-Upload a previously signed certificate. Setting certificate defaults Administrators can set default values for certificates generated for a supported device. The values entered here will be present in all new certificates generated in the Certificate Management task, even though those fields will remain blank on-screen. 1 From the Embedded Web Server Home screen, browse to Settings ª Security ª Certificate Management. 2 Select Set Certificate Defaults. 3 Enter values in the appropriate fields: • Common Name-Type a name for the device (128-character maximum). Note: Leave this field blank to use the domain name for the device. • Organization Name-Type the name of the company or organization issuing the certificate. • Unit Name-Type the name of the unit within the company or organization issuing the certificate. • Country Name-Type the country location for the company or organization issuing the certificate (2-character maximum). • Province Name-Type the name of the province where the company or organization issuing the certificate is located. • City Name-Type the name of the city where the company or organization issuing the certificate is located. • Subject Alternate Name-Type the alternate name and prefix that conforms to RFC 2459. For example, enter an IP address using the format IP:1.2.3.4, or a DNS address using the format DNS:ldap.company.com. Leave this field blank to use the IPv4 address. Note: All fields accept a maximum of 128 characters, except where noted. 4 Click Submit. Configuring confidential printing Users printing confidential or sensitive information may opt to use the confidential print option, which allows print jobs to be PIN-protected so that they remain in the print queue until the user enters a PIN on the operator panel of the device. 1 From the Embedded Web Server Home screen, browse to Settings ª Security ª Confidential Print Setup. 2 Select an option for Max Invalid PIN: • Select 0 to allow users to enter an incorrect PIN as many times as they choose. • Select a value of between 2 and 10 to specify the number of times users can enter an incorrect PIN before being locked out. Using security features in the Embedded Web Server 22
-
 1
1 -
2
-
3
-
4
-
5
-
6
-
7
-
8
-
9
-
10
-
11
-
12
-
13
-
14
-
15
-
16
-
 17
17 -
 18
18 -
 19
19 -
 20
20 -
 21
21 -
 22
22 -
 23
23 -
 24
24 -
 25
25 -
 26
26 -
 27
27 -
28
-
29
-
30
-
31
-
32
-
33
-
34
-
35
-
36
-
37
-
38
-
39
-
40
 |
 |