Lexmark T652DTN Embedded Web Server Administrator's Guide - Page 8
Setting up internal accounts, Defining user groups, Creating user accounts
 |
UPC - 734646317368
View all Lexmark T652DTN manuals
Add to My Manuals
Save this manual to your list of manuals |
Page 8 highlights
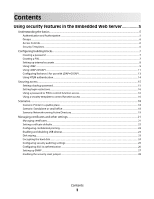
6 Select Admin PIN if the PIN will be used as the Administrator PIN. Note: If an activity is secured by a specific Administrator PIN, then only that PIN will grant access to it. 7 Click Submit. Setting up internal accounts Embedded Web Server administrators can configure one internal account building block per supported device. Each internal account building block can include a maximum of 250 user accounts, and 32 user groups. The internal accounts building block can be used by itself in a security template to provide authentication-level security, or in conjunction with one or more groups to provide both authentication and authorization. Defining user groups If using groups for authorization, define them prior to creating new internal accounts. 1 From the Embedded Web Server Home screen, browse to Settings ª Security ª Edit Security Setups. 2 Under Edit Building Blocks, select Internal Accounts. 3 Select Setup groups for use with internal accounts. 4 Type the Group Name. Note: Group names can contain up to 128 UTF-8 characters. 5 Click Add. 6 Repeat steps 4 through 5 to add additional user groups. Note: When creating groups, it is helpful to first make a list of all users, and then determine which device functions -such as printing, scanning, and copying-will be needed by all users, and which functions will be needed only by certain users. Each group will fulfill a role once combined into a security template, and users can be assigned to more than one group (or role), in order to grant them access to all needed functions. Creating user accounts 1 From the Embedded Web Server Home screen, browse to Settings ª Security ª Edit Security Setups. 2 Under Edit Building Blocks, select Internal Accounts. 3 Select Add an Internal Account, and then provide the information needed for each account: • Account Name-Type the user's account name (example: "Jack Smith"). You can use up to 128 UTF-8 characters. • User ID-Type an ID for the account (example: "jsmith"). You can use up to 128 UTF-8 characters. • Password-Type a password of between 8 and 128 characters. • Re-enter Password-Type the password entered in the field above. • E-mail-Type the user's E-mail address (example: "[email protected]"). • Groups-Select the groups to which the account belongs. Hold down the Ctrl key to select multiple groups for the account. 4 Click Submit to save the new account, or Cancel to return to the Manage Internal Accounts menu without storing the new account. Using security features in the Embedded Web Server 8
-
 1
1 -
2
-
 3
3 -
 4
4 -
 5
5 -
 6
6 -
 7
7 -
 8
8 -
 9
9 -
 10
10 -
 11
11 -
 12
12 -
 13
13 -
14
-
15
-
16
-
17
-
18
-
19
-
20
-
21
-
22
-
23
-
24
-
25
-
26
-
27
-
28
-
29
-
30
-
31
-
32
-
33
-
34
-
35
-
36
-
37
-
38
-
39
-
40
 |
 |