Lexmark X264 User's Guide - Page 73
Adjusting copy quality, Collating copies, Content, Text/Photo, Photo, Options
 |
View all Lexmark X264 manuals
Add to My Manuals
Save this manual to your list of manuals |
Page 73 highlights
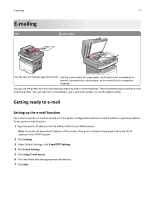
Copying 73 6 Press . 7 Press . 8 If you placed the document on the scanner glass and have additional pages to copy, then place the next page on the scanner glass, and then press 1 on the keypad. Otherwise, press 2 on the keypad. 9 Press to return to Ready. Adjusting copy quality 1 Load an original document faceup, short edge first into the ADF or facedown on the scanner glass. Note: Do not load postcards, photos, small items, transparencies, photo paper, or thin media (such as magazine clippings) into the ADF. Place these items on the scanner glass. 2 If you are loading a document into the ADF, then adjust the paper guides. 3 From the printer control panel, press the Copy button. 4 Press the Content button until the light comes on next to the setting that best represents what you are copying: • Text-Used for original documents that are mostly text or line art • Text/Photo-Used when the original documents are a mixture of text and graphics or pictures • Photo-Used when the original document is a high-quality photograph or inkjet print 5 Press . 6 If you placed the document on the scanner glass and have additional pages to copy, then place the next page on the scanner glass, and then press 1 on the keypad. Otherwise, press 2 on the keypad. 7 Press to return to Ready. Collating copies If you print multiple copies of a document, then you can choose to print each copy as a set (collated) or to print the copies as groups of pages (not collated). Collated Not collated If you want to collate your copies, then select On. If you do not want to collate your copies, then select Off. To select a Collate setting: 1 Load an original document faceup, short edge first into the ADF or facedown on the scanner glass. Note: Do not load postcards, photos, small items, transparencies, photo paper, or thin media (such as magazine clippings) into the ADF. Place these items on the scanner glass. 2 If you are loading a document into the ADF, then adjust the paper guides. 3 From the printer control panel, press the Copy button. 4 Press the Options button.
-
 1
1 -
2
-
3
-
4
-
5
-
6
-
7
-
8
-
9
-
10
-
11
-
12
-
13
-
14
-
15
-
16
-
17
-
18
-
19
-
20
-
21
-
22
-
23
-
24
-
25
-
26
-
27
-
28
-
29
-
30
-
31
-
32
-
33
-
34
-
35
-
36
-
37
-
38
-
39
-
40
-
41
-
42
-
43
-
44
-
45
-
46
-
47
-
48
-
49
-
50
-
51
-
52
-
53
-
54
-
55
-
56
-
57
-
58
-
59
-
60
-
61
-
62
-
63
-
64
-
65
-
66
-
67
-
 68
68 -
 69
69 -
 70
70 -
 71
71 -
 72
72 -
 73
73 -
 74
74 -
 75
75 -
 76
76 -
 77
77 -
 78
78 -
79
-
80
-
81
-
82
-
83
-
84
-
85
-
86
-
87
-
88
-
89
-
90
-
91
-
92
-
93
-
94
-
95
-
96
-
97
-
98
-
99
-
100
-
101
-
102
-
103
-
104
-
105
-
106
-
107
-
108
-
109
-
110
-
111
-
112
-
113
-
114
-
115
-
116
-
117
-
118
-
119
-
120
-
121
-
122
-
123
-
124
-
125
-
126
-
127
-
128
-
129
-
130
-
131
-
132
-
133
-
134
-
135
-
136
-
137
-
138
-
139
-
140
-
141
-
142
-
143
-
144
-
145
-
146
-
147
-
148
-
149
-
150
-
151
-
152
-
153
-
154
-
155
-
156
-
157
-
158
-
159
-
160
-
161
-
162
-
163
-
164
-
165
-
166
-
167
-
168
-
169
-
170
-
171
-
172
-
173
-
174
-
175
-
176
-
177
-
178
-
179
-
180
-
181
-
182
-
183
-
184
-
185
-
186
-
187
-
188
-
189
-
190
-
191
-
192
-
193
-
194
-
195
-
196
-
197
-
198
-
199
-
200
-
201
-
202
-
203
-
204
-
205
-
206
-
207
-
208
-
209
-
210
-
211
-
212
-
213
-
214
-
215
-
216
-
217
-
218
-
219
-
220
-
221
-
222
-
223
-
224
-
225
-
226
-
227
-
228
-
229
-
230
-
231
-
232
-
233
-
234
-
235
 |
 |
