Lexmark X264 User's Guide - Page 81
Faxing, Getting the printer ready to fax, Initial fax setup
 |
View all Lexmark X264 manuals
Add to My Manuals
Save this manual to your list of manuals |
Page 81 highlights
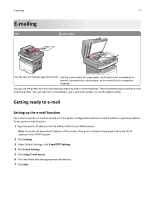
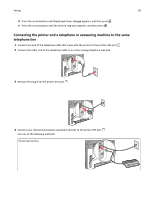
Faxing 81 Faxing ADF Scanner glass Use the ADF for multiple‑page documents. Use the scanner glass for single pages, small items (such as postcards or photos), transparencies, photo paper, or thin media (such as magazine clippings). Getting the printer ready to fax Only select printer models have fax capability. The following connection methods may not be applicable in all countries or regions. CAUTION-SHOCK HAZARD: Do not use the fax feature during a lightning storm. Do not set up this product or make any electrical or cabling connections, such as the fax feature, power cord, or telephone, during a lightning storm. Initial fax setup Many countries and regions require outgoing faxes to contain the following information in a margin at the top or bottom of each transmitted page, or on the first page of the transmission: station name (identification of the business, other entity, or individual sending the message) and station number (telephone number of the sending fax machine, business, other entity, or individual). To enter your fax setup information, use the printer control panel, or use your browser to access the Embedded Web Server and then enter the Settings menu. Note: If you do not have a TCP/IP environment, then you must use the printer control panel to enter your fax setup information. Using the printer control panel for fax setup When the printer is turned on for the first time or if the printer has been off for an extended time, a series of start‑up screens appear. If the printer has fax capabilities, then the following screens appear: Station Name Station Number Note: The Station Name and Station Number must be set before a fax can be sent from the printer.
-
 1
1 -
2
-
3
-
4
-
5
-
6
-
7
-
8
-
9
-
10
-
11
-
12
-
13
-
14
-
15
-
16
-
17
-
18
-
19
-
20
-
21
-
22
-
23
-
24
-
25
-
26
-
27
-
28
-
29
-
30
-
31
-
32
-
33
-
34
-
35
-
36
-
37
-
38
-
39
-
40
-
41
-
42
-
43
-
44
-
45
-
46
-
47
-
48
-
49
-
50
-
51
-
52
-
53
-
54
-
55
-
56
-
57
-
58
-
59
-
60
-
61
-
62
-
63
-
64
-
65
-
66
-
67
-
68
-
69
-
70
-
71
-
72
-
73
-
74
-
75
-
 76
76 -
 77
77 -
 78
78 -
 79
79 -
 80
80 -
 81
81 -
 82
82 -
 83
83 -
 84
84 -
 85
85 -
 86
86 -
87
-
88
-
89
-
90
-
91
-
92
-
93
-
94
-
95
-
96
-
97
-
98
-
99
-
100
-
101
-
102
-
103
-
104
-
105
-
106
-
107
-
108
-
109
-
110
-
111
-
112
-
113
-
114
-
115
-
116
-
117
-
118
-
119
-
120
-
121
-
122
-
123
-
124
-
125
-
126
-
127
-
128
-
129
-
130
-
131
-
132
-
133
-
134
-
135
-
136
-
137
-
138
-
139
-
140
-
141
-
142
-
143
-
144
-
145
-
146
-
147
-
148
-
149
-
150
-
151
-
152
-
153
-
154
-
155
-
156
-
157
-
158
-
159
-
160
-
161
-
162
-
163
-
164
-
165
-
166
-
167
-
168
-
169
-
170
-
171
-
172
-
173
-
174
-
175
-
176
-
177
-
178
-
179
-
180
-
181
-
182
-
183
-
184
-
185
-
186
-
187
-
188
-
189
-
190
-
191
-
192
-
193
-
194
-
195
-
196
-
197
-
198
-
199
-
200
-
201
-
202
-
203
-
204
-
205
-
206
-
207
-
208
-
209
-
210
-
211
-
212
-
213
-
214
-
215
-
216
-
217
-
218
-
219
-
220
-
221
-
222
-
223
-
224
-
225
-
226
-
227
-
228
-
229
-
230
-
231
-
232
-
233
-
234
-
235
 |
 |
