Lexmark X925 Lexmark Document Producer
Lexmark X925 Manual
 |
View all Lexmark X925 manuals
Add to My Manuals
Save this manual to your list of manuals |
Lexmark X925 manual content summary:
- Lexmark X925 | Lexmark Document Producer - Page 1
Document Producer 4.6.02 Administrator's Guide October 2011 www.lexmark.com - Lexmark X925 | Lexmark Document Producer - Page 2
Lexmark Document Distributor system 6 System components ...6 Lexmark Management Console ...7 Supported printers...7 Installing Lexmark system 37 Using Lexmark Management Console...37 Accessing Lexmark Management Console...37 Changing the administrator user name ...38 Changing the administrator - Lexmark X925 | Lexmark Document Producer - Page 3
existing server ...49 Adding an MFP, e‑forms virtual printer, or software client license to an existing server 51 Re‑hosting licenses ...53 Viewing logs 54 Viewing installation logs...54 Viewing the server log...54 Troubleshooting 55 Solving problems with LMC...55 The browser displays a 5yy error - Lexmark X925 | Lexmark Document Producer - Page 4
Contents 4 Notices...58 Edition notice...58 Index...62 - Lexmark X925 | Lexmark Document Producer - Page 5
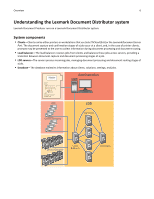
network. Lexmark Document Producer is used with a Lexmark Document Distributor (LDD) system. For more information, see the Lexmark Document Distributor Administrator's Guide, available at http://support.lexmark solution to be installed automatically when the e‑forms virtual printer, or software - Lexmark X925 | Lexmark Document Producer - Page 6
or workstations that use Select'N'Send (SnS) or the Lexmark Document Server Port. The document capture and confirmation stages of a job occur at a client, and, in the case of printer clients, prompts may be presented to the user to collect information during document processing and document routing - Lexmark X925 | Lexmark Document Producer - Page 7
for Lexmark Document Distributor. LMC is a Web application hosted on the LDD servers and accessed through the computer where the load balancer is installed. LMC is accessible from anywhere on the network using a Flash plug‑in with Internet Explorer or Mozilla Firefox. Supported printers Notes - Lexmark X925 | Lexmark Document Producer - Page 8
or "W") models in Lexmark Management Console. Scanning functionality is not affected. 2 These printers may require additional memory to support eSF applications. 3 Supports Simplified Chinese prompting 4 Supports Traditional Chinese prompting 5 Supports Korean prompting 6 Supports Japanese prompting - Lexmark X925 | Lexmark Document Producer - Page 9
• AuthenticationPrompt (requires a supported card reader) • BooleanPrompt • IntegerPrompt • ListPrompt • MessagePrompt • NumericPrompt • PasswordPrompt • StringPrompt 1 Single‑function printers do not support all prompts supported by multifunction printers. Lists of supported prompts are included - Lexmark X925 | Lexmark Document Producer - Page 10
• C7922 • C9252 • C9502 Notes: • These printers support Simplified Chinese, Traditional Chinese, Korean, and Japanese prompting. • For more information about the latest device and firmware level support with LDD, see the Readme file. Supported prompts • ArrayPrompt • BooleanPrompt • IntegerPrompt - Lexmark X925 | Lexmark Document Producer - Page 11
Installing Lexmark Document Distributor 11 Installing Lexmark Document Distributor Minimum and recommended system . 2GHz dual‑core Dual 2.5GHz quad-core Intel Xeon or AMD Opteron RAM Hard disk drive 2GB 4GB 20GB free space for each system Configuration 1‑N, X‑N, or X‑Y‑N: component - Lexmark X925 | Lexmark Document Producer - Page 12
DNS. • Contact Lexmark Professional Services for support of other network systems. • The database must have a static IP Static IP addresses are recommended address if it is installed on a cluster. for all system components and any • The load balancer must have a static e‑Task printers used with the - Lexmark X925 | Lexmark Document Producer - Page 13
an active/passive or active/active clustered print server with the Lexmark Document Server Printer Port. • 32-bit Enterprise Editions of Windows Server support Citrix Presentation Server 4.0. Avoiding conflicts with other software • Install each system component on a computer with a new Windows - Lexmark X925 | Lexmark Document Producer - Page 14
Installing Lexmark Document Distributor 14 Component Load balancer Server Printer Software clients Port 4113 9700 9705 9780 4111 5111 8009 9743 9780 9788 79 161 5000 5353 6000 6100 6110 9100 9300 9500 9780 9788 Protocol Function TCP Web adapter (JMX) TCP Profile submission to e-Task printers - Lexmark X925 | Lexmark Document Producer - Page 15
ID of each node in the cluster and made available on the shared drive. • Before installing the LDD load balancer, the appropriate licenses must be activated. Activation associates the server license, each printer license, and, if applicable, a client license with the physical address of the load - Lexmark X925 | Lexmark Document Producer - Page 16
Installing Lexmark Document Distributor 16 6 Activate and download the license for your LDD server system: a Select the line for the product Lexmark Document Distributor (LDD) Server, and then click Activate. b In the first Host ID field, enter the host ID determined in step 3. c In the Fulfill - Lexmark X925 | Lexmark Document Producer - Page 17
Installing Lexmark Document Distributor 17 7 Activate and download the license for using LDD with your printers: a Select the line for the product Lexmark Document Distributor (LDD) MFP License, and then click Activate. b In the first Host ID field, type the host ID determined in step 3. c In the - Lexmark X925 | Lexmark Document Producer - Page 18
Installing Lexmark Document Distributor 18 8 If you are using e‑forms, then activate and download the license for e‑forms virtual printers: a Select the line for the product Lexmark Document Distributor (LDD) EFVP License, and then click Activate. b In the first Host ID field, type the host ID - Lexmark X925 | Lexmark Document Producer - Page 19
system An enterprise system is used for Document Producer installations. Configuration types for enterprise systems When installing an enterprise system, Lexmark Document Distributor can be installed using the following hardware configurations: Configuration Description Advantages 1‑N Database - Lexmark X925 | Lexmark Document Producer - Page 20
Installing Lexmark Document Distributor 20 Configuration Description 1‑1‑N Database (DB) and load balancer (LB) on separate computers, server on one or more additional computers Server(s) LB Advantages Further - Lexmark X925 | Lexmark Document Producer - Page 21
servers. Note: Multiple servers should not be installed at the same time. Let each server installation complete before beginning another server installation. 4 Change the administrator password. You can also change the administrator user name. 5 Temporarily set servers online to test function - Lexmark X925 | Lexmark Document Producer - Page 22
Installing Lexmark Document Distributor 22 Consider the following example: • Each server in your system can process 3000 jobs per hour using the solution. • There is capacity for 300 printers in your system. • Each printer with average execution time below 30 Lexmark Document Distributor SDK Guide - Lexmark X925 | Lexmark Document Producer - Page 23
sure to follow the correct time‑stamp format when configuring time‑stamp parameters. Installing the database and load balancer without clustering (configurations 1, 1‑N, and 1‑1‑N) Installing the database Note: If you are installing an Oracle database, then do not install the LDD database. Do the - Lexmark X925 | Lexmark Document Producer - Page 24
you must uninstall, and then reinstall the load balancer, or contact Lexmark Professional Services to assist in modifying your current installation. For more information about changing the IP address of a Configuration 1 system, see "Changing the IP address on a configuration 1 system" on page 45 - Lexmark X925 | Lexmark Document Producer - Page 25
node of the failover cluster that will run the database: 1 From the LDD installation package, run Setup.exe. 2 From the Lexmark Solutions installation window, click Install Enterprise System > Install Database. 3 Click Agree to accept the license agreement. 4 Specify a location on a shared cluster - Lexmark X925 | Lexmark Document Producer - Page 26
. If the database is moved, then you must uninstall, and then reinstall the load balancer, or contact Lexmark Professional Services to assist in modifying your current installation. 8 Select the type of database, and then click Next. Note: If you are using an Oracle database, then make sure - Lexmark X925 | Lexmark Document Producer - Page 27
User Account Control dialog appears, then confirm that you want to start the command prompt as an administrator, and then click Continue. d From the command prompt window, change . 5 Allow the installation to complete, and then click OK. The configured cluster contains the necessary Lexmark services. - Lexmark X925 | Lexmark Document Producer - Page 28
Lexmark Professional Services to assist in modifying your current installation. For more information about changing the IP address of a Configuration 1 system, see "Changing GSS IP address only if all the printers in the LDD system are e ‑Task 2 or later. GSS is not supported in e ‑Task and earlier - Lexmark X925 | Lexmark Document Producer - Page 29
Installing Lexmark Document Distributor 29 11 Click Finish. 12 Allow the installation to complete, and then click Done. After all servers are installed, log on to LMC, then change the administrator password, and then set the servers online. - Lexmark X925 | Lexmark Document Producer - Page 30
30 Administration of Lexmark Document Producer Uploading forms printer can print, e‑mail, or save the results, or run a script using the input data. 1 If necessary, install e‑forms virtual printer that other applications using the network are not using the selected port number. • Communication using the - Lexmark X925 | Lexmark Document Producer - Page 31
print job that is processed by the forms printer. 3 Select the settings for duplex, paper type, paper size, and orientation. 4 Select the appropriate printer type for your output printer: Printer type Description Printer support Relative speed Lexmark PCL Sends jobs using PCL data All models - Lexmark X925 | Lexmark Document Producer - Page 32
of Lexmark Document Producer 32 Printer type Description Printer support Lexmark printer with PDF support Lexmark printer with PDF and page formatting support Sends jobs using unformatted PDF Specific models data and PJL commands Sends jobs using formatted PDF data Specific models - Lexmark X925 | Lexmark Document Producer - Page 33
Administration of Lexmark Document Producer 33 Notes: • If servers are installed on computers other than the load balancer, then do not use the load balancer address or LDD system address. • You can use Windows printer pooling with multiple servers in the system for failover. 6 Type a descriptive - Lexmark X925 | Lexmark Document Producer - Page 34
\. 3 Open SpoolIt.properties in a text editor, and then change these settings as necessary: a Set printer to the name of the print queue. For example: printer=my Local Queue or printer=\\myServer\my Remote Queue b Set numJobs to the number of times the input file should be sent. c Set dataFile to - Lexmark X925 | Lexmark Document Producer - Page 35
Administration of Lexmark Document Producer 35 Using directives in merge data You can include the following directives in the merge data to override activation conditions and other settings - Lexmark X925 | Lexmark Document Producer - Page 36
Administration of Lexmark Document Producer 36 Directive Effect Overrides Valid location #!DEFAULT_FORM_NAMES= (1, PPF_file_name_1), (2, PPF_file_name_2)...!# Specifies the page numbers of the forms from the specified formset to create from - Lexmark X925 | Lexmark Document Producer - Page 37
is the computer where the chosen server is installed. • It may take several minutes to start all services after the LDD system boots. If LMC cannot upgrade manually by visiting the Adobe Web site. 2 Enter the administrator user name and password, and then click Login. Notes: • The default user name - Lexmark X925 | Lexmark Document Producer - Page 38
from the System list. 3 Type the new user name. 4 Re‑type the new user name to confirm it. 5 Click Apply. Changing the administrator password 1 Click the System tab. ou=Employees. 7 Do the following to filter the search to users in specific groups: a In the Group Search Filter field, type the - Lexmark X925 | Lexmark Document Producer - Page 39
contains the attribute uniquemember: uid=testuser,ou=Employees,o=MyOrganization. - The object class is groupOfNames . - The correct password is supplied for the user. 8 Select an authentication method: • If the LDAP server accepts anonymous connections, then select Anonymous. • If the LDAP server - Lexmark X925 | Lexmark Document Producer - Page 40
group privileges are combined. Privileges can be modified for LDAP users only. The default administrator has access to all tabs and tasks is allowed to access and perform. When assigning privileges, you can select specific tasks under each tab. 4 Click Save Privileges to save settings. Finding - Lexmark X925 | Lexmark Document Producer - Page 41
do not have a license available in the system Missing Displays the number of previously discovered printers that are no longer responding on the network Out of Policy Displays the number of discovered printers known to have settings different from profiles required by solutions deployed to those - Lexmark X925 | Lexmark Document Producer - Page 42
remove a previously applied filter, click Reset Filter, and then click Refresh. Note: You can also view jobs and logs for specific solutions or printers through the Jobs and Log tasks on set the jobs list to automatically refresh on a timed interval, select the Auto Refresh option, and then select - Lexmark X925 | Lexmark Document Producer - Page 43
forms that are installed along with the solution. 1 Click the Solutions tab. 2 Select a solution from the Solutions list. 3 Select EForms from the Tasks list. Viewing version information You can view version numbers for all LDD components, which may help you to troubleshoot problems and make sure - Lexmark X925 | Lexmark Document Producer - Page 44
must be installed manually. If the new server is left without the same services as existing servers, any jobs that use the solution that is missing services on the new server will fail. 1 Add the computer where the server will be installed on the network, and make sure the time is synchronized - Lexmark X925 | Lexmark Document Producer - Page 45
of the local computer, and then press Enter. 3 The desktop shortcut must be changed to the new address manually: a On the desktop of the computer where the components are installed, right click the Lexmark Management Console (LMC) icon, and then click Properties. b Click Find Target. c In the - Lexmark X925 | Lexmark Document Producer - Page 46
service, any solution‑related file in the \Lexmark \Solutions\apps\wf-ldss\ or \Lexmark\Solutions\apps\wf-ldss\solutions folders, such as a property file for a solution, is reverted to the version stored with the solution package as it was initially installed or upgraded, and any manual changes - Lexmark X925 | Lexmark Document Producer - Page 47
server goes offline. • If a server does not change from the status setting offline after all jobs have drive where LDD components are installed. b In the Cluster Administrator, move all cluster resources to the primary node where the LDD components are originally installed. c Stop the cluster service - Lexmark X925 | Lexmark Document Producer - Page 48
the Services tab. 2 Select Email from the Services list. 3 Select Parameters from the Tasks list. 4 Type the password and user ID installation files, or if you have multiple host IDs and want to determine which is associated with the network adapter connected to the same network as your printers, - Lexmark X925 | Lexmark Document Producer - Page 49
or download, and then click View Licenses. 5 To download the license file, click Save To File. 6 To return to the start page of the Lexmark Licensing Portal, click Complete. Upgrading the license of an existing server Note: Back up your current license files before updating with new files. 1 Open - Lexmark X925 | Lexmark Document Producer - Page 50
Monitoring and maintaining the system 50 4 Select the line for the product Lexmark Document Distributor (LDD) Server License that indicates one or more licenses in the Copies Left column, and then click Activate. 5 In the Host ID field, - Lexmark X925 | Lexmark Document Producer - Page 51
that indicates one or more licenses in the Copies Left column, and then click Activate. • For an e‑forms virtual printer license, select the line for the product Lexmark Document Distributor (LDD) EFVP License that indicates one or more licenses in the Copies Left column, and then click Activate - Lexmark X925 | Lexmark Document Producer - Page 52
the host ID" on page 48. 6 Type the number of printers, virtual printers, or software clients associated with the current server in the Fulfill Count Note: The server automatically adds a time stamp to the file name of new licenses as they are installed, so existing licenses are not overwritten if - Lexmark X925 | Lexmark Document Producer - Page 53
transferred to a new computer, then printers are moved to a different server system, or the network adapter is changed hosting only some of the printer licenses, then you must replace the license file on license, and a second time for all printer licenses. 10 Launch Lexmark Management Console for the - Lexmark X925 | Lexmark Document Producer - Page 54
file lsas.log in the folder Lexmark\Solutions\tomcat \logs where the server is installed. Open the file in a text editor to view the log. The default message severity for recording is warn. When troubleshooting a problem, the message priority can be changed to debug to capture all available messages - Lexmark X925 | Lexmark Document Producer - Page 55
Troubleshooting 55 Troubleshooting Solving problems with LMC The browser displays a 5yy error when accessing LMC When services are starting on the LDD system or the system is under a heavy processing load, your browser may display a 5yy error, such as "500 Internal Server Error" or "503 Service - Lexmark X925 | Lexmark Document Producer - Page 56
which the user belongs. For more information, see "Assigning privileges to groups" on page 39. Solving server problems One or more installation, see "Adding an MFP, e‑forms virtual printer, or software client license to an existing server" on page 51. • Check your proxy, firewall, and other network - Lexmark X925 | Lexmark Document Producer - Page 57
Troubleshooting 57 One or more servers cannot be set offline From the Windows Services control panel, make sure the Lexmark Solutions Apache Agent service is is used for the database when installing the load balancer. Note that when the load balancer is installed on the same computer as the - Lexmark X925 | Lexmark Document Producer - Page 58
in conjunction with other products, programs, or services, except those expressly designated by the manufacturer, are the user's responsibility. For Lexmark technical support, visit support.lexmark.com. For information on supplies and downloads, visit www.lexmark.com. If you don't have access to - Lexmark X925 | Lexmark Document Producer - Page 59
/or other materials provided with the distribution. 3 The end-user documentation included with the redistribution, if any, must include the DAMAGES (INCLUDING, BUT NOT LIMITED TO, PROCUREMENT OF SUBSTITUTE GOODS OR SERVICES; LOSS OF USE, DATA, OR PROFITS; OR BUSINESS INTERRUPTION) HOWEVER CAUSED - Lexmark X925 | Lexmark Document Producer - Page 60
have made, use, offer to sell, sell, import, and otherwise transfer the Work, where such license applies only to those patent claims licensable b (b) You must cause any modified files to carry prominent notices stating that You changed the files; and c (c) You must retain, in the Source form of any - Lexmark X925 | Lexmark Document Producer - Page 61
use the trade names, trademarks, service marks, or product names of the a fee for, acceptance of support, warranty, indemnity, or other the fields enclosed by brackets "[]" replaced with your own identifying information. (Don specific language governing permissions and limitations under the License. - Lexmark X925 | Lexmark Document Producer - Page 62
A accessing Lexmark Management Console 37 accessing LMC troubleshooting 55 activating LDD licenses 15 activation conditions overriding 35 adding an e‑forms virtual printer license to an existing server 51 adding an MFP license to an existing server 51 adding servers after initial installation 44 - Lexmark X925 | Lexmark Document Producer - Page 63
setting online or offline 44 troubleshooting 57 upgrading licenses 49 viewing and changing status 44 servers cannot be set offline 57 servers cannot be set online 56 services configuring connection to an SMTP server 48 setting server status 44 single‑function printers supported by LDD 7 SMTP server - Lexmark X925 | Lexmark Document Producer - Page 64
21 system sizing guidelines 21 system status Home tab 41 System tab changing the administrator user name 38 viewing and changing server status 44 T test jobs sending 34 troubleshooting 500 Internal Server Error 55 503 Service Unavailable 55 browser displays 5yy error when accessing LMC 55 data is
-
 1
1 -
 2
2 -
 3
3 -
 4
4 -
 5
5 -
 6
6 -
 7
7 -
8
-
9
-
10
-
11
-
12
-
13
-
14
-
15
-
16
-
17
-
18
-
19
-
20
-
21
-
22
-
23
-
24
-
25
-
26
-
27
-
28
-
29
-
30
-
31
-
32
-
33
-
34
-
35
-
36
-
37
-
38
-
39
-
40
-
41
-
42
-
43
-
44
-
45
-
46
-
47
-
48
-
49
-
50
-
51
-
52
-
53
-
54
-
55
-
56
-
57
-
58
-
59
-
60
-
61
-
62
-
63
-
64
 |
 |

Document Producer 4.6.02
Administrator's Guide
October 2011
www.lexmark.com