Lexmark X925 Lexmark Document Producer - Page 23
Using Oracle database with LDD
 |
View all Lexmark X925 manuals
Add to My Manuals
Save this manual to your list of manuals |
Page 23 highlights
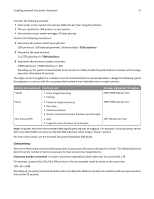
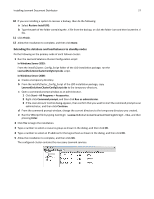
Installing Lexmark Document Distributor 23 Using Oracle database with LDD If you are using Oracle as the back-end database, then make sure: • The Oracle database 10g or later is completely installed before proceeding with the LDD installation. • LDD system components are not installed on the server running Oracle. • The internal LDD database is not installed. For LDD to work with Oracle, six databases should be created before the load balancer and server are installed. To help the database administrator create these databases, LDD includes the following in the installation package: • Database templates-These are Database Configuration Assistant (DBCA) templates used to create LDD databases. Your database administrator can launch these templates through DBCA, and then configure parameter settings as needed. • Scripts-These are user configuration scripts for adding users. Users are added to access and manage LDD databases. • Pfiles-These files contain information about the database configuration parameters. The values of database configuration parameters may vary, except the parameter value for nls_timestamp_format and nls_timestamp_tz_format of the MONITOR database. These parameters should have the following values: nls_timestamp_format string YYYY-MM-DD HH24:MI:SS:FF3 nls_timestamp_tz_format string YYYY-MM-DD HH24:MI:SS:FF3 Note: Make sure to follow the correct time‑stamp format when configuring time‑stamp parameters. Installing the database and load balancer without clustering (configurations 1, 1‑N, and 1‑1‑N) Installing the database Note: If you are installing an Oracle database, then do not install the LDD database. Do the following on the computer that will run the database: 1 From the LDD installation package, run Setup.exe. 2 From the Lexmark Solutions installation window, click Install Enterprise System > Install Database. 3 Click Agree to accept the license agreement. 4 If necessary, specify a location for the installation, and then click Next. Note: The installation path cannot contain double‑byte characters. 5 Select the IP address of the computer that will run the database. 6 If you want to use only IP addresses for a system without reliable DNS, then select IP address only install, and then click Next. 7 If you are installing a system to recover a backup, then do the following: a Select Restore Install (RI). b Type the path of the folder containing the .ri file from the backup, or click the folder icon, and then locate the .ri file.
-
 1
1 -
2
-
3
-
4
-
5
-
6
-
7
-
8
-
9
-
10
-
11
-
12
-
13
-
14
-
15
-
16
-
17
-
 18
18 -
 19
19 -
 20
20 -
 21
21 -
 22
22 -
 23
23 -
 24
24 -
 25
25 -
 26
26 -
 27
27 -
 28
28 -
29
-
30
-
31
-
32
-
33
-
34
-
35
-
36
-
37
-
38
-
39
-
40
-
41
-
42
-
43
-
44
-
45
-
46
-
47
-
48
-
49
-
50
-
51
-
52
-
53
-
54
-
55
-
56
-
57
-
58
-
59
-
60
-
61
-
62
-
63
-
64
 |
 |