Maytag MDB4629AWS Installation Instructions - Page 10
a U.L.-Hsted/CSAocertified
 |
UPC - 883049187891
View all Maytag MDB4629AWS manuals
Add to My Manuals
Save this manual to your list of manuals |
Page 10 highlights
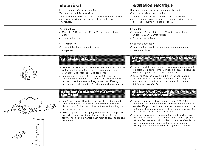
m m 3ao 6" (1B.2 cm) 4ao Run wire into house vvMng junction box. Use strain relief method provided with junction box. if no strain relief is provided, install a U.L.-Hsted/CSAocertified champ connector for flexiMe-type wire. ff installing conduit, attach a U.L.iisted/CSA-certified conduit connector to junction box. Run other end of wire through cabinet hole. Cable must extend to the right front of cabinet opening. Go to step 6. Faire passer HecSbie dans Habotte de connexion. UfiHser He serre-c_Me fourni avec Habo_te de connexion. Si un serre-c_Ne n'est pas fourni, installer un serre-fil homologu6 U.L./CSA pour c_bb flexible. Si les conducteurs d'alimentation sont plac6s dans un conduit, installer un connecteur de conduit homologu6 U.LJCSA sur la boi'te de connexion. Faire passer I'autre extremit6 du c_ble dans le trou du phcard. Le c_ble doit se rendre jusqu'_ I'avant du c6te droit de I'ouverture prevue pour le hve-vaisselle. Passer 1'6tape 6. Cut a 1-1/2" (3.8 cm) hole _) in right-hand side. Optional locations are shown. Wood cabinet: Sand hole until smooth. cabinet rear or Metal cabinet: Cover hob with Grommet (Part No. 302797) supplied with the power supply cord kit. Percer un trou de 3,8 cm (1 1/2 po) @ dans le placard du c6te droit de I'ouverture, a I'arriere ou dans le plancher. Les ouvertures facultatives sont indiquees. Placard en bois : poncer le trou pour produire une surface lisse. Placard m6tallique : garnir le trou avec le passe-fil (Piece N ° 302797) fourni avec le cordon d'alimentation. Install a mating, three-prong, receptacle @ in the cabinet Go to step 6. grounding-type wall next to the dishwasher opening. Installer dans le placard a c6te de I'ouverture du lavevaisselle une prise de courant _ trois alveoles @ reliee a la terre. Passer _ I'etape 6. 9
-
 1
1 -
2
-
3
-
4
-
 5
5 -
 6
6 -
 7
7 -
 8
8 -
 9
9 -
 10
10 -
 11
11 -
 12
12 -
 13
13 -
 14
14 -
 15
15 -
16
-
17
-
18
-
19
-
20
-
21
-
22
-
23
-
24
-
25
-
26
-
27
-
28
-
29
-
30
-
31
-
32
 |
 |
