Memorex MVD4544 User Guide - Page 13
Connecting The Unit To A Home Theater System - dvd
 |
View all Memorex MVD4544 manuals
Add to My Manuals
Save this manual to your list of manuals |
Page 13 highlights
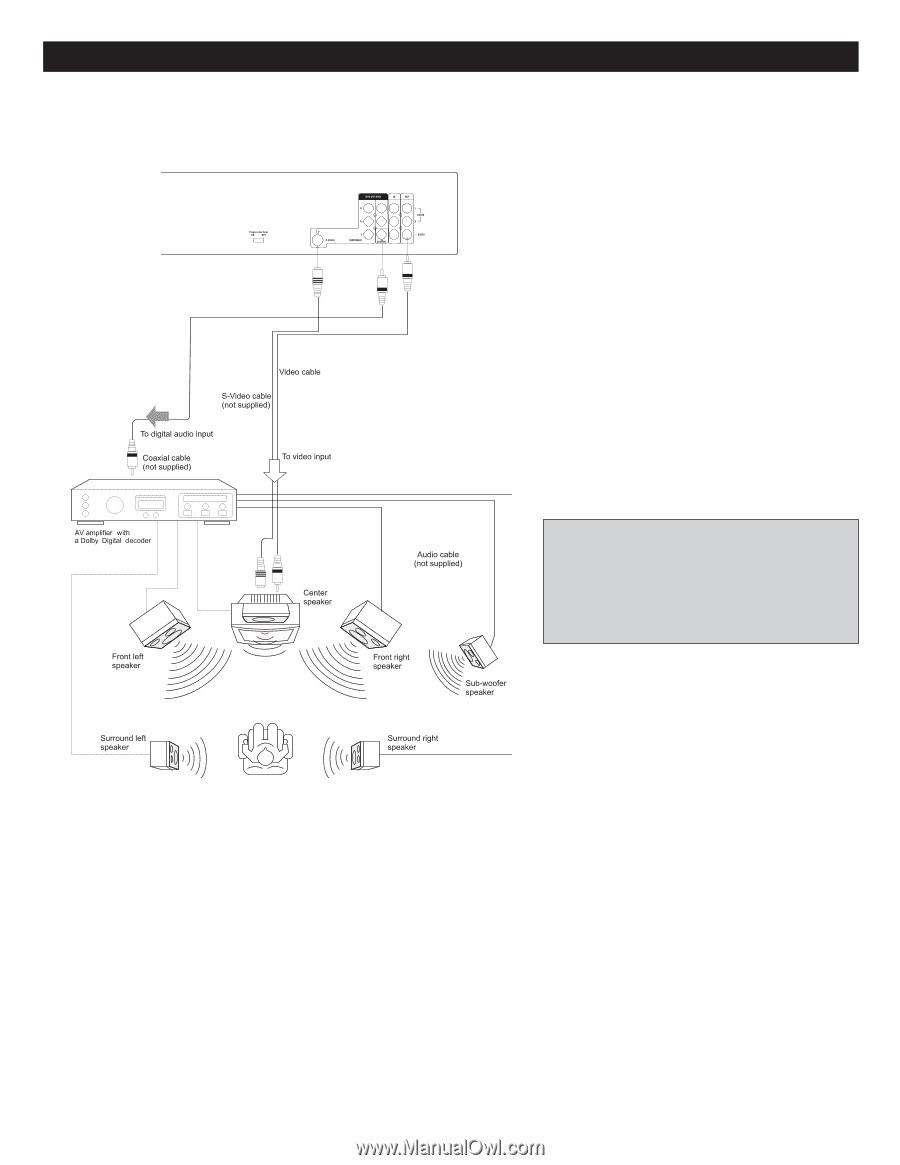
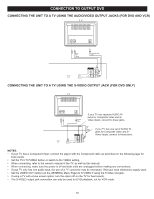
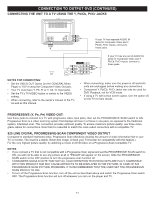
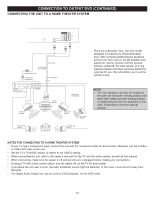
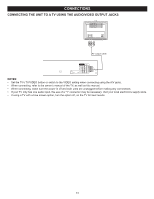
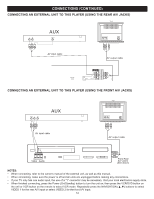
CONNECTION TO OUTPUT DVD (CONTINUED) CONNECTING THE UNIT TO A HOME THEATER SYSTEM Place the subwoofer, front, rear and center speakers in locations as shown/described here. After correctly positioning the speakers, perform the Tone Test on the AV Amplifier and adjust the volume controls until the desired sound is achieved. For best results, sit in the viewing position and have someone adjust the volumes for you; this will enable you to set the optimal levels. NOTE: • The rear speakers can also be located on the side wall facing the viewing position and each other. Make sure the viewing position is located between the two speakers in this case. Experiment to find the optimal position. NOTES FOR CONNECTING TO A HOME THEATER SYSTEM: • If your TV has a Component input, connect the unit with the component cable for best results, otherwise use the S-Video or Video OUT jack on the unit. • Set the TV's TV/VIDEO button or switch to the VIDEO setting. • When connecting the unit, refer to the owner's manuals for the TV and the audio system, as well as this manual. • When connecting, make sure the power is off and all units are unplugged before making any connections. • If using a TV with a blue screen option, turn the option off, on the TV for best results. • If you place the unit near a tuner, the radio broadcast sound might be distorted. In this case, move the unit away from the tuner. • The Digital Audio Output can only be used for DVD playback, not for VCR mode. 12
-
 1
1 -
2
-
3
-
4
-
5
-
6
-
7
-
 8
8 -
 9
9 -
 10
10 -
 11
11 -
 12
12 -
 13
13 -
 14
14 -
 15
15 -
 16
16 -
 17
17 -
 18
18 -
19
-
20
-
21
-
22
-
23
-
24
-
25
-
26
-
27
-
28
-
29
-
30
-
31
-
32
-
33
-
34
-
35
-
36
-
37
-
38
-
39
-
40
-
41
-
42
-
43
-
44
-
45
-
46
-
47
-
48
-
49
-
50
-
51
-
52
-
53
-
54
-
55
-
56
-
57
-
58
-
59
-
60
-
61
-
62
-
63
-
64
-
65
-
66
-
67
-
68
-
69
-
70
-
71
-
72
-
73
-
74
-
75
-
76
-
77
-
78
-
79
-
80
-
81
-
82
-
83
-
84
-
85
-
86
-
87
-
88
-
89
-
90
-
91
-
92
-
93
-
94
-
95
-
96
-
97
-
98
-
99
-
100
-
101
-
102
-
103
-
104
-
105
-
106
 |
 |