Nikon D3200 User Manual - Page 132
Adjust printing options., Start printing.
 |
View all Nikon D3200 manuals
Add to My Manuals
Save this manual to your list of manuals |
Page 132 highlights
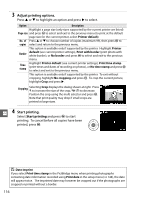
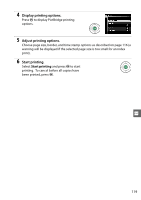
3 Adjust printing options. Press 1 or 3 to highlight an option and press 2 to select. Option Description Highlight a page size (only sizes supported by the current printer are listed) Page size and press J to select and exit to the previous menu (to print at the default page size for the current printer, select Printer default). No. of Press 1 or 3 to choose number of copies (maximum 99), then press J to copies select and return to the previous menu. This option is available only if supported by the printer. Highlight Printer Border default (use current printer settings), Print with border (print photo with white border), or No border and press J to select and exit to the previous menu. Time stamp Highlight Printer default (use current printer settings), Print time stamp (print times and dates of recording on photos), or No time stamp and press J to select and exit to the previous menu. This option is available only if supported by the printer. To exit without cropping, highlight No cropping and press J. To crop the current picture, highlight Crop and press 2. Cropping Selecting Crop displays the dialog shown at right. Press X to increase the size of the crop, W (Q) to decrease. Position the crop using the multi selector and press J. Note that print quality may drop if small crops are printed at large sizes. 4 Q Start printing. Select Start printing and press J to start printing. To cancel before all copies have been printed, press J. D Date Imprint If you select Print time stamp in the PictBridge menu when printing photographs containing date information recorded using Print date in the setup menu (0 144), the date will appear twice. The imprinted date may however be cropped out if the photographs are cropped or printed without a border. 116
-
 1
1 -
2
-
3
-
4
-
5
-
6
-
7
-
8
-
9
-
10
-
11
-
12
-
13
-
14
-
15
-
16
-
17
-
18
-
19
-
20
-
21
-
22
-
23
-
24
-
25
-
26
-
27
-
28
-
29
-
30
-
31
-
32
-
33
-
34
-
35
-
36
-
37
-
38
-
39
-
40
-
41
-
42
-
43
-
44
-
45
-
46
-
47
-
48
-
49
-
50
-
51
-
52
-
53
-
54
-
55
-
56
-
57
-
58
-
59
-
60
-
61
-
62
-
63
-
64
-
65
-
66
-
67
-
68
-
69
-
70
-
71
-
72
-
73
-
74
-
75
-
76
-
77
-
78
-
79
-
80
-
81
-
82
-
83
-
84
-
85
-
86
-
87
-
88
-
89
-
90
-
91
-
92
-
93
-
94
-
95
-
96
-
97
-
98
-
99
-
100
-
101
-
102
-
103
-
104
-
105
-
106
-
107
-
108
-
109
-
110
-
111
-
112
-
113
-
114
-
115
-
116
-
117
-
118
-
119
-
120
-
121
-
122
-
123
-
124
-
125
-
126
-
 127
127 -
 128
128 -
 129
129 -
 130
130 -
 131
131 -
 132
132 -
 133
133 -
 134
134 -
 135
135 -
 136
136 -
 137
137 -
138
-
139
-
140
-
141
-
142
-
143
-
144
-
145
-
146
-
147
-
148
-
149
-
150
-
151
-
152
-
153
-
154
-
155
-
156
-
157
-
158
-
159
-
160
-
161
-
162
-
163
-
164
-
165
-
166
-
167
-
168
-
169
-
170
-
171
-
172
-
173
-
174
-
175
-
176
-
177
-
178
-
179
-
180
-
181
-
182
-
183
-
184
-
185
-
186
-
187
-
188
-
189
-
190
-
191
-
192
-
193
-
194
-
195
-
196
-
197
-
198
-
199
-
200
-
201
-
202
-
203
-
204
-
205
-
206
-
207
-
208
-
209
-
210
-
211
-
212
-
213
-
214
-
215
-
216
-
217
-
218
-
219
-
220
-
221
-
222
-
223
-
224
-
225
-
226
-
227
-
228
 |
 |
