Nikon D3200 User Manual - Page 198
Manual Cleaning, Lock mirror up for cleaning
 |
View all Nikon D3200 manuals
Add to My Manuals
Save this manual to your list of manuals |
Page 198 highlights
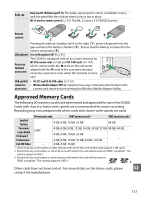
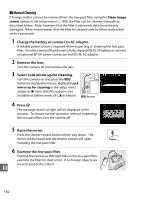
❚❚ Manual Cleaning If foreign matter can not be removed from the low-pass filter using the Clean image sensor option in the setup menu (0 180), the filter can be cleaned manually as described below. Note, however, that the filter is extremely delicate and easily damaged. Nikon recommends that the filter be cleaned only by Nikon-authorized service personnel. 1 Charge the battery or connect an AC adapter. A reliable power source is required when inspecting or cleaning the low-pass filter. Turn the camera off and insert a fully-charged EN-EL14 battery or connect an optional EP-5A power connector and EH-5b AC adapter. 2 Remove the lens. Turn the camera off and remove the lens. 3 Select Lock mirror up for cleaning. Turn the camera on and press the G button to display the menus. Highlight Lock mirror up for cleaning in the setup menu and press 2 (note that this option is not available at battery levels of H or below). G button 4 Press J. The message shown at right will be displayed in the monitor. To restore normal operation without inspecting the low-pass filter, turn the camera off. 5 Raise the mirror. Press the shutter-release button all the way down. The mirror will be raised and the shutter curtain will open, revealing the low-pass filter. 6 Examine the low-pass filter. Holding the camera so that light falls on the low-pass filter, examine the filter for dust or lint. If no foreign objects are present, proceed to Step 8. n 182
-
 1
1 -
2
-
3
-
4
-
5
-
6
-
7
-
8
-
9
-
10
-
11
-
12
-
13
-
14
-
15
-
16
-
17
-
18
-
19
-
20
-
21
-
22
-
23
-
24
-
25
-
26
-
27
-
28
-
29
-
30
-
31
-
32
-
33
-
34
-
35
-
36
-
37
-
38
-
39
-
40
-
41
-
42
-
43
-
44
-
45
-
46
-
47
-
48
-
49
-
50
-
51
-
52
-
53
-
54
-
55
-
56
-
57
-
58
-
59
-
60
-
61
-
62
-
63
-
64
-
65
-
66
-
67
-
68
-
69
-
70
-
71
-
72
-
73
-
74
-
75
-
76
-
77
-
78
-
79
-
80
-
81
-
82
-
83
-
84
-
85
-
86
-
87
-
88
-
89
-
90
-
91
-
92
-
93
-
94
-
95
-
96
-
97
-
98
-
99
-
100
-
101
-
102
-
103
-
104
-
105
-
106
-
107
-
108
-
109
-
110
-
111
-
112
-
113
-
114
-
115
-
116
-
117
-
118
-
119
-
120
-
121
-
122
-
123
-
124
-
125
-
126
-
127
-
128
-
129
-
130
-
131
-
132
-
133
-
134
-
135
-
136
-
137
-
138
-
139
-
140
-
141
-
142
-
143
-
144
-
145
-
146
-
147
-
148
-
149
-
150
-
151
-
152
-
153
-
154
-
155
-
156
-
157
-
158
-
159
-
160
-
161
-
162
-
163
-
164
-
165
-
166
-
167
-
168
-
169
-
170
-
171
-
172
-
173
-
174
-
175
-
176
-
177
-
178
-
179
-
180
-
181
-
182
-
183
-
184
-
185
-
186
-
187
-
188
-
189
-
190
-
191
-
192
-
 193
193 -
 194
194 -
 195
195 -
 196
196 -
 197
197 -
 198
198 -
 199
199 -
 200
200 -
 201
201 -
 202
202 -
 203
203 -
204
-
205
-
206
-
207
-
208
-
209
-
210
-
211
-
212
-
213
-
214
-
215
-
216
-
217
-
218
-
219
-
220
-
221
-
222
-
223
-
224
-
225
-
226
-
227
-
228
 |
 |
