Nikon D3200 User Manual - Page 36
Adjust Viewfinder Focus - lens
 |
View all Nikon D3200 manuals
Add to My Manuals
Save this manual to your list of manuals |
Page 36 highlights
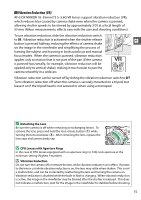
Adjust Viewfinder Focus The camera is equipped with diopter adjustment to accommodate individual differences in vision. Check that the display in the viewfinder is in focus before framing pictures in the viewfinder. 1 Remove the lens cap. 2 X Turn the camera on. 3 Focus the viewfinder. Rotate the diopter adjustment control until the viewfinder display and focus point are in sharp focus. When operating the control with your eye to the viewfinder, be careful not to put your fingers or fingernails in your eye. Focus point A Adjusting Viewfinder Focus If you are unable to focus the viewfinder as described above, select single-servo autofocus (AF-S; 0 35), single-point AF (c; 0 38), and the center focus point (0 40), and then frame a high-contrast subject in the center focus point and press the shutter-release button halfway to focus the camera. With the camera in focus, use the diopter adjustment control to bring the subject into clear focus in the viewfinder. If necessary, viewfinder focus can be further adjusted using optional corrective lenses (0 176). 20
-
 1
1 -
2
-
3
-
4
-
5
-
6
-
7
-
8
-
9
-
10
-
11
-
12
-
13
-
14
-
15
-
16
-
17
-
18
-
19
-
20
-
21
-
22
-
23
-
24
-
25
-
26
-
27
-
28
-
29
-
30
-
 31
31 -
 32
32 -
 33
33 -
 34
34 -
 35
35 -
 36
36 -
 37
37 -
 38
38 -
 39
39 -
 40
40 -
 41
41 -
42
-
43
-
44
-
45
-
46
-
47
-
48
-
49
-
50
-
51
-
52
-
53
-
54
-
55
-
56
-
57
-
58
-
59
-
60
-
61
-
62
-
63
-
64
-
65
-
66
-
67
-
68
-
69
-
70
-
71
-
72
-
73
-
74
-
75
-
76
-
77
-
78
-
79
-
80
-
81
-
82
-
83
-
84
-
85
-
86
-
87
-
88
-
89
-
90
-
91
-
92
-
93
-
94
-
95
-
96
-
97
-
98
-
99
-
100
-
101
-
102
-
103
-
104
-
105
-
106
-
107
-
108
-
109
-
110
-
111
-
112
-
113
-
114
-
115
-
116
-
117
-
118
-
119
-
120
-
121
-
122
-
123
-
124
-
125
-
126
-
127
-
128
-
129
-
130
-
131
-
132
-
133
-
134
-
135
-
136
-
137
-
138
-
139
-
140
-
141
-
142
-
143
-
144
-
145
-
146
-
147
-
148
-
149
-
150
-
151
-
152
-
153
-
154
-
155
-
156
-
157
-
158
-
159
-
160
-
161
-
162
-
163
-
164
-
165
-
166
-
167
-
168
-
169
-
170
-
171
-
172
-
173
-
174
-
175
-
176
-
177
-
178
-
179
-
180
-
181
-
182
-
183
-
184
-
185
-
186
-
187
-
188
-
189
-
190
-
191
-
192
-
193
-
194
-
195
-
196
-
197
-
198
-
199
-
200
-
201
-
202
-
203
-
204
-
205
-
206
-
207
-
208
-
209
-
210
-
211
-
212
-
213
-
214
-
215
-
216
-
217
-
218
-
219
-
220
-
221
-
222
-
223
-
224
-
225
-
226
-
227
-
228
 |
 |
