Nikon D3200 User Manual - Page 172
Select the second image., Adjust gain., Preview the overlay., Image 1, Preview, Overlay
 |
View all Nikon D3200 manuals
Add to My Manuals
Save this manual to your list of manuals |
Page 172 highlights
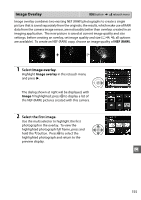
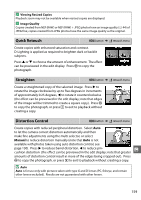
3 Select the second image. The selected image will appear as Image 1. Highlight Image 2 and press J, then select the second photo as described in Step 2. 4 Adjust gain. Highlight Image 1 or Image 2 and optimize exposure for the overlay by pressing 1 or 3 to select gain from values between 0.1 and 2.0. Repeat for the second image. The default value is 1.0; select 0.5 to halve gain or 2.0 to double it. The effects of gain are visible in the Preview column. 5 Preview the overlay. Press 4 or 2 to place the cursor in the Preview column and press 1 or 3 to highlight Overlay. Press J to preview the overlay as shown at right (to save the overlay without displaying a preview, select Save). To return to Step 4 and select new photos or adjust gain, press W (Q). 6 Save the overlay. Press J while the preview is displayed to save the overlay. After an overlay is created, the resulting image will be displayed full-frame in the monitor. D Image Overlay The overlay has the same photo info (including date of recording, metering, shutter speed, aperture, shooting mode, exposure compensation, focal length, and image orientation) and values for white balance and Picture Control as the photograph selected for Image 1. u 156
-
 1
1 -
2
-
3
-
4
-
5
-
6
-
7
-
8
-
9
-
10
-
11
-
12
-
13
-
14
-
15
-
16
-
17
-
18
-
19
-
20
-
21
-
22
-
23
-
24
-
25
-
26
-
27
-
28
-
29
-
30
-
31
-
32
-
33
-
34
-
35
-
36
-
37
-
38
-
39
-
40
-
41
-
42
-
43
-
44
-
45
-
46
-
47
-
48
-
49
-
50
-
51
-
52
-
53
-
54
-
55
-
56
-
57
-
58
-
59
-
60
-
61
-
62
-
63
-
64
-
65
-
66
-
67
-
68
-
69
-
70
-
71
-
72
-
73
-
74
-
75
-
76
-
77
-
78
-
79
-
80
-
81
-
82
-
83
-
84
-
85
-
86
-
87
-
88
-
89
-
90
-
91
-
92
-
93
-
94
-
95
-
96
-
97
-
98
-
99
-
100
-
101
-
102
-
103
-
104
-
105
-
106
-
107
-
108
-
109
-
110
-
111
-
112
-
113
-
114
-
115
-
116
-
117
-
118
-
119
-
120
-
121
-
122
-
123
-
124
-
125
-
126
-
127
-
128
-
129
-
130
-
131
-
132
-
133
-
134
-
135
-
136
-
137
-
138
-
139
-
140
-
141
-
142
-
143
-
144
-
145
-
146
-
147
-
148
-
149
-
150
-
151
-
152
-
153
-
154
-
155
-
156
-
157
-
158
-
159
-
160
-
161
-
162
-
163
-
164
-
165
-
166
-
 167
167 -
 168
168 -
 169
169 -
 170
170 -
 171
171 -
 172
172 -
 173
173 -
 174
174 -
 175
175 -
 176
176 -
 177
177 -
178
-
179
-
180
-
181
-
182
-
183
-
184
-
185
-
186
-
187
-
188
-
189
-
190
-
191
-
192
-
193
-
194
-
195
-
196
-
197
-
198
-
199
-
200
-
201
-
202
-
203
-
204
-
205
-
206
-
207
-
208
-
209
-
210
-
211
-
212
-
213
-
214
-
215
-
216
-
217
-
218
-
219
-
220
-
221
-
222
-
223
-
224
-
225
-
226
-
227
-
228
 |
 |
