Oki B6250n Reference Guide - Page 13
Nternal, Description
 |
View all Oki B6250n manuals
Add to My Manuals
Save this manual to your list of manuals |
Page 13 highlights
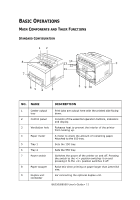
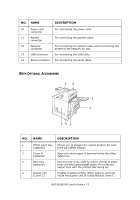
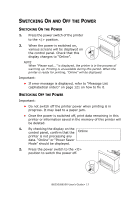
NO. 5 6 7 NAME DESCRIPTION Rear output tray lever When the rear tray has been installed, the paper output location can be switched between it and the center output tray. Raise the lever to output to the rear tray and lower the lever to output to the center output tray. A4 universal tray Can install up to two levels of an Letter/A4 universal tray (550) to this printer. Right detachable Remove this when installing optional accessories cover such as hard disk and additional memory. INTERNAL VIEW 12 3 5 46 NO. NAME 1 Paper stopper 2 Drum/toner cartridge 3 Cover A 4 Fuser unit 5 Transfer roll cartridge 6 Cover B DESCRIPTION Raise this when printing on paper larger than A4 size. Contains the toner and the photosensitive drum. Open this when replacing the drum/toner cartridge and removing jammed paper. Fixes the toner on the paper. Do not touch this when using the printer as it is hot. Transfers the toner image on the surface of the photosensitive drum to the paper. Open this when removing jammed paper. B6250/B6500 User's Guide> 13
-
 1
1 -
2
-
3
-
4
-
5
-
6
-
7
-
 8
8 -
 9
9 -
 10
10 -
 11
11 -
 12
12 -
 13
13 -
 14
14 -
 15
15 -
 16
16 -
 17
17 -
 18
18 -
19
-
20
-
21
-
22
-
23
-
24
-
25
-
26
-
27
-
28
-
29
-
30
-
31
-
32
-
33
-
34
-
35
-
36
-
37
-
38
-
39
-
40
-
41
-
42
-
43
-
44
-
45
-
46
-
47
-
48
-
49
-
50
-
51
-
52
-
53
-
54
-
55
-
56
-
57
-
58
-
59
-
60
-
61
-
62
-
63
-
64
-
65
-
66
-
67
-
68
-
69
-
70
-
71
-
72
-
73
-
74
-
75
-
76
-
77
-
78
-
79
-
80
-
81
-
82
-
83
-
84
-
85
-
86
-
87
-
88
-
89
-
90
-
91
-
92
-
93
-
94
-
95
-
96
-
97
-
98
-
99
-
100
-
101
-
102
-
103
-
104
-
105
-
106
-
107
-
108
-
109
-
110
-
111
-
112
-
113
-
114
-
115
-
116
-
117
-
118
-
119
-
120
-
121
-
122
-
123
-
124
-
125
-
126
-
127
-
128
-
129
-
130
-
131
-
132
-
133
-
134
-
135
-
136
-
137
-
138
-
139
-
140
-
141
-
142
-
143
-
144
-
145
-
146
-
147
-
148
-
149
-
150
-
151
-
152
-
153
-
154
-
155
-
156
-
157
-
158
-
159
-
160
-
161
-
162
-
163
-
164
-
165
-
166
-
167
-
168
-
169
-
170
-
171
-
172
-
173
 |
 |
