Oki ML490 Network User's Guide for OkiLAN 6120i - Page 195
Start, Settings, Printers, Properties, Add Port, OkiLAN Connect IP Monitor, New Port, Locate non-
 |
View all Oki ML490 manuals
Add to My Manuals
Save this manual to your list of manuals |
Page 195 highlights
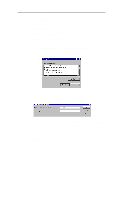
Section 6 - Chapter 1 - OkiLAN 6120i Setup for Windows NT Installation To install OkiLAN Connect for TCP/IP, follow the instructions below: 1. Install the OkiLAN Connect for TCP/IP files - see Section I. 2. When installation is complete, click on Start, Settings and then Printers. 3. Select the Windows printer from which you would like to print with the OkiLAN Connect, then select Properties from the menu. 4. Add an OkiLAN Connect port. This may be done by selecting Add Port under the Ports tab. 5. From the list of Available Printer Ports, select OKI OkiLAN Connect IP Monitor as the type of port to add and click New Port. You will enter into the Add OkiLAN Connect Port screen where there will be a list of all OkiLAN 6120i print servers available on the local subnet. 6. If the port you wish to add is listed in the Ports available on local subnet: window, select the port name and click Add. If the port you wish to use is not listed, click the Locate non-local device button and enter the Static IP Address used for the print server. Click the Add button. VI - 4 OKI OkiLAN 6120i User's Guide
-
 1
1 -
2
-
3
-
4
-
5
-
6
-
7
-
8
-
9
-
10
-
11
-
12
-
13
-
14
-
15
-
16
-
17
-
18
-
19
-
20
-
21
-
22
-
23
-
24
-
25
-
26
-
27
-
28
-
29
-
30
-
31
-
32
-
33
-
34
-
35
-
36
-
37
-
38
-
39
-
40
-
41
-
42
-
43
-
44
-
45
-
46
-
47
-
48
-
49
-
50
-
51
-
52
-
53
-
54
-
55
-
56
-
57
-
58
-
59
-
60
-
61
-
62
-
63
-
64
-
65
-
66
-
67
-
68
-
69
-
70
-
71
-
72
-
73
-
74
-
75
-
76
-
77
-
78
-
79
-
80
-
81
-
82
-
83
-
84
-
85
-
86
-
87
-
88
-
89
-
90
-
91
-
92
-
93
-
94
-
95
-
96
-
97
-
98
-
99
-
100
-
101
-
102
-
103
-
104
-
105
-
106
-
107
-
108
-
109
-
110
-
111
-
112
-
113
-
114
-
115
-
116
-
117
-
118
-
119
-
120
-
121
-
122
-
123
-
124
-
125
-
126
-
127
-
128
-
129
-
130
-
131
-
132
-
133
-
134
-
135
-
136
-
137
-
138
-
139
-
140
-
141
-
142
-
143
-
144
-
145
-
146
-
147
-
148
-
149
-
150
-
151
-
152
-
153
-
154
-
155
-
156
-
157
-
158
-
159
-
160
-
161
-
162
-
163
-
164
-
165
-
166
-
167
-
168
-
169
-
170
-
171
-
172
-
173
-
174
-
175
-
176
-
177
-
178
-
179
-
180
-
181
-
182
-
183
-
184
-
185
-
186
-
187
-
188
-
189
-
 190
190 -
 191
191 -
 192
192 -
 193
193 -
 194
194 -
 195
195 -
 196
196 -
 197
197 -
 198
198 -
 199
199 -
 200
200 -
201
-
202
-
203
-
204
-
205
-
206
-
207
-
208
-
209
-
210
-
211
-
212
-
213
-
214
-
215
-
216
-
217
-
218
-
219
 |
 |
