Oki B720n B710, B720, B730 User Guide (English) - Page 64
Storing a Job in the Printer, Retrieving a Document for Printing, For Timed Jobs, For Stored
 |
View all Oki B720n manuals
Add to My Manuals
Save this manual to your list of manuals |
Page 64 highlights
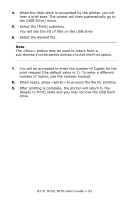
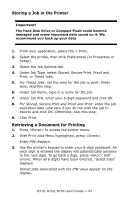
Storing a Job in the Printer Important! The Hard Disk Drive or Compact Flash could become damaged and erase important data saved on it. We recommend you back up your data. 1. From your application, select File > Print. 2. Select the printer, then click Preferences (or Properties or Setup). 3. Select the Job Options tab. 4. Under Job Type, select Stored, Secure Print, Proof and Print, or Timed Jobs. 5. For Timed Jobs: set the time for the job to print. Other wise, skip this step. 6. Under Job Name, type in a name for the job. 7. Under Job PIN, enter your 6-digit password and click OK. 8. For Stored, Secure Print and Proof and Print: enter the job expiration date (use zero if you do not wish the job to expire) and click OK. Otherwise, skip this step. 9. Click Print. Retrieving a Document for Printing 1. Press to access the printer menu. 2. With Print Jobs Menu highlighted, press . Enter PIN displays. 3. Use the printer's keypad to enter your 6-digit password. As each digit is entered the display will automatically advance to the next digit. To go back a digit, press (left arrow). When all 6 digits have been entered, "Select Jobs" displays. Stored jobs associated with the PIN value appear on the display. B710, B720, B730 User's Guide > 64
-
 1
1 -
2
-
3
-
4
-
5
-
6
-
7
-
8
-
9
-
10
-
11
-
12
-
13
-
14
-
15
-
16
-
17
-
18
-
19
-
20
-
21
-
22
-
23
-
24
-
25
-
26
-
27
-
28
-
29
-
30
-
31
-
32
-
33
-
34
-
35
-
36
-
37
-
38
-
39
-
40
-
41
-
42
-
43
-
44
-
45
-
46
-
47
-
48
-
49
-
50
-
51
-
52
-
53
-
54
-
55
-
56
-
57
-
58
-
 59
59 -
 60
60 -
 61
61 -
 62
62 -
 63
63 -
 64
64 -
 65
65 -
 66
66 -
 67
67 -
 68
68 -
 69
69 -
70
-
71
-
72
-
73
-
74
-
75
-
76
-
77
-
78
-
79
-
80
-
81
-
82
-
83
-
84
-
85
-
86
-
87
-
88
-
89
-
90
-
91
-
92
-
93
-
94
-
95
-
96
-
97
-
98
-
99
-
100
-
101
-
102
-
103
-
104
-
105
-
106
-
107
-
108
-
109
-
110
-
111
-
112
-
113
-
114
-
115
-
116
-
117
-
118
-
119
-
120
-
121
-
122
-
123
-
124
-
125
-
126
-
127
-
128
-
129
-
130
-
131
-
132
-
133
-
134
-
135
-
136
-
137
 |
 |