Olympus DM 520 DM-420 Detailed Instructions (English) - Page 89
Select the folder., Select the voice file., Select the folder to upload., Upload the voice file.,
 |
UPC - 807360860868
View all Olympus DM 520 manuals
Add to My Manuals
Save this manual to your list of manuals |
Page 89 highlights
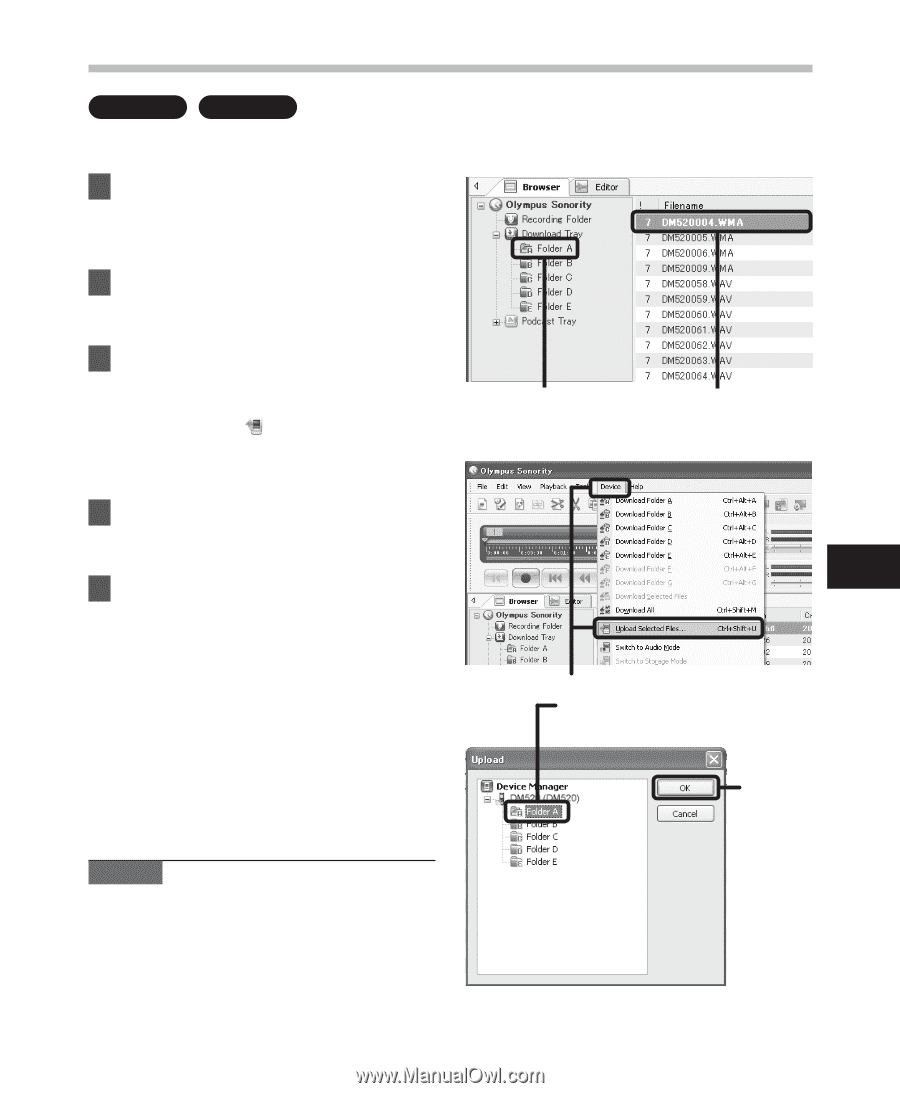
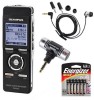
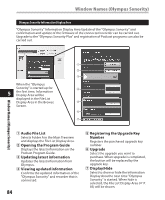
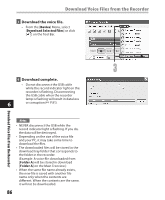
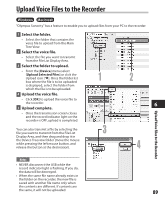
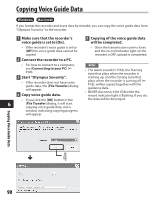
Upload Voice Files to the Recorder Windows Macintosh "Olympus Sonority" has a feature to enable you to upload files from your PC to the recorder. 1 Select the folder. • Select the folder that contains the voice file to upload from the Main Tree View. 2 Select the voice file. • Select the file you want to transmit from the File List Display Area. 3 Select the folder to upload. • From the [Device] menu select [Upload Selected Files] or click the Upload icon [ ]. Once the folder list box where the file is to be uploaded is displayed, select the folder from which the file is to be uploaded. 4 Upload the voice file. • Click [OK] to upload the voice file to the recorder. 5 Upload complete. • Once the transmission screen closes and the record indicator light on the recorder is OFF, upload is completed. You can also transmit a file by selecting the file you want to transmit from the File List Display Area, and then drag and drop it in the Device Treeview folder (move the mouse while pressing the left mouse button, and release the button at the destination). 1 3 2 6 4 Upload Voice Files to the Recorder Notes • NEVER disconnect the USB while the record indicator light is flashing. If you do, the data will be destroyed. • When the same file name already exists in the folder on the recorder, the new file is saved with another file name only when the contents are different. If contents are the same, it will not be uploaded. 89
-
 1
1 -
2
-
3
-
4
-
5
-
6
-
7
-
8
-
9
-
10
-
11
-
12
-
13
-
14
-
15
-
16
-
17
-
18
-
19
-
20
-
21
-
22
-
23
-
24
-
25
-
26
-
27
-
28
-
29
-
30
-
31
-
32
-
33
-
34
-
35
-
36
-
37
-
38
-
39
-
40
-
41
-
42
-
43
-
44
-
45
-
46
-
47
-
48
-
49
-
50
-
51
-
52
-
53
-
54
-
55
-
56
-
57
-
58
-
59
-
60
-
61
-
62
-
63
-
64
-
65
-
66
-
67
-
68
-
69
-
70
-
71
-
72
-
73
-
74
-
75
-
76
-
77
-
78
-
79
-
80
-
81
-
82
-
83
-
 84
84 -
 85
85 -
 86
86 -
 87
87 -
 88
88 -
 89
89 -
 90
90 -
 91
91 -
 92
92 -
 93
93 -
 94
94 -
95
-
96
-
97
-
98
-
99
-
100
-
101
-
102
-
103
-
104
-
105
-
106
-
107
-
108
-
109
-
110
-
111
-
112
-
113
-
114
-
115
-
116
-
117
-
118
-
119
-
120
-
121
-
122
-
123
-
124
-
125
-
126
-
127
-
128
 |
 |